Most viewed 5 articles
Most liked 3 articles
Recent 5 articles
Frequently Asked Questions
- Where can I get an X Signature Key?
You can get the X Signature Key at your Billplz Account Settings.
- Where can I get a Collection ID?
You can get the Collection ID at your Billplz >> Billing.
- Where can I get API Secret Key?
You can get the API Secret Key at your Billplz Account Settings.
- Will it slow down my website?
Syspro Website Multilingual will have little impact on your site speed.
- What types of content can I translate?
Syspro Website Multilingual add-on works out of the box with website, custom post types, complex themes and site builders, so you’ll be able to translate any type of content.
- How do I start to translate my website?
After installing the add-on, select your secondary language and click “Translate Site” to start translating your entire site exactly as it looks in the front-end.
- Can you translate your E-Commerce store?
Yes, Syspro Website Multilingual works out of the box with E-Commerce. You can use it to build a multilingual E-Commerce store.
- Where are my translations stored?
All the translations are stored locally in your server’s database.
- What happens after my licence expires ?
When your licence expires the plugin will still continue to work as configured. However, you will lose access to updates and premium support. This includes new features, bug fixes, and full compatibility with the latest versions of WordPress and WooCommerce.
- Does TranslatePress work on WordPress Multisite?
Yes, TranslatePress works on multisite as well. You can either network activate the plugin, or do it individually for each sub-site.
It works to add languages on individual sub-sites in a network install (and choose the languages in which you translate each sub-site).It will NOT work to have each sub-site as a secondary language.
Note: The license key of the premium product needs to be added in the Main site -> Settings -> TranslatePress, not in the Network Dashboard.
- How can I translate an email that I customize in my Dashboard ?
This can be achieved using the Conditional Shortcode Based on Language.
You wrap the content for every language using the right shortcode and only the correct part will be emailed to the user.
Ex.
This content will be sent only to English users. - How can I make TranslatePress not process a custom URL ?
When the Force Language in Custom Links option is set to Yes, any custom link that you add to your website will get processed by TranslatePress to add the language to it.
If you want TP to ignore an URL, you can append this hash to it: #TRPLINKPROCESSED
Example: Let’s say the URL we want to be ignored is this one:
https://mysite.com/ignored-url
To make this work we add the hash from above so the link we will insert is:
- How do I change the Default Language ?
You might want to make the language you translated your website into the first one.
To do this, go to Settings -> TranslatePress and set the Use subdirectory for default language option to Yes. Then, using drag and drop, drag the language you want to be the default one to the top.
A better way of handling this is to use the Automatic Detection of User Language add-on. This will redirect the user to the correct language based on his IP or browser settings.
Ex.

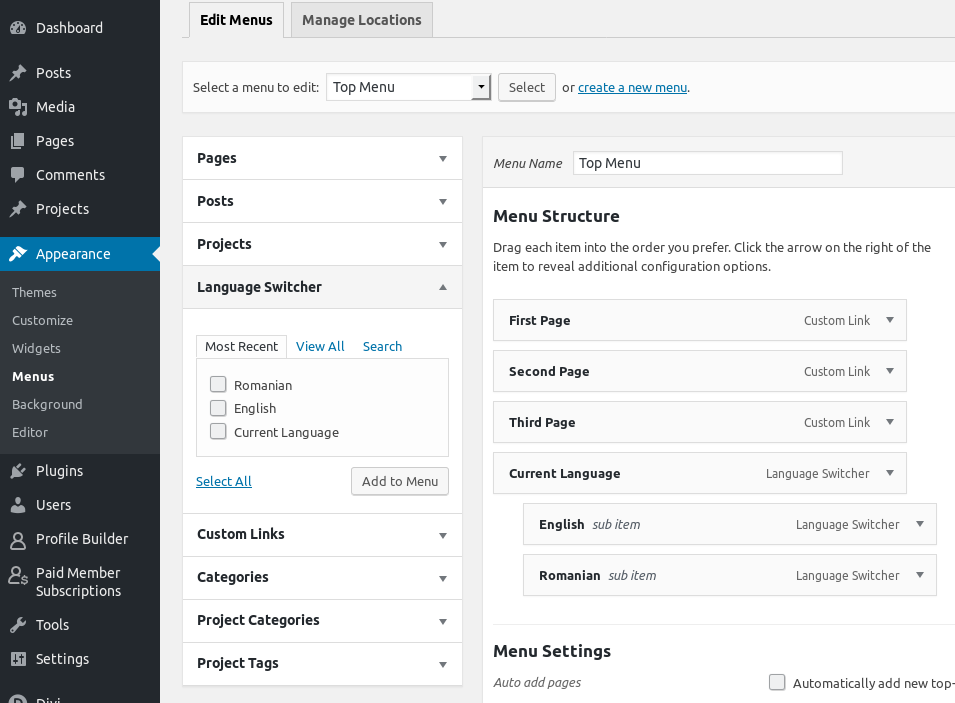
- How do I add a dropdown language selector to my menu ?
When you’re adding or modifying a menu and TranslatePress is active, you’ll find the defined languages under the Language Switcher tab. You can use these elements to create the dropdown menu, exactly as you would create any other dropdown menu on your website.
Ex:
- My Google Translation API key doesn’t work
If you’re having trouble with your Google API key, please make sure that you followed correctly our guide for generating it.
Be extra careful at Step 4 since this is the cause of issues most of the time.
- Is the DeepL API free ?
No, the package that contains API access is listed and can be purchased for 4.99€ + usage fees.
More information about the DeepL API package can be found here: https://www.deepl.com/pro.html#developer.
- Is the Google Translation API free ?
No, the Google Translation API is not free, they charge 20$ per million characters that you translate. You can read more about this here.
However, Google is offering a Free Trial option that gives you access to 300$ over 12 months that can be used towards the Google Translation API. This means that you can use it for free, within this limit, because TranslatePress is storing the translations locally. The data is retrieved from Google only once, then it’s being served from your own database.
To access this trial, you can follow this link: https://console.cloud.google.com/freetrial
- How can I show different versions of a video based on the current language ?
This can be achieved using the Conditional Shortcode Based on Language.
You add both versions of the video to the content and wrap them up with the shortcode using the correct languages.
Ex.
- I cannot select some strings from the page to translate
It’s possible that some strings cannot be clicked through our visual interface.
If this is the case, you should try to look for them inside the Strings List that’s available under the current language at the top of the translation interface.
- I don’t see the Licence tab to add my serial key
The licence tab only appears after installing one of the paid add-ons.
So first go to your TranslatePress Account page, download, install and activate one of the add-ons and the tab will show afterwards. - I want to access the extended profile data?
If you want to access extended user data, please upgrade to the premium plugin and follow the steps mentioned below.
- Login to miniOrange dashboard (https://login.xecurify.com) with your miniOrange account credentials.
- Go to Social analytics->Social Applications Usage Summary, click on Search and then click on View under Additional Information.
- You will find user details fetched by our Plugin for each login attempt there.
Note: Make sure you have enabled the extended attribute check from the plugin. Also, your app needs to have permissions from user to collect extended attributes.
- Why should I register?
We ask our customers to register with miniOrange because we take care of creating applications for you so that you don’t have to worry about creating applications in each social network.
Also, registration helps us to be in contact with our customers. In case you need any help, we can help you with step by step instructions.
By registering for our plugin, you can also upgrade to our Premium plans with ease. Our premium plans come with a lot more features tailored for providing your users with a seamless login experience.
Please Note: You can go through our Privacy Policy for how we use your information. We don’t sell your information to any third-party organization.
- I cannot see some icons in preview or on blog even though I have selected them in the plugin setting.
Please check if you have an Adblock extension installed on your browser where you are checking the plugin. If you do, the Adblock extension will have a setting to block social buttons. Uncheck this option.
If you don’t have Adblock installed and still face this issue, please contact us using the support form on the right or mail us at info@xecurify.com
- Email share is not working. Why?
Email share is the plugin is enabled through mailto. mailto is generally configured through desktop or browser if it is not working, mailto is not setup or improperly configured.
To set it up properly, search for “mailto settings” followed by your operating system’s name where you have your browser installed.
- There is no option of instagram in social sharing. Why?
Instagram has made a conscious effort to not allow sharing from external sources to fight spam and low quantity photos at this point in time, uploading via Instagram’s API from external sources is not possible.
- Why is sharing with some applications not working?
This issue arises if your website is not publicly hosted. facebook, for example, looks for URI to generate its preview for sharing. That does not work on the localhost or any privately hosted URI.
- It is possible to show sharing icons below the post content?
You can put social sharing icons before the content, after the content or both before and after the content. Go to the sharing tab, check the blog post checkbox and select one of three(before, after, both)options available. save settings.
- My user get the following message-“There was an error in registration. please contact your administration “. What should I do?
This message is thrown by WordPress when there is an error in user registration.
1.To see the actual error thrown by wordpress,go to \wordpress\wp-content\plugins\miniorange-login-openid\class-mo-openid-login-widget.php file.
2.Search for the line:
//print_r($user_id);3.Change it to
print_r($user_id);4. Save the file and try logging again. please send us the error you while logging in through the support forum to your right.
- I forgot the password of my miniorange account. How can I reset it ?
There are two cases to according to the page you see –
1. Login to the miniorange screen: you should click on forgot password link. you will get your new password on your email address which you have registered with miniorange. now you can login with the new password.
2. Register with miniorange screen: Enter your email ID and any random password in the password and confirm password input box. This will redirect you to login with miniorange screen. Now follow the first step.
- After entering OTP, I get invalid OTP. What should I do?
Use the Resend OTP option to get an additional OTP. please make sure you did not enter the first OTP you received if you selected Resend OTP option to get an additional OTP. Enter the latest OTP since the previous ones expire once you click on Resend OTP.
If OTP sent on your email address are not working, please verify your account using your mobile number. you will get an OTP on your mobile number which you need to enter on the page. If none of the works. please contact using the support form on the right.
- I did not recieve OTP. What should I do?
The OTP send as an email to your email address with which you have registered with miniorange. If you can’t see the email from miniorange in your emails, please make sure to check your SPAM folder.
If you don’t see an email even in the SPAM folder, please verify your account using your mobile number. you will get an OTP on your mobile number which you need to enter on the page. If none of the works. please contact using the support form on the right.
- I want to change the email address with which I access my account. How can I do that?
You will have to register in miniorange again with your new email id. please deactivate and activate the plugin by going to Plugins -> Installed Plugins and then go to the social login plugin to register again. This will enable you to access miniorange dashboard with a new email address.
For any further queries, please submit a query on the right-hand side in our support section.
- My users get the following message -“Registration has been disabled for this site. Please contact your administrator.” What should I do?
This means you must have unchecked the check-box of auto-register in the Social Login tab. Please check it. This will allow new users to be able to register to your site.
- I am getting an error while logging in with Facebook. This URL Is Blocked. The URL http://social.xecurify.com/moas/openid-connect/client-app/callback has been blocked from Facebook.
You can set up the custom app for Facebook in the social login plugin so that the issue is altogether avoided. We have contacted Facebook regarding the blocked URL issue. We are awaiting their response.
Steps to set up custom app:
1. Go to the Custom app tab in the WordPress social login plugin.
2. Click on the Add Application button.
3. Select the facebook app in the dropdown list and follow the instructions to set up the app.
Instructions to configure Custom Facebook App :
1. Go to Facebook developers console https://developers.facebook.com/apps/. Login with your facebook developer account.
2. Click on Create a New App/Add new App button.
3. Enter Display Name and click on Create App ID.
4. Click on Products from the left pane of the page and select Facebook Login and click on Set Up button.
5. Click on Web. Enter your site URL into Site URL option then click on Save.
6. Goto Settings -> Basic from the left pane of the page, Enter App Domain (eg. example.com), your privacy policy URL in Privacy Policy URL and select Category of your website. Then click on Save Changes.
7. From the left pane, select Facebook Login -> Settings.
8.Under Client OAuth Settings, enter {YouWebsiteURL}/openidcallback/{appname} (eg: login.xecurify/openidcallback/facebook ) in Valid OAuth redirect URIs and click Save Changes button.
9. Change your app status from In Development to Live by clicking on OFF (sliding button) beside Status option of the top right corner. Then, click on the Confirm button.
10. Go to Settings –> Basic. Copy the App ID and App Secret and Paste into the Facebook custom app tab in the plugin.
11. Input email, public_profile as scope.
12. Click on the Save settings button.
Please contact us at info@xecurify.com if you need help with the setup.
- How do I center the social login icons?
1.If you are making changes to a PHP file.
Go to the PHP file which invokes your page/post and insert the following html snippet. Also, increase the margin-left value as per your requirement. Save the file.
<div style="margin-left:100px;"><?php echo do_shortcode('[miniorange_social_login]')?></div>2.If you are making changes to an HTML file.
Go to the HTML file which invokes your page/post and insert the following html snippet. Also, increase the margin-left value as per your requirement. Save the file.
<div style="margin-left:100px;">[miniorange_social_login]')</div> - Why do my users get a message that it is not secure to proceed?
Your website must be starting with http://. Now generally that’s not an issue but our service uses https://( s stands for secure). You get a warning from the browser that the information is being passed insecurely. This happens after you log in to social media application and are coming back to your website. The warning is triggered from the browser since the data passes from https:// to http://, i.e. from a secure site to non-secure site.
We make sure that the information(email, name, username) getting passed from social media application to your website is encrypted with a key which is unique to you. So, even if the there is a warning of sending information without security, that information is encrypted.
To remove this warning, you can add an SSL certificate to your website to change it to https OR use your own custom app
- I am not able to fetch extended attributes. How do I access extended attributes?
Check the option of Extended Attributes in the Social Login tab. Then in the miniOrange dashboard, go to Social analytics-> Social Applications Usage Summary, click on Search and then click on View under Additional Information to see extended attributes of users who login using your app. You can also download it as a csv there.
Note: Your app needs to have permission from users to collect extended attributes. - Can I configure my own apps for Google, Facebook and Twitter?
Yes, it is possible to configure your own app. That is available in the Standard and Premium plans.
Please contact us using the Support form if you want to purchase these plans.
- After logout I am redirected to blank page?
Your theme and Social Login plugin may conflict during logout. To resolve it you need to uncheck Enable Logout Redirection checkbox under Display Option of Social Login tab.
- How can I redirect to my blog page after login?
You can select one of the options from Redirect URL after login of Display Option section under Social Login tab.
1. Same page where user logged in
2. Homepage
3. Account Dsahboard
4. Custom URL – Example: https://www.example.com
- Social login icons are not added to login/registration form.
Your login/registration form may not be wordpress’s default login/registration form. In this case you can add social login icons to custom login/registration form using ‘social login shortcode’ [miniorange_social_login]. Refer to ‘Shortcode’ tab to add customizations to Shortcode.
- How can i put social login icons on a page without using widgets?
You can add social login icons to any page or custom login page using ‘social login shortcode’ [miniorange_social_login]. Refer to ‘Shortcode‘ tab to add customizations to Shortcode.
- How to add login icons to frontend login page?
You can add social login icons to frontend login page using our shortcode [miniorange_social_login]. Refer to ‘Shortcode’ tab to add customizations to Shortcode.
- I want to access the extended profile data?
If you want to access extended user data, please upgrade to the premium plugin and follow the steps mentioned below.
- Login to miniOrange dashboard (https://login.xecurify.com) with your miniOrange account credentials.
- Go to Social analytics->Social Applications Usage Summary, click on Search and then click on View under Additional Information.
- You will find user details fetched by our Plugin for each login attempt there.
Note: Make sure you have enabled the extended attribute check from the plugin. Also, your app needs to have permissions from user to collect extended attributes.
- How do I logout from the plugin and login with a different email address?
Deactivate the plugin from WordPress dashboard and activate again. Now go to the account setup tab of the plugin and login with the new email.
- Facebook sharing is showing the wrong image. How do I change the image?
The image is selected by Facebook and it is a part of Facebook sharing feature. We provide Facebook with webpage URL. It generates the entire preview of webpage using that URL.
To set an image for the page, set it as a meta tag in of your webpage.
< meta property=”og:image” content=”http://example.com/image.jpg” >
You can further debug the issue with Facebook’s tool – https://developers.facebook.com/tools/debug/og/object
- Will pages in your website dashboard be cached?
No, your website dashboard pages are not cached. The cache functionality is only meant to cache frontend pages.
- How do I serve cached pages to people using a phone or tablet?
You can generate a separate cache by selecting ”Generate separate files for mobile devices” in the page cache settings. This cache setting is only necessary if you use a specific theme for mobile devices, or for certain AMP plugins.
- What is the maximum number of pages I can cache?
There is no limit to the number of pages you can cache. The only limit is the space on your server and the maximum number of subdirectories allowed by your server, as caching will write files in subdirectories following the permalink structure.
If you were to reach a caching limit, it probably means that your server is not fit for the size of your website and caching needs.
- Can I make certain parts of the page stay dynamic when cache is enabled?
The cached page is sent to the user before most of your website is loaded. The add-on aren’t loaded yet, making it impossible for them to change the cached content at every request.
- Will caching slow down my server?
No, caching will actually reduce the load on your server, by reducing the amount of PHP and mysql used. You might see a peak in resource usage when using the cache preloader, as this functionality will create the cache files for all your pages in a short amount of time. But once this is done, performance should increase and the load on your server will decrease. Every single major site uses caching to serve cached pages faster by using fewer resources.
- How do I prevent Syspro Website Optimize from caching a certain page?
To prevent a page from being cached, you can add the URL to the field “URLs to exclude from cache” in the cache “Advanced settings” tab. If you are developing a plugin and want to prevent a page from being cached, you can define the “DONOTCACHEPAGE” constant on the pages you need. Any request where “DONOTCACHEPAGE” is defined will not be cached.
- How do I cache only the home page?
Add /.+ to the cache option “URLs to exclude from cache” on the advanced settings tab.
- What frequency should I choose for the cache preloading schedule?
Choosing a frequency for the cache preloading schedule will depend on factors such as the frequency at which the website content is updated, the number of pages in the cache, the resources of the server and more.
For example a site with hundreds of pages will require more resources to preload its cache. So choosing a high frequency will mean that the cache will be recreated often, and the resource usage will be higher.
On a website where updates aren’t as frequent, you can even disable the cache preloading schedule, or set a high cache lifespan and set the cache preloading schedule to follow it.
- What is “cache preloading”?
Usually, a page is cached when a user visits it. So the first user visiting won’t be served a cached version of the page, and will wait longer than the next users. The cache preloading functionality will go through all your pages and posts, and simulate a visit by a user, allowing Syspro Website Optimize to cache the pages before anyone visits them. Your first visitor will thus be served a cached version of the page, increasing its performance.
- Will the comments work even when page caching is enabled?
Yes, when using our website’s commenting system, your users will still be able to post comments. Every time a comment is approved, the cache for that page or post will be cleared, allowing the next visitor to see an up to date list of comments.
- Do I need a special setup to use the caching feature?
No, if your website works properly, Syspro Website Optimize will be able to cache your pages and posts.
- How do I know my webpage is being cached (or why it isn’t)?
If cache is enabled, and in order to see if your page is cached, use the “View Source” function in your web browser to view the page source. However, note that if you are using a further service that minifies HTML (e.g. Cloudflare). Also note that if you do not preload the cache, a page or post will have to be visited once for the cache file to be generated.
- Why should I use a caching add-on on my website?
You think your site is fast without caching? A caching add-on will make your website even faster. A faster cached website will increase SEO, it will improve your visitors experience. Caching will also save your server’s resources.
- What is caching, or page caching?
“Caching”, from Wikipedia: “In computing, a cache is a hardware or software component that stores data so that future requests for that data can be served faster; the data stored in a cache might be the result of an earlier computation or a copy of data stored elsewhere. A cache hit occurs when the requested data can be found in a cache, while a cache miss occurs when it cannot.” — Syspro Website Optimize cache does this by saving the page computed by your website on the disk. When a user visits a page, Syspro Website Optimize will serve the cached page before your website is loaded. If the page wasn’t cached before, it will be computed by your website, and Syspro Website Optimize will then save the result to the cache.
- Which optimization will make the biggest difference?
This depends on your setup (theme, number and quality of add-on used, etc…), but generally, caching will make the biggest visible difference to your website’s performance.
- Can you help me restore my database?
Not unless you have an existing backup. Please ensure that you make a backup of your entire database before using Syspro Website Optimize for the first time, and when you upgrade to a major new version of it.
- Is optimizing my database safe?
Yes; optimizing does not involve any “tricks” or poking around in dangerous ways. It involves running routine clean-up operations using well-defined, common MySQL commands. Nevertheless, we always recommend backups, which cover every possibility; not just database malfunctions, but hackers, human errors, etc.
- What savings can I expect to make?
This is a “how long is string?” sort of question. It depends completely on your site – how big it is, how many users interact on it, how long it has been running, and when you last optimised it. However, the savings and speed-ups can be substantial; it is always worth making sure that your database is optimised.
- Isn’t it better to use a dedicated caching add-on to cache my site?
Our caching tests and feedback from real-world users show that the caching feature alone can make your site faster than any other cache add-on or optimization. See these speed test results.
- Do I need to be logged to the website backend to get the notifications?
Yes, it is essential to be logged in your website backend to receive any notifications. Moreover, every type of notification must be created and configured first since the add-on doesn’t enable any for your shop by default.
- What is the difference between “A product is sold” and “A new order is placed”?
A product is sold is the type of notification showing when a specific product is sold. You can specify one or more products when you create the notification. Whereas, A new order is placed is the notification shown when an order is created.
- It can be set two currencies on the same time?
Into UAP system can be set one main Currency to manage the entire process. It can not be handled two currencies on the same time, payment gateways does not accept a such kind of workflow.
- I can not see the Login/Register forms
You may not see those forms if you are already Logged. As Admin you will see a warning message but regular users will see nothing.
Admin Info: Login Form is not showing up when you’re logged.Just logout or check the page into a new incognito browser window.
- Can not activate the License
If you’re not able to activate the license based on your <<Purchase Code>> check if cURL is enabled and properly set on your server. Also, be sure that your server is able to connect to other servers, such Envato API, and no denied permissions are provided.
- How to promote specific Products
This is what your Affiliates will do by going to their account page and generating a referrer code for your product. They can copy the Product link and generate an affiliate link via Account Page->Affiliate Links section. Then they will share this code on social networks, blogs, forums etc. and bring traffic to your website and product.
You could stimulate your affiliates by creating a good offer for a specific product so that they are more motivated and focused on that product. To learn more about offers read this article.
- Different time shows for Referrals
If different time shows up for referrals it means that the date of the server on which your website is installed on or/and the DataBase server is on a different Time Zone and needs to be changed. We recommend to get in touch with your hosting provider for a such change.
- Coupons does not work
This magic feature DOES NOT create new coupons. It simply assigns EXISTING coupons created in integrated systems (such UMP or WooCommerce) to an affiliate.
For more information read this article.
- Exclude specific products to provide Referrals
To exclude a specific product from providing referrals, follow these steps:
1. Create a new Offer
Go to UAP Dashboard -> Offers and create a new offer and in the offer amount set 0. Establish the date range to determine for how long it will be active, select the products and affiliates for which this offer is valid. If the offer amount is set to 0, this will override the usual amount they would make. For more information on offers read this article.
2. Change Used Referral Amount
Go to UAP Dashboard -> General Options -> General Settings and select LOWEST AMOUNT under the “Which Amount should be used for Referral?“. For more information about this, read this article. It is very important to set this up.
3. Empty Referrals (Optional)
Go to UAP Dashboard -> General Options -> General Settings and scroll down to Empty Referrals and disable it. This means it will not save all the payment information about referrals of 0$. Read this article for more information.
To sum this up, if for example you want to exclude “Product 01” from providing referrals to all of your affiliates, follow these steps: Create a new offer targeting all affiliates, for however long you want, select Product 01 and have it set to 0$. Then go to general options and select lowest amount and disable empty referrals.
- Can be affiliates charged during register step or periodically?
The short answer is no, because Ultimate Affiliate Pro is an affiliate system, in this type of system you pay your users for their hard work, you don’t charge them like on a membership system.
- What Campaigns is for?
The Campaigns is found on the frontend and it is used by your affiliates to better promote their strategy. As an admin you have little to no interaction with this feature, it is there to help your affiliates.
- How to exclude Shipping and Taxes from Referral calculation?
If you wish to exclude shipping and / or taxes from referral calculation simply head over to the UAP Dashboard -> General Options -> General Settings tab. Under Amount Value Settings you will find two buttons for Exclude Shipping and Exclude Tax.
- The registration doesnt work – Please complete all required fields
Be sure that other 3rd party plugins don’t affect the WP Register and Login process.
To see which plugins have been reported for affecting the WP and UMP workflow, read this article.
- How to disable “Bank Transfer” payout option?
To disable the Bank Transfer option, please go to the UAP Dashboard -> General Options -> Public Workflow tab. Here you will find the Disable Bank Transfer option, turn it on to disable it and click save to keep the changes.
- What “Empty Referrals” means?
Empty Referrals are referrals of 0$ for example. You have the option to save them, they will appear in the payments tab if so.
You can activate this option by going to the UAP Dashboard -> General Options -> General Settings tab.
- Automatically Affiliate option
You can activate this option by going to the UAP Dashboard -> General Options -> General Settings tab.
By activating this option all of your new users will automatically become affiliates.
- Which Amount should be used for Referral?
You can activate this option by going to the UAP Dashboard -> General Options -> General Settings tab.
This feature allows you to choose which amount is used if there are multiple ones set for the same action. A good example would be ranks & offers, your rank could give you 20% but the current offer gives you 50%. If you select the Biggest Amount, then the offer will be in effect since 50% > 20%, but if the Lowest Amount is selected, then it will remain at 20% despite the existing offer.
- I need some style Customization
For each showcase (Login form, Register Form, Account Page) there are some predefined templates that come with the installation of the UAP plugin. If you want to change them you can do so by using the Custom CSS box found in each showcase section.
There you can write your desired CSS code that will change the way each showcase will look like on the front-end side.
Some minimum CSS Knowledge will be required. Some tips and tricks can be found here.
The main steps are:
- Identify the CSS class of the html element that you want to customize. More about that can be found here.
- Go to the showcase page from the UMP dashboard and identify the Custom CSS box.
- Type your custom css code for that specific CSS Class using !important; after each one.
- Save and clear your cache system.
- How to identify the showcases structure
If you need to identify the register, login or account page structure for a custom CSS requirement, you can do that by using the available tools of your browser.
Firefox
- We recommend installing the free Firebug developer extension for Firefox. Download the extension and follow the installation instructions. You can find it here.
- Once installed, click on the Firebug icon in your Firefox browser menu, or go to Tools in the top menu bar and select Web Developer -> Firebug and click Open Firebug.
- Visit your showcase pages.
- Right click on the desired element and select Inspect Element with FireBug.
- Click on the HTML tab and check the right-side tab where Style is provided.
Chrome
- Visit your showcase pages.
- Go to the View menu in the top menu bar and scroll down to the Developer option.
- Click on Developer Tools.
- Right click on the desired element and select Inspect.
- Click on the Elements tab and check the right-side tab where Style is provided.
Once you’ve identified the HTML and CSS structure for your element, you can further use it for other customisations and configurations.
- Payout process
Go to UAP Dashboard -> Payments tab to see all of the payments.

To make a payment go to the All UnPaid Referrals sub-tab and select which referrals will be paid. After selecting the referrals click on the Pay selected Referrals button.

Next you will have to choose the payment method, please note that Bank Transfer is an offline alternative payment. Once everything is set, simply click on the Submit button.
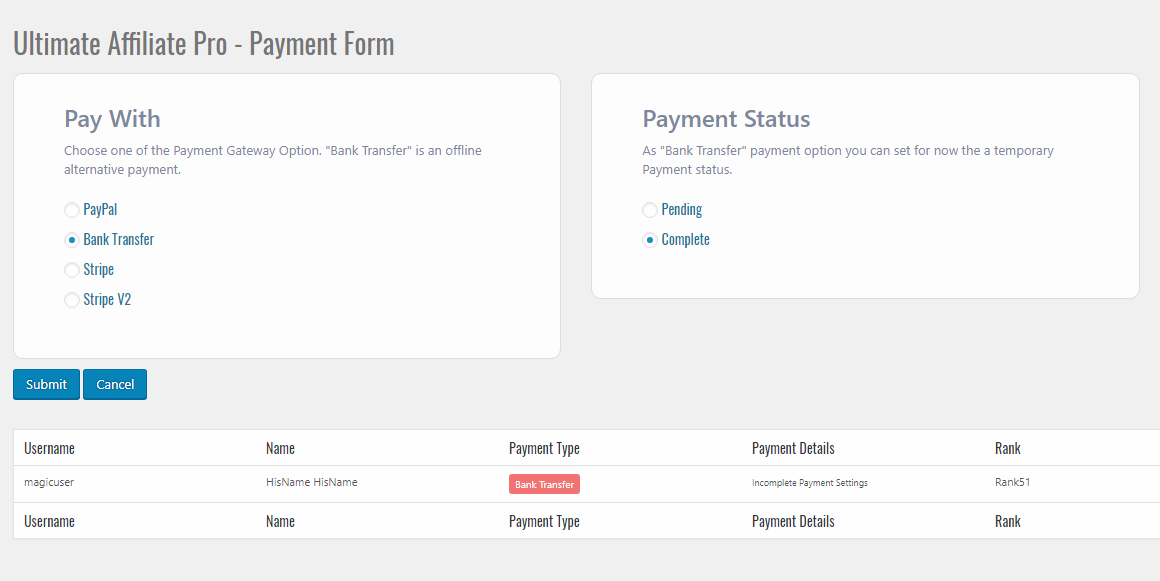 Note: If your Stripe or PayPal settings are not correctly set up your payments can end up in the pending or fail state since they can not be processed.
 - How a logged user can become an Affiliate?
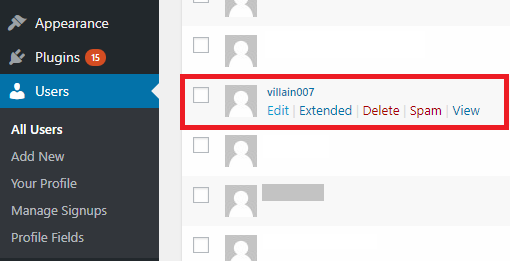
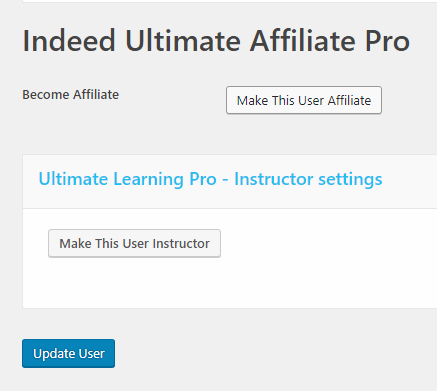
Your users can become an Affiliate in two different ways. If they are logged on your website you can have a page set up with the following shortcode . This will create a button as seen in the picture below. All they have to do is click this button and they will become an affiliate.

You can also go to the Users tab from WordPress, locate a specific user and edit. If you scroll down near the end you will see a button to turn this user into an affiliate, see the picture below for reference.
- Offers
You can create special Offers for certain products, these offers will override the rank amount of your affiliates. This means that through an offer your affiliates can earn more or less than their default amount based on how you set up the offer.
To create an offer, go to UAP Dashboard -> Offers and click on the add new button.

You can activate or deactivate it without needing to delete it. Name your offer and then set an Offer Amount which will replace the standard rank amount. Set up a date range by clicking on the field and then selecting the date.

Targeting
In this section you can choose the Source from which you will search for Products. For example if you choose Ultimate Membership Pro as a source, you can find all the UMP related products by typing in the name inside the product field. You can select more than one product here. Next you can choose to provide this offer for All of your affiliates by typing this inside the username field or selecting specific affiliates. Just like the product field, you can select more than one affiliate.


Once you are done simply click save.
Important
Depending on your offer your users can earn more or less than their usual standard rank amount. In order for this to work please go to UAP Dashboard -> General Options -> General Settings. Here you will see “Which Amount should be used for Referral?”, make sure that you select Biggest Amount if your users would earn more with the offer or Lowest Amount if they would earn less. Make sure to click the save button!

- Landing Commissions
You can create a landing commission which you can attach to any successful page (ex: Thank You Register page). When a user reaches this page, the affiliate will receive a certain commission based on the generated referral.
To create one, go to UAP Dashboard -> Landing Commissions and click on the add new button.

You can activate or deactivate it without needing to delete it. You must also provide a unique slug for your landing commission. Next you will have to enter a landing commission price based on which the referral amount will be calculated depending on the affiliate rank amount.

You can set the referral default status to verified or unverified, a referral description and the cookie expire time. When done click the save button and a new card will appear under the add new button. Copy the shortcode and use it on a successful page.

Example: You need to get users to fill in a short survey, after they submit their answers you can redirect them to a Thank You page and have the shortcode used here. If affiliate John redirects users to this survey, he will receive referral only for the users that finish the survey, because they land on the Thank You page.
- MLM Workflow Example
For a better understanding of how the MLM system works and provides rewards to affiliates, a common scenario is listed below:
MLM Settings
Matrix Depth(Levels) : 3
Amount For Each Level
- Level 1: 20%
- Level 2: 10%
- Level 3: 5%
John MLM Matrix sub-affiliates:
- Geo – Level 1
- Bob – Level 2
- Max – Level 3
Actions:
Max has Rank “Premium” with Amount: %25
Max refers a user that purchases a product of: $400
Rank Reward:
Max gets a referral of: $100
MLM Rewards:
- Bob gets: $20 (20% of $100)
- Geo gets: $10 (10% of $100)
- John gets: $5 (5% of $100)
- It is possible to Import users or other options into the Plugin?
If you want to import data from one website to another, there is no dedicated option available in UAP.
A solution may be to use one of the default import solutions provided by WordPress: WordPress Importer.
If you want to import users from a different affiliate system to UAP, you can do so if those users are WP users. UAP is linked to WP and any user that is added as a WP user will show up in the UAP system.
- Can I set multiple Register forms?
Register Form is a complex and important module from UAP which is strongly linked to other modules such as Notifications, Ranks, Conditional Logic fields, Subscription, WP Roles, etc.
In this case, only one main register form can be set.
- Already set Pages like Login,Register, Lost Password doesn’t work
If the main pages that were assigned as Affiliate Pages are not working as you expected, first check if those were set properly.
You can learn more about setting those pages by reading this article.
Those pages may show up differently or not at all, even if you have set common slugs such as: login/, lost-password/, register/. In this case, WordPress may require an update on permalinks.
To avoid interacting with other scripts, we recommend that you set custom slugs for those pages (my-lost-password, uap-login, register-page, etc).
- The registration doesnt work – Please complete all required fields
Be sure that other 3rd party plugins don’t affect the WP Register and Login process.
To see which plugins have been reported for affecting the WP and UAP workflow, read this article.
- Avatar is working properly but the standard user image/avatar is not replaced
The Avatar feature is custom built in UAP, and it only works inside the system. It is not meant to replace the standard Profile image or Gravatar which are displayed on other pages.
- The OptIn Subscription are not stored
New subscriber emails can be sent to an external email platform for follow-up on newsletter campaigns. If your subscribers are not stored in your list, this may be caused by a few things:
- Double-check your Opt-In credentials for the desired email platform destination (UAP Dashboard -> Magic Features -> Opt-in Settings).
- Check your destination list for restricted conditions, such as required fields (should be off).
- Check your destination list for a double opt-in requirement (should be off).
- Check if the Opt-In Subscription is enabled and properly set in the Register Form settings.
We recommend that you first try to create a fresh new list on the email platform of your choice, but with no additional options attached.
- The Upload file button on Register form is not working
If the upload file button on the Register form or the Avatar buttons don’t work, make sure that the jQuery library has not been altered or customized by 3rd party scripts installed in your WordPress environment (such as plugins or WP Themes).
Try checking the upload file button after deactivating the other plugins, or after changing the current WP Theme.
- Change reCaptcha language
Change reCaptcha language
- Created March 28, 2016
- Author WPIndeed
- Category Frequently Asked
The default language for reCaptcha script is English.
You can change that from Uap_Add_Edit_Affiliate.class.php file on line 674
- Error 500 Internal Server Error is showing up
Internal server errors are not specific to WordPress, they can also happen as a result of anything else running on your server as well.
500 Internal Server is an error from server side.
An internal server error is very generic, therefore it does not tell the developer anything. It does not specify the cause of the error or where the problem is.
Increase the PHP Memory Limit
Sometimes this error can show up if you are exhausting your PHP memory limit. Ask your hosting provider about your server settings and limitations. There may be a very small limit set there and any script that needs to process bigger jobs will be stopped.
Check Server Permissions
On some servers based on firewall conditions, or other restrictions, certain files (from subfolders, or with specific names) are restricted from being accessed via browser. Ask your hosting provider what error was stored in the server logs behind the generic “500 Server Error”.
- I can not activate the Plugin
The plugin is activated based on the purchase code verification, which is done directly on the Envato server.
It is possible that the Envato API is down, if that is the case, try to check again a little bit later.
If it’s still not working, please check on your server/website if the cURL option is enabled in your PHP settings.
Even with cURL enabled, based on security settings your server may refuse to send or receive data from the Envato server.
You can ask your hosting provider about it.
cURL is the only professional way that two servers connect to get data from one place to another.
- Native Fields can not be edited. I want to change the Label
The native WordPress fields (Username, Email, First Name, Last Name, Password, Confirm Password, etc.) can’t be edited or deleted. If you want to change the labels for those fields, you can do so by using the translation file.
The Ultimate Affiliate Pro plugin is translation ready, meaning you can add an additional language file (even English) to your language set on WP.
All the text elements that are not available to be managed from within the UAP Dashboard (native fields labels, buttons, etc), can be handled via the Translation file, the plugin being fully translation ready.
For English – uap-en_EN.mo & uap-en_EN.po
- Some words/texts needs to be changed. How to?
All the texts that can not be changed from the UAP Dashboard (native field labels, buttons, etc) can be modified through the translation file.
You can add an additional language file (even English) to your language set on WP.
For English: uap-en_EN.mo & uap-en_EN.po
- How can I translate the Plugin?
The Ultimate Affiliate Pro plugin is translation ready.
You can add an additional language file for your language set on WP.
Make sure that the plugin folder of the translation target is on your local machine before starting the translation.
Copy and rename the file with the relevant WordPress locale. For example, if you want to translate the file to French, rename the file to fr_FR.po. In the case of a plugin, rename it to uap-fr_FR.po, where uap is the name of the text domain that the plugin loads.
For French: uap-fr_FR.mo & uap-fr_FR.po
You can use the free PoEdit app to create and manage language files based on the default files available from the Ultimate Affiliate Pro plugin.
- Open the po translation file in Poedit, click update to update the translationsource.
- Open the catalog properties from Catalog > Properties and select the language,press ok.
- Now you can go through the source text and enter your translations.
- Click validate then save the translations, the po file will be updated and an mo filewill be generated.
- Upload the new or updated language files to your WordPress installation folder ultimate-affiliate-pro/languages/.
- Set your WordPress language by using a plugin such as WordPress localize, WPML, or manually update the WP_LANG constant in your WordPress config.php file.
There are many guides on how to add a new translation file to any WP Plugin or Theme:
https://make.wordpress.org/polyglots/handbook/
http://wordpress.stackexchange.com/questions/57219/how-to-translate-a-plugin-via-po-mo
If an important update was released and texts were added, you will need to update your language file.
The plugin’s custom name used in the translation file name is: uap
- A New version was released, how to Update the Plugin?
The safest way to update the plugin to a new version is via FTP Upload. Download the latest version, unzip the file and copy the folder to your website wp-content/plugins/ overwriting the current plugin folder.
Important features and fixes are released with each update. If your plugin version is very old, make sure to keep a back-up of your current version before updating to the latest plugin version.
- Parse error: syntax error, unexpected T_STRING
If you encounter any syntax errors while you are trying to install the plugin, it’s most probably that the PHP version installed on your server is a very old one. The current available PHP version is v.7.x, but for a proper workflow a PHP version starting with 5.3 is required.
Example of error:
Parse error: syntax error, unexpected T_STRING in /home/public_html/xxxx/wp-content/plugins/………/ on line
Contact your hosting provider and request a PHP update.
- Known Compatibility Issues
If you have installed our plugin and it’s not behaving as expected, this can be due to a number of reasons including some known compatibility issues with third party plugins.
To help troubleshoot, we recommend taking the following steps:
- Deactivate Jetpack as it may cause some issues.
- Deactivate any third party login plugin where the captcha functionality may cause conflicts.
- Deactivate any other third party plugins, not specifically advertised as compatible¹.
- A2 Optimized WP doesn’t let you login using the front-end form.
If you’re still experiencing any issues after attempting all of the above, please get in touch with us so we can look into it.
Due to the incredibly large offering of WordPress plugins, it’s nearly impossible to guarantee compatibility with all of them. That being said, we haven’t received many reports about compatibility issues.
Customers have also reported the following free plugins that have affected the UMP workflow: Bakery Custom Post Types, Contact Form 7 – Stripe Extension, WP Maintenance.
- Notifications do not work, please help!
The plugin comes with a few example notifications, but due to the vast number of different scenarios it was impossible to include them all by default.
We recommend creating notifications catered to your specific needs by using one of the examples as a template.
If your notifications are not sent, first check if your WordPress environment and your server are able to send emails. Notifications module is based on the standard WP function: wp_mail().
You should first check if your notifications are active and properly set.
In some cases the SMTP mail server refuses to send some emails based on destination or email content. Check if your SMTP mail server has no additional filters or restrictions, such as special links inside or long words.
- My favorite carrier is not in the list, can I add it?
The right way to do that is to open a ticket in our support desk and specify in it: carrier name, carrier URL and a valid tracking code (even if expired). Yet, as a temporary solution, you can add the carrier you prefer manually in the class.carriers.php file that you find in the plugin directory and harking back to one of the existing ones for the right way to add it.
N.B. Any change you make in the code scripts will be overwritten, and therefore deleted, in the next update. For this reason, we suggest you send us the data concerning the carrier you’re interested in, so that we can add them in the plugin and include them in the first following update.
- How can I get support if my WooCommerce plugin is not working?
If you have problems with our plugins or something is not working as it should, first follow this preliminary steps:
- Test the plugin with a WordPress default theme, to be sure that the error is not caused by the theme you are currently using.
- Deactivate all plugins you are using and check if the problem is still occurring.
- Ensure that you plugin version, your theme version and your WordPress and WooCommerce version (if required) are updated and that the problem you are experiencing has not already been solved in a later plugin update.
If none of the previous listed actions helps you solve the problem, then, submit a ticket in the forum and describe your problem accurately, specify WordPress and WooCommerce versions you are using and any other information that might help us solve your problem as quickly as possible.
- I always use the same carrier to ship my WooCommerce orders, may I set it as default carrier?
Yes, sure, you can set the carrier name in the settings of YITH WooCommerce Order Tracking and for each new WooCommerce order you will find the field “carrier name” automatically filled with your default carrier.
- Can I customize the message I want to sent to customers?
You can set your own text for your WooCommerce orders using the specific option available in YITH WooCommerce Order Tracking. You can also use some optional placeholders to specify carrier’s name, tracking code and shipping date.
- How can I try the full-featured plugin?
If you want to see a demonstration version of the premium version of YITH WooCommerce Order Tracking, you can see that in this page. Browse it and try all options available so that you can see how your plugin looks like.
- What is the difference between “A product is sold” and “A new order is placed”?
A product is sold is the type of notification showing when a specific product is sold. You can specify one or more products when you create the notification. Whereas, A new order is placed is the notification shown when an order is created.
- Do I need to be logged to the website backend to get the notifications?
Yes, it is essential to be logged in your website backend to receive any notifications. Moreover, every type of notification must be created and configured first since the add-on doesn’t enable any for your shop by default.
- Drip Content Main Settings
When creating or editing a page in WordPress, you have the option to release content at regular intervals by creating a schedule for your content with Membership Pro – Drip Content. This can be found in the right hand side of the screen of any page, by default you will see this message:

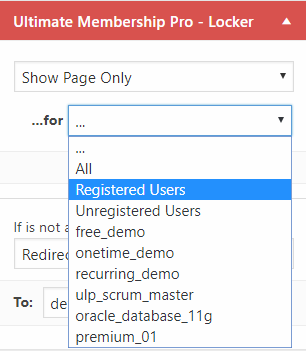
You will first have to set for which users this page is active by using the Ultimate Membership Pro – Locker also found on the right hand side. You can choose to display or block the page for: All, Registered, Unregistered and any of your levels. Multiple types can be selected.
After setting up the Locker, you will now have access to Membership Pro – Drip Content. You will be able to turn it on / off for the users set up in the locker.
You will then have the option to pick the Release Time by using the slider to select one of three options:
- Instantly Subscription – after the user receives subscription access;
- After Subscription – determine after how many days / weeks / months to grant access to users;
- On Specific Date – use this date picker to select on which desired date the page will become available;
Below this you will find Expiration Time which can be set by using the slider exactly like release time:
- Never – once available, the content will not expire;
- After certain Period – determine after how many days / weeks / months access to the page will expire;
- On Specific Date – use this date picker to select on which desired date access to the page will expire;
- I want to add HTML content inside Email templates
In order to add HTML content inside Email templates, please go to UMP Dashboard -> Notifications and create a new notification or edit an existing one.
In the WP text editor switch from visual to text as shown in the screenshot below and add your html content here.
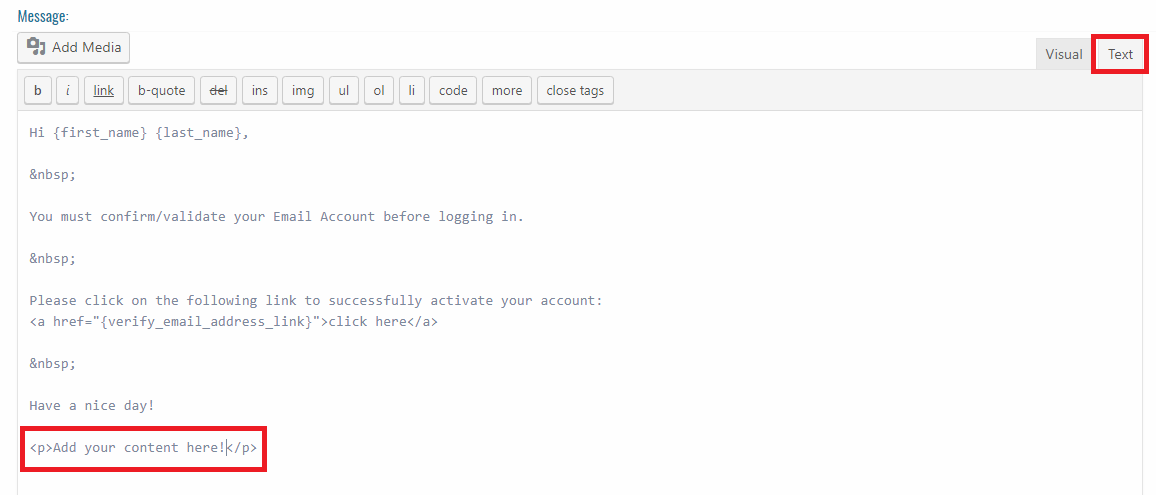 Note: Some html elements may be parsed by the WordPress Text Editor.
 - How to set a Trial for my Level
To create a Trial for a level you will need to go to UMP Dashboard -> Levels. Next we will create a new level, in our example we will have the slug: premium_01 and label: Premium.
Level Access
In this section set the Access Type to Regular Period and set up your own duration.
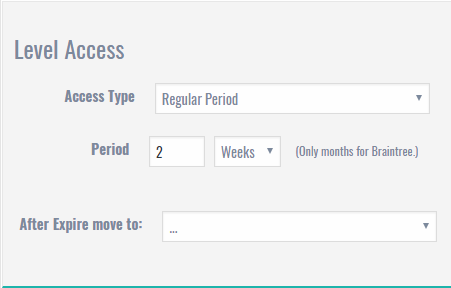
Billing Options
Next we will take a look at the billing options and what to set.
Payment Type: Payment
Level Price: you choose how much it costs
Billing Recurrences: On Going
Trial Period Price: you can set it to 0 to make the trial free, otherwise set up your custom amount.
Trial Period Type: here you will have two options Certain Period and Couple cycles subscription payments. With certain period you can choose how long this trial will last, you can pick from days, weeks, months, years. With the second option you can choose how many bill cycles have the trial period price after which the following ones use the level price.
Example:
For a Period of 2 weeks with the Level Price of 25$, Trial Period Price of 10$, Trial Period Type set to Couple cycles subscription payments and Trial Couple Cycles set to 1, the following will happen:
Your users will pay 10$ for the first 2 weeks, after which they will be charged with 25$ every two weeks.
- I can not see the Login/Register forms
You may not see those forms if you are already Logged. As Admin you will see a warning message but regular users will see nothing.
Admin Info: Login Form is not showing up when you’re logged.Just logout or check the page into a new incognito browser window.
- Why does Stripe transaction show as pending after being approved?
Means the payment have been proceeded via Stripe but there was NO Payment confirmation sent to the system. If your payment was completed on Stripe platform but not confirmed into UMP system, check your settings that have been required and especially be sure that you’ve set the WebHook properly, being the way system and Stripe communicates. . Most probably you didn’t set the WebHook into your Stripe Account like is required. Keep in mind you have set stripe on Test mode to setup Wehhook on this way too.
- Why I’m redirected to Subscription Plan when access the Register Page?
Ultimate Membership Pro system redirects visitors to Subscription Plan when the Register page is accessed because into the Register Form settings have been specified to work with “Subscription Plan”. So, user is redirected first to pick a plan before the the register step, being a required condition to have assigned a level first.
If you do not want a such approach just change the “Choose Subscription Type” option from Register Form settings.
- Is it UMP a Multilingual environment?
UMP system does not provide a bilingual environment but it can be translated into any language.
For a such approach, you may need a proper multilingual script that will be able to manage translations of input/textarea fields. - It can be set two currencies on the same time?
Into UMP system can be set one main Currency to manage the entire process. It can not be handled two currencies on the same time, payment gateways does not accept a such kind of workflow.
- Different time shows for Orders and Levels
If different time shows up for orders or levels it means that the date of the server on which your website is installed on or/and the DataBase server is on a different Time Zone and needs to be changed. We recommend to get in touch with your hosting provider for a such change.
- Coupon Codes not working with Stripe Payment
For recurring subscriptions if the coupon was set to apply the discount just once, it means that it will provide a different price only for the first payment.
Stripe and Braintree only accept either 0% or 100% of the price for the initial payment.
This means that the discount can not be provided for this kind of coupon if it will be paid via Stripe or Braintree.
This is a condition and limitation from Stripe and Braintree, not from the UMP system.
- Can not activate the License
If you’re not able to activate the license based on your <<Purchase Code>> check if cURL is enabled and properly set on your server. Also, be sure that your server is able to connect to other servers, such Envato API, and no denied permissions are provided.
- Login Error: Invalid Email Address or Password entered
If this type of error shows up even if the credentials are correct, or if the login form doesn’t perform the login process, check to see if other scripts affect the login process to WordPress.
Some themes provide by default a login option and if it’s active on the same page as the UMP Login Form, it may affect the login process.
Try to deactivate all other scripts and change to a different WP Theme to see if it works.
- I need some style Customization
For each showcase (Login form, Register Form, Subscription Plan, Account Page) there are some predefined templates that come with the installation of the UMP plugin. If you want to change them you can do so by using the Custom CSS box found in each showcase section.

There you can write your desired CSS code that will change the way each showcase will look like on the front-end side.
Some minimum CSS Knowledge will be required. Some tips and tricks can be found here.
The main steps are:
- Identify the CSS class of the html element that you want to customize. More about that can be found here.
- Go to the showcase page from the UMP dashboard and identify the Custom CSS box.
- Type your custom css code for that specific CSS Class using !important; after each one.
- Save and clear your cache system.
- Custom Special Fields
Custom Special Fields – are used by the system to accomplish certain special features and are provided by default. They can not be deleted or added by the website admin.
- ihc_avatar – provides a special avatar option in the forms where users can upload their avatar image.
- ihc_coupon – is a special input field that provides the option for users to insert a coupon code for discounts. If there are no coupons set in the system, this field will not show up.
- ihc_social_media – provides the perfect way to link users’ WP accounts to their social accounts for an easier login approach. If there is no social login option activated this field will not show up.
- payment_select – provides a way for your users to select which payment gateway to use for their payments. More than one payment gateway needs to be active for this field to show up.
- ihc_invitation_code_field – is a special input field that requires an invitiation code in order to allow the user to register in the system. If the Invitation Code module is disabled or there are no invitation codes, then this field will not show up.
- ihc_dynamic_price – allows your users to choose the price they will pay for all subscription levels and/or specific levels. You can set up the minimum and maximum price. If the Level Dynamic Price module is disabled, this field will not show up. If the module is disabled for a certain level, then users that have selected that level will not see this field. For the time being, ihc_dynamic_price is only available during the Register step.
- What is the Public Individual Page?
In the Ultimate Membership Pro system you have an additional module called: Members List which will provide a way to display members’ profiles on public.
Depending on your settings, you can activate the Public Individual Page option which lets you display an individual page for each profile. It is accessed by clicking on a member’s item from the members list showcase. To do this, you need to set a specific Visitor Inside User Page using the

 shortcode.
Visitor Inside User Page is not mandatory if the Public Individual Page functionality from Members List is not required.
- Is it possible to Import users or other options in the Plugin?
If you want to import data from one website to another, there is a dedicated module available in UMP.
This can be found by going to Extensions -> Import Users&Levels.
An additional solution may be to use one of the default import solutions provided by WordPress: WordPress Importer.
If you want to import users from a different membership system to UMP, you can do so if those users are WP users. UMP is linked to WP and any user that is added as a WP user will show up in the UMP system.
- Can I set multiple Register forms?
Register Form is a complex and important module from UMP which is strongly linked to other modules such as Payment, Double Email Verification, Notifications, Levels, Conditional Logic Fields, Subscription, WP Roles, etc.
Although only one register form may be used, each field can be set to show up only for specific levels. Based on what level is selected from the subscription plan, the visitor may see a “different” register form, with unique fields.
- Already set Pages like Login,Register, Lost Password doesn’t work
If the main pages that were assigned as Membership Pages are not working as you expected, first check if those were set properly.
You can learn more about setting those pages by reading this article.
Those pages may show up differently or not at all, even if you have set common slugs such as: login/, lost-password/, register/. In this case, WordPress may require an update on permalinks.
To avoid interacting with other scripts, we recommend that you set custom slugs for those pages (my-lost-password, ump-login, register-page, etc).
- Charging tax on any membership
The Ultimate Membership Pro system doesn’t manage taxes and invoices. These are handled by the the payment services that are integrated in the membership system as Payment Gateways.
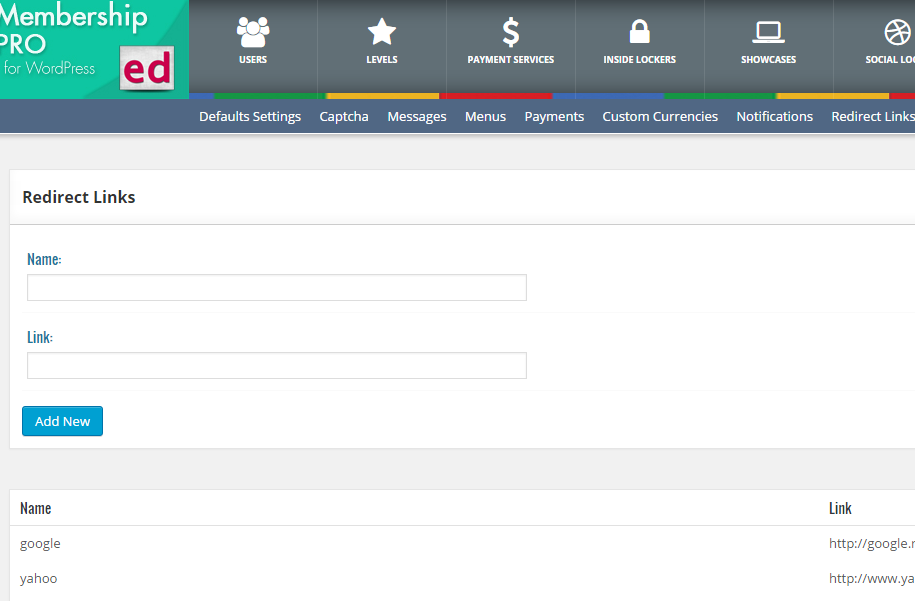
- RedirectLinks: Can I use External Links for redirect?
Yes you can, and we made sure that it’s very easy. Simply head over to the UMP Dashboard -> Extensions -> Redirect Links module and add your desired redirects.
There you simply add an identification name for your external link and the link itself. Once they are stored, you will find that custom redirect in any drop-down menu where a redirect is requested.
- The registration doesnt work – Please complete all required fields
Be sure that other 3rd party plugins don’t affect the WP Register and Login process.
- New Account email/Welcome email Notification is not sent
There are two different welcome notifications from the register process that are sent to users:
- New Account – when the user is able to login.
- New Account Review Request – when the user is set by default to pending.
Based on your settings, especially in the Register Form section, make sure that you have the proper notification active.
- New users are not set on Pending even if the WP default role is set properly
This may happen because of setting up a specific WP role to be assigned to certain levels. Specific WP Roles set on levels will override the default WP role set in the register form.
- The Stripe Payment is invoked, even if the registration form is not completed
This kind of behaviour may occur only when it comes to required fields and stripe payment gateway.
Stripe – works based on JS calls, providing a popup box where customers need to fill their payment details (Card Number, Expiration Date, etc).Because it is a JS action, it cannot be processed until after the registration form is submitted. Even if the Stripe box shows up before the registration form is completed, the customer will be charged only when the register process will have concluded and the new user stored.
Stripe details are not requested twice, therefore there should be no worry about the charging procedure.
- Avatar is working properly but the standard user image/avatar is not replaced
The Avatar feature is custom built in UMP, and it only works inside the system. It is not meant to replace the standard Profile image or Gravatar which are displayed on other pages.
- Users are not receiving Double Email Verification
There can be several reasons as to why this is happening:
- Check if double email verification is properly set. You may want to check out the following article.
- Verify that your WordPress environment and your server are able to send regular emails.
- Check the spam folder.
- The OptIn Subscription are not stored
New subscriber emails can be sent to an external email platform for follow-up on newsletter campaigns. If your subscribers are not stored in your list, this may be caused by a few things:
- Double-check your Opt-In credentials for the desired email platform destination (Extensions -> Opt-in Settings).
- Check your destination list for restricted conditions, such as required fields (should be off).
- Check your destination list for a double opt-in requirement (should be off).
- Check if the Opt-In Subscription is enabled and properly set in the Register Form settings.
We recommend that you first try to create a fresh new list on the email platform of your choice, but with no additional options attached. - How to set a Multi Payments option?
If you want to provide your customers a multi payment option, you need to go through the following steps:
- Activate multiple payment gateways from the Payment Services tab by completing the payment settings and turning the activation button on.
- Activate the custom field payment_select from the Showcases->Register Form->Custom Fields page by checking where you want this field to appear (“On Register Page” and/or “On Account Page”).
Tip: By editing the special payment_select field you can choose the template showcase and also set additional options: labels, sub-label, etc.You might also want to look over the additional options found in the General Options->Payments page.
- The Upload file button on Register form is not working
If the upload file button on the Register form or the Avatar buttons don’t work, make sure that the jQuery library has not been altered or customized by 3rd party scripts installed in your WordPress environment (such as plugins or WP Themes).
Try checking the upload file button after deactivating the other plugins, or after changing the current WP Theme.
- Inside Locker is showing up but the content is not restricted
If the Inside Locker box is showing up, that means that you’ve already properly set up the Inside Locker Template and the restrict conditions, but the restricted content is not properly set.
If you want to restrict specific content (text, button, images, videos) on a certain page, you need to place that content between the Inside Locker shortcode tabs.


You can set the content inside manually, or when you wanna add an Inside Locker over a specific Content, just select that content inside the Page content with dragging the mouse and after that Add the Inside Content using the red-button: MP Locker. The shortcode will be set automatically on a proper way.
When you want to add an Inside Locker over specific content, just select the content with your mouse and after that use the MP Locker red button. The shortcodes will be placed automatically and in the correct position.
- Change reCaptcha language
The default language for the reCaptcha script is English.
You can change that in the UserAddEdit.class.php file on line 975, utilities.php file on line 904 or you can search for recaptcha/api.js?hl= in both files.
- Error 500 Internal Server Error is showing up
Internal server errors are not specific to WordPress, they can also happen as a result of anything else running on your server as well.
500 Internal Server is an error from server side.An internal server error is very generic, therefore it does not tell the developer anything. It does not specify the cause of the error or where the problem is.
Increase the PHP Memory Limit
Sometimes this error can show up if you are exhausting your PHP memory limit. Ask your hosting provider about your server settings and limitations. There may be a very small limit set there and any script that needs to process bigger jobs will be stopped.
Check Server Permissions
On some servers based on firewall conditions, or other restrictions, certain files (from subfolders, or with specific names) are restricted from being accessed via browser. Ask your hosting provider what error was stored in the server logs behind the generic “500 Server Error”.
- Can I add another Payment Gateway or use an external script?
Ultimate Membership Pro has multiple payment gateways included which automatically manage recurring payments and are able to confirm any completed payment on external payment platforms.
Each payment gateway is linked to multiple modules such as: Register, Subscriptions, Coupons, Transactions, Levels, etc.
Adding a new payment option is a very complex job, therefore not on option for the customer. External scripts can not replace the available payment gateways from UMP.
- I can not activate the Plugin
The plugin is activated based on the purchase code verification, which is done directly on the Envato server.
It is possible that the Envato API is down, if that is the case, try to check again a little bit later.
If it’s still not working, please check on your server/website if the cURL option is enabled in your PHP settings.
Even with cURL enabled, based on security settings your server may refuse to send or receive data from the Envato server.
You can ask your hosting provider about it.cURL is the only professional way that two servers connect to get data from one place to another.
- Native Fields can not be edited. I want to change the Label
The native WordPress fields (Username, Email, First Name, Last Name, Password, Confirm Password, etc.) can’t be edited or deleted. If you want to change the labels for those fields, you can do so by using the translation file.
The Ultimate Membership Pro plugin is translation ready, meaning you can add an additional language file (even English) to your language set on WP.
All the text elements that are not available to be managed from within the UMP Dashboard (native fields labels, buttons, etc), can be handled via the Translation file, the plugin being fully translation ready.
For English – ihc-en_EN.mo & ihc-en_EN.po
To learn more, please head over to this link.
- Some words/texts needs to be changed. How to?
All the texts that can not be changed from the UMP Dashboard (native field labels, buttons, etc) can be modified through the translation file.
You can add an additional language file (even English) to your language set on WP.
For English: ihc-en_EN.mo & ihc-en_EN.po
A full guide on how to add a new language file can be found here.
- How can I translate the Plugin?
The Ultimate Membership Pro plugin is coming by default with English interface but fully translation ready. You may translate the entire Front-end and Back-end section based on your needs.
Part of existent strings and custom messages are directly manageable from UMP Dashboard interface and not via language files. So look into UMP Dashboard first for all available options.You can add an additional language file for your language set on WP.
Make sure that the plugin folder of the translation target is on your local machine before starting the translation.
Copy and rename the file with the relevant WordPress locale. For example, if you want to translate the file to French, rename the file to fr_FR.po. In the case of a plugin, rename it to ihc-fr_FR.po, where ihc is the name of the text domain that the plugin loads.
For French: ihc-fr_FR.mo & ihc-fr_FR.po
1. Using PoEdit standalone app
You can use the free PoEdit app to create and manage language files based on the default files available from the Ultimate Membership Pro plugin.
- Open the po translation file in Poedit, click update to update the translation
source. - Open the catalog properties from Catalog > Properties and select the language,
press ok. - Now you can go through the source text and enter your translations.
- Click validate then save the translations, the po file will be updated and an mo file
will be generated. - Upload the new or updated language files to your WordPress installation folder indeed-membership-pro/languages/.
- Set your WordPress language by using a plugin such as WordPress localize, WPML, or manually update the WP_LANG constant in your WordPress config.php file.
2. Using LocoTranslate plugin
https://wordpress.org/plugins/loco-translate/
You can easily manage translations over Ultimate Membership Pro directly from WordPress Dashboard.
- Install Loco Translate free plugin
- Change default Loco Translate Settings by increasing “Skip PHP files larger than“.
- Open Loco Translate -> Plugins section and search for Ultimate Membership Pro
- Edit ihc.pot Template file and proceed a “Sync” action in order to be sure that all available strings are included. You must “Save” changes before leave current file setup.
- Create or open your language file and use “Sync” button to have all available strings inside.
- Translate all available strings
There are many guides on how to add a new translation file to any WP Plugin or Theme:
https://make.wordpress.org/polyglots/handbook/
http://themekraft.com/add-your-own-language-files-to-wordpress-plugins-with-poedit/
http://wordpress.stackexchange.com/questions/57219/how-to-translate-a-plugin-via-po-mo
If an important update was released and texts were added, you will need to update your language file.
The plugin’s custom name used in the translation file name is: ihc - Open the po translation file in Poedit, click update to update the translation
- A New version was released, how to Update the Plugin?
If you have received an update notification and you want to update the plugin to the latest version, first you need to download the newest uploaded file. You must log in your CodeCanyon account and head over to:
http://codecanyon.net/downloads
The safest way to update the plugin to a new version is via FTP Upload. Download the latest version, unzip the file and copy the folder to your website wp-content/plugins/ overwriting the current plugin folder.
Important features and fixes are released with each update. If your plugin version is very old, make sure to keep a back-up of your current version before updating to the latest plugin version. - Parse error: syntax error, unexpected T_STRING
If you encounter any syntax errors while you are trying to install the plugin, it’s most probably that the PHP version installed on your server is a very old one. The current available PHP version is v.7.x, but for a proper workflow a PHP version starting with 5.3 is required.
Example of error:
Parse error: syntax error, unexpected T_STRING in /home/public_html/xxxx/wp-content/plugins/indeed-membership-pro/utilities.php on lineContact your hosting provider and request a PHP update.
- Set PayPal on Sandbox but I’m not receiving payment confirmation
SandBox from PayPal is a testing environment for managing payments without being charged. For a proper workflow, you will need a Merchant sandbox Account and a Buyer Sandbox Account.
If you haven’t received payment confirmation and the level hasn’t activated yet, don’t worry. Sandbox does not work as fast as the live system, and some delays may occur from time to time.It’s recommended that you run a few tests using the live PayPal environment, but with insignificant prices (ex: $0.01) for a foolproof simulation. If you’re still experiencing issues, please drop us a quick line and we’ll see how we can help.
- User cancelled payment, still has access to content?
If a user has registered but cancelled the process right before setting up payment, the user does not have access to paid content. They are however registered as a subscriber.
In fact, here’s a breakdown of exactly everything that happens behind the scenes:
Signup Phase:
- Upon signup, the user completes his registration and is forwarded to the payment section
- At this stage, the user is assigned their access level
- Activation occurs automatically once payment is confirmed during the Confirmation Phase
Confirmation Phase:
- If you check the Subscription tab, you can verify the payment status of specific levels
- If the user hasn’t completed the payment, you’ll notice that their status is set to [Hold]
- At this stage, the user’s WP-Role is set to [Pending] and manual admin activation is required
- If the payment was not completed, the user’s role is changed to [Subscriber]
- If a user is demoted to [Subscriber] they can only continue payment with assistance from the admin
In short, as stated above, there’s no real need to worry! Unless the user has completed payment, they are unable to access any paid content for their respective signup level.
- Known Compatibility Issues
If you have installed our plugin and it’s not behaving as expected, this can be due to a number of reasons including some known compatibility issues with third party plugins.
To help troubleshoot, we recommend taking the following steps:
- Deactivate Jetpack as it may cause some issues.
- Deactivate any third party login plugin where the captcha functionality may cause conflicts.
- Deactivate any other third party plugins, not specifically advertised as compatible¹.
- A2 Optimized WP doesn’t let you login using the front-end form.
- Zoho Campaign Plugin affects the register form style and VC elements.
If you’re still experiencing any issues after attempting all of the above, please get in touch with us so we can look into it.
Due to the incredibly large offering of WordPress plugins, it’s nearly impossible to guarantee compatibility with all of them. That being said, we haven’t received many reports about compatibility issues.Customers have also reported the following free plugins that have affected the UMP workflow: Bakery Custom Post Types, Contact Form 7 – Stripe Extension, WP Maintenance.
- Notifications do not work, please help!
The plugin comes with a few example notifications, but due to the vast number of different scenarios it was impossible to include them all by default.
We recommend creating notifications catered to your specific needs by using one of the examples as a template.
If your notifications are not sent, first check if your WordPress environment and your server are able to send emails. Notifications module is based on the standard WP function: wp_mail().You should first check if your notifications are active and properly set. For more information, please follow the next topic: How to send Notifications?
In some cases the SMTP mail server refuses to send some emails based on destination or email content. Check if your SMTP mail server has no additional filters or restrictions, such as special links inside or long words.
- Set everything up correctly, but everything is visible to all users?
No need to panic!
If you have set up a paid membership tier or a content locker and want to check out what it looks like, you need to keep in mind that you’re logged in as an admin user, with the highest privileges. This means that you should be able to see everything, at all times, and the plugin is working as intended.
In order to see the plugin functionality in action, you need to do one of two things:
- Log out of your Admin Account and browse to the respective page
- Open an Incognito Window (Chrome) or Private tab (Firefox) and browse to the respective page
Alternatively, you can create a test user, with a lower access level than the one you’re trying to test, and sign in as that user. You will notice the functionality magically works as expected!
This approach is particularly useful if you have a really complex tier-system and want to make sure that everything is set up properly, without a shadow of a doubt.
- Will it slow down my website?
Syspro Website Multilingual will have little impact on your site speed.
- What types of content can I translate?
Syspro Website Multilingual add-on works out of the box with website, custom post types, complex themes and site builders, so you’ll be able to translate any type of content.
- How do I start to translate my website?
After installing the add-on, select your secondary language and click “Translate Site” to start translating your entire site exactly as it looks in the front-end.
- Can you translate your E-Commerce store?
Yes, Syspro Website Multilingual works out of the box with E-Commerce. You can use it to build a multilingual E-Commerce store.
- Where are my translations stored?
All the translations are stored locally in your server’s database.
- What happens after my licence expires ?
When your licence expires the plugin will still continue to work as configured. However, you will lose access to updates and premium support. This includes new features, bug fixes, and full compatibility with the latest versions of WordPress and WooCommerce.
- Does TranslatePress work on WordPress Multisite?
Yes, TranslatePress works on multisite as well. You can either network activate the plugin, or do it individually for each sub-site.
It works to add languages on individual sub-sites in a network install (and choose the languages in which you translate each sub-site).It will NOT work to have each sub-site as a secondary language.
Note: The license key of the premium product needs to be added in the Main site -> Settings -> TranslatePress, not in the Network Dashboard.
- How can I translate an email that I customize in my Dashboard ?
This can be achieved using the Conditional Shortcode Based on Language.
You wrap the content for every language using the right shortcode and only the correct part will be emailed to the user.
Ex.
This content will be sent only to English users. - How can I make TranslatePress not process a custom URL ?
When the Force Language in Custom Links option is set to Yes, any custom link that you add to your website will get processed by TranslatePress to add the language to it.
If you want TP to ignore an URL, you can append this hash to it: #TRPLINKPROCESSED
Example: Let’s say the URL we want to be ignored is this one:
https://mysite.com/ignored-url
To make this work we add the hash from above so the link we will insert is:
- How do I change the Default Language ?
You might want to make the language you translated your website into the first one.
To do this, go to Settings -> TranslatePress and set the Use subdirectory for default language option to Yes. Then, using drag and drop, drag the language you want to be the default one to the top.
A better way of handling this is to use the Automatic Detection of User Language add-on. This will redirect the user to the correct language based on his IP or browser settings.
Ex.
- How do I add a dropdown language selector to my menu ?
When you’re adding or modifying a menu and TranslatePress is active, you’ll find the defined languages under the Language Switcher tab. You can use these elements to create the dropdown menu, exactly as you would create any other dropdown menu on your website.
Ex:
- My Google Translation API key doesn’t work
If you’re having trouble with your Google API key, please make sure that you followed correctly our guide for generating it.
Be extra careful at Step 4 since this is the cause of issues most of the time.
- Is the DeepL API free ?
No, the package that contains API access is listed and can be purchased for 4.99€ + usage fees.
More information about the DeepL API package can be found here: https://www.deepl.com/pro.html#developer.
- Is the Google Translation API free ?
No, the Google Translation API is not free, they charge 20$ per million characters that you translate. You can read more about this here.
However, Google is offering a Free Trial option that gives you access to 300$ over 12 months that can be used towards the Google Translation API. This means that you can use it for free, within this limit, because TranslatePress is storing the translations locally. The data is retrieved from Google only once, then it’s being served from your own database.
To access this trial, you can follow this link: https://console.cloud.google.com/freetrial
- How can I show different versions of a video based on the current language ?
This can be achieved using the Conditional Shortcode Based on Language.
You add both versions of the video to the content and wrap them up with the shortcode using the correct languages.
Ex.
- I cannot select some strings from the page to translate
It’s possible that some strings cannot be clicked through our visual interface.
If this is the case, you should try to look for them inside the Strings List that’s available under the current language at the top of the translation interface.
- I don’t see the Licence tab to add my serial key
The licence tab only appears after installing one of the paid add-ons.
So first go to your TranslatePress Account page, download, install and activate one of the add-ons and the tab will show afterwards. - I want to access the extended profile data?
If you want to access extended user data, please upgrade to the premium plugin and follow the steps mentioned below.
- Login to miniOrange dashboard (https://login.xecurify.com) with your miniOrange account credentials.
- Go to Social analytics->Social Applications Usage Summary, click on Search and then click on View under Additional Information.
- You will find user details fetched by our Plugin for each login attempt there.
Note: Make sure you have enabled the extended attribute check from the plugin. Also, your app needs to have permissions from user to collect extended attributes.
- Why should I register?
We ask our customers to register with miniOrange because we take care of creating applications for you so that you don’t have to worry about creating applications in each social network.
Also, registration helps us to be in contact with our customers. In case you need any help, we can help you with step by step instructions.
By registering for our plugin, you can also upgrade to our Premium plans with ease. Our premium plans come with a lot more features tailored for providing your users with a seamless login experience.
Please Note: You can go through our Privacy Policy for how we use your information. We don’t sell your information to any third-party organization.
- I cannot see some icons in preview or on blog even though I have selected them in the plugin setting.
Please check if you have an Adblock extension installed on your browser where you are checking the plugin. If you do, the Adblock extension will have a setting to block social buttons. Uncheck this option.
If you don’t have Adblock installed and still face this issue, please contact us using the support form on the right or mail us at info@xecurify.com
- Email share is not working. Why?
Email share is the plugin is enabled through mailto. mailto is generally configured through desktop or browser if it is not working, mailto is not setup or improperly configured.
To set it up properly, search for “mailto settings” followed by your operating system’s name where you have your browser installed.
- There is no option of instagram in social sharing. Why?
Instagram has made a conscious effort to not allow sharing from external sources to fight spam and low quantity photos at this point in time, uploading via Instagram’s API from external sources is not possible.
- Why is sharing with some applications not working?
This issue arises if your website is not publicly hosted. facebook, for example, looks for URI to generate its preview for sharing. That does not work on the localhost or any privately hosted URI.
- It is possible to show sharing icons below the post content?
You can put social sharing icons before the content, after the content or both before and after the content. Go to the sharing tab, check the blog post checkbox and select one of three(before, after, both)options available. save settings.
- My user get the following message-“There was an error in registration. please contact your administration “. What should I do?
This message is thrown by WordPress when there is an error in user registration.
1.To see the actual error thrown by wordpress,go to \wordpress\wp-content\plugins\miniorange-login-openid\class-mo-openid-login-widget.php file.
2.Search for the line:
//print_r($user_id);3.Change it to
print_r($user_id);4. Save the file and try logging again. please send us the error you while logging in through the support forum to your right.
- I forgot the password of my miniorange account. How can I reset it ?
There are two cases to according to the page you see –
1. Login to the miniorange screen: you should click on forgot password link. you will get your new password on your email address which you have registered with miniorange. now you can login with the new password.
2. Register with miniorange screen: Enter your email ID and any random password in the password and confirm password input box. This will redirect you to login with miniorange screen. Now follow the first step.
- After entering OTP, I get invalid OTP. What should I do?
Use the Resend OTP option to get an additional OTP. please make sure you did not enter the first OTP you received if you selected Resend OTP option to get an additional OTP. Enter the latest OTP since the previous ones expire once you click on Resend OTP.
If OTP sent on your email address are not working, please verify your account using your mobile number. you will get an OTP on your mobile number which you need to enter on the page. If none of the works. please contact using the support form on the right.
- I did not recieve OTP. What should I do?
The OTP send as an email to your email address with which you have registered with miniorange. If you can’t see the email from miniorange in your emails, please make sure to check your SPAM folder.
If you don’t see an email even in the SPAM folder, please verify your account using your mobile number. you will get an OTP on your mobile number which you need to enter on the page. If none of the works. please contact using the support form on the right.
- I want to change the email address with which I access my account. How can I do that?
You will have to register in miniorange again with your new email id. please deactivate and activate the plugin by going to Plugins -> Installed Plugins and then go to the social login plugin to register again. This will enable you to access miniorange dashboard with a new email address.
For any further queries, please submit a query on the right-hand side in our support section.
- My users get the following message -“Registration has been disabled for this site. Please contact your administrator.” What should I do?
This means you must have unchecked the check-box of auto-register in the Social Login tab. Please check it. This will allow new users to be able to register to your site.
- I am getting an error while logging in with Facebook. This URL Is Blocked. The URL http://social.xecurify.com/moas/openid-connect/client-app/callback has been blocked from Facebook.
You can set up the custom app for Facebook in the social login plugin so that the issue is altogether avoided. We have contacted Facebook regarding the blocked URL issue. We are awaiting their response.
Steps to set up custom app:
1. Go to the Custom app tab in the WordPress social login plugin.
2. Click on the Add Application button.
3. Select the facebook app in the dropdown list and follow the instructions to set up the app.
Instructions to configure Custom Facebook App :
1. Go to Facebook developers console https://developers.facebook.com/apps/. Login with your facebook developer account.
2. Click on Create a New App/Add new App button.
3. Enter Display Name and click on Create App ID.
4. Click on Products from the left pane of the page and select Facebook Login and click on Set Up button.
5. Click on Web. Enter your site URL into Site URL option then click on Save.
6. Goto Settings -> Basic from the left pane of the page, Enter App Domain (eg. example.com), your privacy policy URL in Privacy Policy URL and select Category of your website. Then click on Save Changes.
7. From the left pane, select Facebook Login -> Settings.
8.Under Client OAuth Settings, enter {YouWebsiteURL}/openidcallback/{appname} (eg: login.xecurify/openidcallback/facebook ) in Valid OAuth redirect URIs and click Save Changes button.
9. Change your app status from In Development to Live by clicking on OFF (sliding button) beside Status option of the top right corner. Then, click on the Confirm button.
10. Go to Settings –> Basic. Copy the App ID and App Secret and Paste into the Facebook custom app tab in the plugin.
11. Input email, public_profile as scope.
12. Click on the Save settings button.
Please contact us at info@xecurify.com if you need help with the setup.
- How do I center the social login icons?
1.If you are making changes to a PHP file.
Go to the PHP file which invokes your page/post and insert the following html snippet. Also, increase the margin-left value as per your requirement. Save the file.
<div style="margin-left:100px;"><?php echo do_shortcode('[miniorange_social_login]')?></div>2.If you are making changes to an HTML file.
Go to the HTML file which invokes your page/post and insert the following html snippet. Also, increase the margin-left value as per your requirement. Save the file.
<div style="margin-left:100px;">[miniorange_social_login]')</div> - Why do my users get a message that it is not secure to proceed?
Your website must be starting with http://. Now generally that’s not an issue but our service uses https://( s stands for secure). You get a warning from the browser that the information is being passed insecurely. This happens after you log in to social media application and are coming back to your website. The warning is triggered from the browser since the data passes from https:// to http://, i.e. from a secure site to non-secure site.
We make sure that the information(email, name, username) getting passed from social media application to your website is encrypted with a key which is unique to you. So, even if the there is a warning of sending information without security, that information is encrypted.
To remove this warning, you can add an SSL certificate to your website to change it to https OR use your own custom app
- I am not able to fetch extended attributes. How do I access extended attributes?
Check the option of Extended Attributes in the Social Login tab. Then in the miniOrange dashboard, go to Social analytics-> Social Applications Usage Summary, click on Search and then click on View under Additional Information to see extended attributes of users who login using your app. You can also download it as a csv there.
Note: Your app needs to have permission from users to collect extended attributes. - Can I configure my own apps for Google, Facebook and Twitter?
Yes, it is possible to configure your own app. That is available in the Standard and Premium plans.
Please contact us using the Support form if you want to purchase these plans.
- After logout I am redirected to blank page?
Your theme and Social Login plugin may conflict during logout. To resolve it you need to uncheck Enable Logout Redirection checkbox under Display Option of Social Login tab.
- How can I redirect to my blog page after login?
You can select one of the options from Redirect URL after login of Display Option section under Social Login tab.
1. Same page where user logged in
2. Homepage
3. Account Dsahboard
4. Custom URL – Example: https://www.example.com
- Social login icons are not added to login/registration form.
Your login/registration form may not be wordpress’s default login/registration form. In this case you can add social login icons to custom login/registration form using ‘social login shortcode’ [miniorange_social_login]. Refer to ‘Shortcode’ tab to add customizations to Shortcode.
- How can i put social login icons on a page without using widgets?
You can add social login icons to any page or custom login page using ‘social login shortcode’ [miniorange_social_login]. Refer to ‘Shortcode‘ tab to add customizations to Shortcode.
- How to add login icons to frontend login page?
You can add social login icons to frontend login page using our shortcode [miniorange_social_login]. Refer to ‘Shortcode’ tab to add customizations to Shortcode.
- I want to access the extended profile data?
If you want to access extended user data, please upgrade to the premium plugin and follow the steps mentioned below.
- Login to miniOrange dashboard (https://login.xecurify.com) with your miniOrange account credentials.
- Go to Social analytics->Social Applications Usage Summary, click on Search and then click on View under Additional Information.
- You will find user details fetched by our Plugin for each login attempt there.
Note: Make sure you have enabled the extended attribute check from the plugin. Also, your app needs to have permissions from user to collect extended attributes.
- How do I logout from the plugin and login with a different email address?
Deactivate the plugin from WordPress dashboard and activate again. Now go to the account setup tab of the plugin and login with the new email.
- Facebook sharing is showing the wrong image. How do I change the image?
The image is selected by Facebook and it is a part of Facebook sharing feature. We provide Facebook with webpage URL. It generates the entire preview of webpage using that URL.
To set an image for the page, set it as a meta tag in of your webpage.
< meta property=”og:image” content=”http://example.com/image.jpg” >
You can further debug the issue with Facebook’s tool – https://developers.facebook.com/tools/debug/og/object
- Will pages in your website dashboard be cached?
No, your website dashboard pages are not cached. The cache functionality is only meant to cache frontend pages.
- How do I serve cached pages to people using a phone or tablet?
You can generate a separate cache by selecting ”Generate separate files for mobile devices” in the page cache settings. This cache setting is only necessary if you use a specific theme for mobile devices, or for certain AMP plugins.
- What is the maximum number of pages I can cache?
There is no limit to the number of pages you can cache. The only limit is the space on your server and the maximum number of subdirectories allowed by your server, as caching will write files in subdirectories following the permalink structure.
If you were to reach a caching limit, it probably means that your server is not fit for the size of your website and caching needs.
- Can I make certain parts of the page stay dynamic when cache is enabled?
The cached page is sent to the user before most of your website is loaded. The add-on aren’t loaded yet, making it impossible for them to change the cached content at every request.
- Will caching slow down my server?
No, caching will actually reduce the load on your server, by reducing the amount of PHP and mysql used. You might see a peak in resource usage when using the cache preloader, as this functionality will create the cache files for all your pages in a short amount of time. But once this is done, performance should increase and the load on your server will decrease. Every single major site uses caching to serve cached pages faster by using fewer resources.
- How do I prevent Syspro Website Optimize from caching a certain page?
To prevent a page from being cached, you can add the URL to the field “URLs to exclude from cache” in the cache “Advanced settings” tab. If you are developing a plugin and want to prevent a page from being cached, you can define the “DONOTCACHEPAGE” constant on the pages you need. Any request where “DONOTCACHEPAGE” is defined will not be cached.
- How do I cache only the home page?
Add /.+ to the cache option “URLs to exclude from cache” on the advanced settings tab.
- What frequency should I choose for the cache preloading schedule?
Choosing a frequency for the cache preloading schedule will depend on factors such as the frequency at which the website content is updated, the number of pages in the cache, the resources of the server and more.
For example a site with hundreds of pages will require more resources to preload its cache. So choosing a high frequency will mean that the cache will be recreated often, and the resource usage will be higher.
On a website where updates aren’t as frequent, you can even disable the cache preloading schedule, or set a high cache lifespan and set the cache preloading schedule to follow it.
- What is “cache preloading”?
Usually, a page is cached when a user visits it. So the first user visiting won’t be served a cached version of the page, and will wait longer than the next users. The cache preloading functionality will go through all your pages and posts, and simulate a visit by a user, allowing Syspro Website Optimize to cache the pages before anyone visits them. Your first visitor will thus be served a cached version of the page, increasing its performance.
- Will the comments work even when page caching is enabled?
Yes, when using our website’s commenting system, your users will still be able to post comments. Every time a comment is approved, the cache for that page or post will be cleared, allowing the next visitor to see an up to date list of comments.
- Do I need a special setup to use the caching feature?
No, if your website works properly, Syspro Website Optimize will be able to cache your pages and posts.
- How do I know my webpage is being cached (or why it isn’t)?
If cache is enabled, and in order to see if your page is cached, use the “View Source” function in your web browser to view the page source. However, note that if you are using a further service that minifies HTML (e.g. Cloudflare). Also note that if you do not preload the cache, a page or post will have to be visited once for the cache file to be generated.
- Why should I use a caching add-on on my website?
You think your site is fast without caching? A caching add-on will make your website even faster. A faster cached website will increase SEO, it will improve your visitors experience. Caching will also save your server’s resources.
- What is caching, or page caching?
“Caching”, from Wikipedia: “In computing, a cache is a hardware or software component that stores data so that future requests for that data can be served faster; the data stored in a cache might be the result of an earlier computation or a copy of data stored elsewhere. A cache hit occurs when the requested data can be found in a cache, while a cache miss occurs when it cannot.” — Syspro Website Optimize cache does this by saving the page computed by your website on the disk. When a user visits a page, Syspro Website Optimize will serve the cached page before your website is loaded. If the page wasn’t cached before, it will be computed by your website, and Syspro Website Optimize will then save the result to the cache.
- Which optimization will make the biggest difference?
This depends on your setup (theme, number and quality of add-on used, etc…), but generally, caching will make the biggest visible difference to your website’s performance.
- Can you help me restore my database?
Not unless you have an existing backup. Please ensure that you make a backup of your entire database before using Syspro Website Optimize for the first time, and when you upgrade to a major new version of it.
- Is optimizing my database safe?
Yes; optimizing does not involve any “tricks” or poking around in dangerous ways. It involves running routine clean-up operations using well-defined, common MySQL commands. Nevertheless, we always recommend backups, which cover every possibility; not just database malfunctions, but hackers, human errors, etc.
- What savings can I expect to make?
This is a “how long is string?” sort of question. It depends completely on your site – how big it is, how many users interact on it, how long it has been running, and when you last optimised it. However, the savings and speed-ups can be substantial; it is always worth making sure that your database is optimised.
- Isn’t it better to use a dedicated caching add-on to cache my site?
Our caching tests and feedback from real-world users show that the caching feature alone can make your site faster than any other cache add-on or optimization. See these speed test results.
- Bulk Remove Sale Dates
This operation is possible with enabled “binded editing” mode only, where products should be selected by checkboxes:
If necessary make filtration by your logicSet pagination value to the max necessarySelect products using checkboxes (press SHIFT keyboard to select from first to last)Enable binded editing modeClick ‘Clear’ button on any selected productWait until operation finished - Can I bulk increase multiplying product prices like ‘price x 2’ instead of by percentage?
Yes, but you will need to use percentage anyway, apply 200% in this case!
- Can I copy products title into slug field using bulk edit?
Yes! Use variable {TITLE} in the bulk editing form.
Hint: if clear the slug cell it will re-generated the slug using product title string!
- Change products price value for 15% in regular price
Yes! It is possible to manipulate with regular prices of Syspro E-Commerce products, and change products price value related to their current value.
Select products using checkboxes or filter them by any parameters you need
Open Bulk Editor form
Find field ‘regular price’ and check it by checkbox near
Enter 15 in the textinput and in the drop-down near it select ‘increase by %’
Click on ‘Do Bulk Edit’ and wait while the operation finish
- How to add to existing gallery 2 new images using bulk edit?
Task: 370 products with defined set of gallery images in each product. How to add 2 more images?
Enable column ‘Gallery’ in the tab Settings and press Save button thereBy Filters select the products by categories or other parametersOpen Bulk Edit tab -> tab AdditionalFind and enable there button ‘Images’Using button in the opened popup window add image(s) you want to add to the selected productsIn the drop-down select: ‘Add selected images to the products in the popup to the already existed ones’Press ‘Apply’ buttonPress ‘Do Bulk Edit’ and wait until operation finishedThe same algorithm works for images deleting.
Note: steps above are actual for the operations ‘add’ and ‘delete’ in: ‘Download files’, ‘Cross-sells’, ‘Up-sells’, ‘Grouped products’ - How to add Syspro E-Commerce products custom taxonomies
Custom taxonomies allows you to create such notions for your products as locations for example.
- How to detach completely an attribute from the product?
For example you decided to detach completely attribute Material from the variable products. Do next steps:
Using the functionality of the tab ‘Filters’ make filtering of the products by type: ‘Variable’ and also if necessary you can filter by more parametersIf you need to change only some products you can select them using checkboxes in the Products Editor or skip this step. Also you should know that you can do this operation without any filtering using product selection by checkboxes only.Go to tab ‘Bulk Edit’ and enable there in section taxonomies attribute ‘Product Material’Do not select any terms in the drop-down for the ‘materials’ there but select behavior in the near drop-down: ‘replace’Click on ‘Do Bulk Edit’ and wait until operation is finishedIf you want you can rollback changes in the tab History - How to edit product variations using bulk?
Using tab Filters filter all products by product type – variableIf you have a lot of variations per product (>10) set products per page no more than 5 to avoid server 500 error. And it is better to activate columns only which you need for your current bulk operation.On tools panel activate switcher ‘variations’Now if you open tab Bulk Edit all visible fields will be able to edit “products variations” only, ignoring their parent-products
- How to filter Syspro E-Commerce products by attachment of taxonomies/attributes to them
For such filtration there is no necessary select terms as it filters by taxonomy/attribute attachment to the product generally, and not for terms.
- How to order product variations using bulk?
Its possible using ‘Ordering’ tab of Variations Advanced Bulk Operations
- How to remove all products variations at all?
If you need to remove all products variations from all variables products of your shop:
In the Filter select product type ‘variable’ and filter by itAfter filtering on the tools panel click on button ‘Variations Advanced Bulk Operations’There go to tab Deleting and select ‘Delete all products variations’Click on ‘Start deleting’ button and wait until deleting finishedIf you need to delete the product variations from the products of any product category – in the tab Filter also select the category (or their combination) you need!
Also if there are only some products which you can see on one page – do not use Filtering – select variables-products using checkbox and do the same another described above. - How to remove images from the gallery of some products?
Two ways about how to clean the gallery of some products, and for this operation column ‘Gallery’ should be activated!
Way 1:Use checkboxes to select some productsEnable ‘binded editing’ switcherClick on Gallery button of any selected productIn the opened popup remove all images and press ‘Apply’ buttonWait until changes apply to all other selected productsWay 2:Use the Filter tab functionality where you should filter products by parameters you needThen go to tab Bulk Edit -> AdditionalSelect using checkbox Gallery fieldClick on Images button there and remove all images there if presented, or/and press ‘Apply’ buttonClick on ‘Do Bulk Edit’ button and wait until bulk operation for filtered products appliesOf course using way 2 it is possible to clean galleries of all products in the shop if to miss step one there (filtering) - How to remove sale prices by bulk operation
Do filtration or selection of the products if it necessary, then go to tab Bulk Edit, find field ‘Sale price’ and set there ‘-1’ and select operation ‘set new’
- How to remove selected downloads?
If you want to delete file from the products downloads use that file link with the next algorithm:
Select by checkboxes or/and make filtering of products from which you want to delete that download link(s)Go to Bulk Edit tab -> tab Advanced -> select ‘Downloads’ and open its popup thereSelect in the drop-down there option ‘Remove selected downloads’Press button ‘Add File’ and set files you want to deletePress ‘Apply’ button on popupClick on ‘Do Bulk Edit’ button and wait until operation finished - How to reset page cache in the browser
press CTRL+R
CTRL+F5
Ctrl+Shift+R
Apple + R or command + R (apple)
in Chrome browser the best way is:
Open the developer tools: Ctrl + Shift + I
Now, leaving the panel open, left click on the “Update” button (next to the address line) and do not release the button.
After a few seconds, you will see a drop-down menu in which there will be an item: Clearing the cache and hardware reboot.
- How to set different prices to the different variations? I need a different price for each size
Example of the task: user has products like posters with foreground color, background color and poster size. Colors here no matter, matters only size which makes the price. So we have: poster 10×12 for RM10, 15×20 for RM14, etc … How to set the price using bulk editing for each such product variation?
Answer:
Using tab Filters – filter “variable products” with category posters if such one existsIf you have about 50 variations per product set products per page 5 to avoid memory fail on the server side. In such cases better activate columns which you need for current operation only!On tools panel enable ‘variations’ switcherOpen tab “Bulk Edit” and select there attributes combination(s) you wantSet regular price value (and/or sale price value if you need)Click ‘Do Bulk Edit’ buttonWait until the operation finished - How to set sale prices lower than regular for 20%?
There is 2 ways: use binded editing or Bulk Editing.
First way:This way is good when you can do it for some products or variations on the same one page in the Products EditorSelect some productsEnable ‘binded editing’ switcherHover on any selected product sell price cell and click on calculator iconIn calculator select: rp- and in the text field there enter 20, and in the last drop-down select percentsSelect prices rounding if you need itClick on blue accept button on the calculator and wait until this bulk operation is finishedIf you did smth wrong you can roll back this operation in the tab History
Second way:In this way you can apply changes to all products on the site or to the filtered ones by your logic.So make products filtering by category or categories, or/and any other parameters if you need itGo to tab Bulk Edit and select field ‘Sale price’ thereEnter 20 in the textinputIn the drop-down select ‘regular price minus value’Click on ‘Do Bulk Edit’ button and wait until operation is finished - How to set the same value for some products on the same time
Binded editing feature will help:
Select first product you need using checkbox in the most left columnPress SHIFT button on your keyboard and without releasing it click on the last (last by your logic) product checkboxOn the tools panel enable ‘binded editing’Enter any value to any field of any selected product you needWait until operation is finishedHint: really this operation is bulk editing, so you can cancel it in tab Bulk Edit and then roll back it in tab History - How to swap one attribute to another without product variation deleting?
Task: I have 3000 variable products in the shop and I want to search attributes and set new attributes instead. For example items marked with the color attribute ‘Brown’ are searched and changed to ‘Red’ without data deletion – Brown should be replaced by Red and nothing more should be changed!
Yes, it is possible with tab Swap in Variations Advanced Bulk Operations
- How to toggle variations to be “enabled” or “disabled”
If you need to disable any variation(s) in variables products you can do next:
In the Filter select product type ‘variable’ and click on ‘Filter’ buttonOn tools panel enable switcher ‘variations’Now you can select (using checkbox in the first column) product variations which you want to disable OR if you have a lot of such variations in tab Bulk Edit check post status and select ‘Private’. Of course if that variation belongs to the products which belong to any category or any other attributes you can continue with filtering of variable products to avoid looking them in all variable products in the shop – so if you can use Filter for targeting – use Filter.Now main thing: select on the top of tab “Bulk Edit” all combinations of variations you want to disable using button ‘Add attributes combination to apply on’: select attributes you need and then if you going to disable 2 combinations click on that button 2 times, and in generated drop-downs below set combinations.After checking twice that you did all right click on ‘Do Bulk Edit’ and wait while operation will be finished
If you decided that you did something wrong – you can roll-back operation in tab History - How to work with the products which have a sale price?
I need to see and work with the products which have sale prices.
Using Filters find all products where the sale price greater than 1. - Is it possible to add new attribute terms in the existing attributes using bulk?
Yes! You can apply operation ‘Attaching’ using Variations Advanced Bulk Operations
- Is there a way to limit the role of Shop Manager?
Task: I want the Shop Manager to be able to update the prices and stock quantity only and nothing else.
Yes, you can, in tab Settings click columns you need using checkbox ‘visible for shop manager’ - Is there any way to add SKUs with variations?
Syspro E-Commerce Bulk Editor allows adding SKU to products variations of variable products.
For example, the main product with 10 variations – the main product SKU is wp-pennant and I would like to be able to add variations 1-10 like: wp-pennant-1, wp-pennant-2, wp-pennant-3, etc.
Nearly Yes. Instead of -1,-2,-3 can be applied variation ID or its menu order (but it is not the best idea as menu order is will be recounted after adding new variation), so it is possible to get such results as: wp-pennant-256, wp-pennant-475, wp-pennant-12
In the Products Editor enable variations switcherNow you can use bind editing OR bulk editing (see the screens)For both ways use syntax: {PARENT_SKU}-{ID} OR apply {PARENT_SKU}-{MENU_ORDER}Read more about variables here. - Is there any way to edit products together with my team at the same time?
Yes! Different users can edit products together at the same time using Syspro E-Commerce Products Editor not interfering with each other as each user has its own options in the add-on system.
Even more: site admin can allow or not allow to the “shop Managers” which products fields they can use in the tab Settings:

- How to Change Store Name in Plugin and at Cusrev.com
If name of your store has changed, there are two ways to update it.
Update store name in your account at cusrev.com
If you have an account at cusrev.com, there is an option to update your store name there.
- Log in to your account at cusrev.com. If you don’t have an account, you can create a new one.
- If you have multiple stores linked to your account, make sure that the right store is selected in the top right corner.
- Navigate to Store Settings page.
- Update your store name in the Name field.

Update store name in our WooCommerce plugin
If you don’t have an account at cusrev.com, it is also possible to update the store name from our WordPress plugin.
- Navigate to the plugin’s settings in WordPress admin area (Reviews > Settings > Review Reminder).
- Update your store name in the Shop Name field and save settings.
- If you display verified copies of your reviews at cusrev.com, then you also need to go to the Trust Badges tab and re-save settings there.

- How to Stop Receiving Emails About New Reviews
Our plugin helps shops to receive a lot of authentic reviews. After a customer submits an aggregated review form, the plugin sends an email with a summary of reviews for each product in the order. The email is sent to the email address that is specified in Email for Notifications field on Review Reminder tab of the plugin’s settings.
In addition to this summarized email, the standard WordPress might also send several notification emails about new reviews (comments). The standard WordPress notifications are sent for each product, so if an order includes multiple products, WordPress will send an email per product.
These WordPress notifications can be annoying, if customers place large orders (e.g., for 15-20 products). It is possible to disable WordPress notification in the standard WordPress settings (Settings > Discussion > Email me whenever). Tick or untick checkboxes for notification emails as necessary and WordPress will stop sending an individual email about each new review.
Please bear in mind that WooCommerce reviews are based on WordPress comments. So, if you disable notification emails for reviews, it will also disable notification emails for comments on non-WooCommerce pages/posts. A possible solution to have all email notifications enabled but still keep your mailbox organized and tidy is to create an email filtering rule in your mailbox. The filtering rule can automatically move all notification emails in a special folder of your mailbox to avoid flooding the inbox with notifications.
- Does Your Plugin Use XMLRPC.PHP?
WordPress provides XML-RPC interface for remote management of the website. It allows you to access your website from custom admin software and mobile applications, rather than through a browser.
Our plugin requires REST API but it does not use XML-RPC interface. You can safely disable XML-RPC and use our plugin.
- Is it Possible to Collect Shop Reviews Only?
The plugin was build to invite customers to reviews products bought in WooCommerce powered stores. However, not all stores sell products. In these cases, it is more reasonable to ask customers provide only store-level feedback without reviewing specific products.
The professional version of the plugin offers the advanced review form editor that enables additional customization of the review forms. One of the options supported by the advanced editor is removal of product-related questions from the review forms. So, it is possible to create review forms that have only store-related questions.
The advanced review form editor is available in My Account area of www.cusrev.com. If you don’t have an account at cusrev.com yet, create a free account to preview features offered by the advanced review form editor.
- How to Delete Reviews?
You have the full control over reviews on your site. If you would like to delete a review, please use Trash button on the Reviews page in the plugin’s menu.
If you enable Trust Badges and opt in for publication of verified copies of all reviews on www.cusrev.com, the plugin will publish verified copies of reviews on www.cusrev.com in addition to saving them into your WooCommerce database. Verified copies of reviews published on www.cusrev.com cannot be deleted because it will compromise their authenticity and undermine trust.
If you disable Trust Badges option, all verified copies of all reviews related to your shop will be immediately hidden and the page of your shop on www.cusrev.com will be deleted.
- How Can Customers Update Their Reviews?
Sometimes customers might want to modify their own bad reviews. For example, after a resolution has been made or if the complaint is not related to the product, among other things. If a review was submitted in response to a review invitation via an aggregated review form, the customer can modify their review using the same link from the original invitation. Please ask them to click the “Review” link in the email one more time and update their review.
If a customer cannot find the original review reminder (invitation), it is possible to re-send them the review reminder. Re-sending of review reminders is available in the Pro version of the plugin. Unfortunately, it is not possible to re-send review reminders with the Free version because of the limit of one reminder per order (see this article for more information).
- Is It Possible to Moderate Reviews?
You have a full control over moderation of reviews on your site. There is a checkbox Moderation of Reviews on the Review Reminder tab in the plugin’s settings. If you enable this checkbox, all reviews submitted via aggregated review forms will need to be manually reviewed and approved before publication on your site.
If you enable Trust Badges and opt in for publication of verified copies of all reviews on www.cusrev.com, you won’t be able to moderate copies of reviews published on www.cusrev.com. However, you still will be able to moderate these reviews on your site. Shop owners cannot moderate verified copies of reviews on www.cusrev.com because this will compromise their authenticity and undermine trust. If you work with a customer and resolve their issue, the customer has a possibility to update their review. You can also post a public response to a review as explained here: how to reply to reviews.
If you disable Trust Badges option, all verified copies of all reviews related to your shop will be immediately hidden and the page of your shop on www.cusrev.com will be deleted.
WooCommerce reviews submitted directly on pages of individual products on your site can also be moderated. This is controlled by Before a comment appears option in the standard WordPress settings (menu path Settings > Discussion).
- Does the Plugin Create Schema Markup for Reviews?
As Moz.com defines it, Schema.org (often called Schema) is a semantic vocabulary of tags (or microdata) that you can add to your HTML to improve the way search engines read and represent your page in SERPs.
The standard WooCommerce functionality already includes structured data mark up to display your product reviews effectively within organic search results. You don’t need any additional plugins for this.
Our plugin extends the standard functionality and adds some extra mark up to help search engines properly crawl your shop (the standard WooCommerce functionality doesn’t provide schema mark up for reviews with pictures).
It is important to understand that having a valid structured data mark up in place makes your website eligible for organic stars in Google but it doesn’t guarantee that they will be shown. You can test the rich snippets using Google’s Structured Data Testing Tool.
- I found a bug in the add-on. How to get it fixed?
Please create a new topic at the support forum and provide detailed information with a screenshot.
- Will collected reviews be shown as stars in Google?
The standard Syspro E-Commerce functionality already includes structured data mark up to display your product reviews effectively within organic search results. This add-on extends the standard functionality and adds some extra mark up to help search engines properly crawl your shop. It is important to understand that having a valid structured data mark up in place makes your website eligible for organic stars in Google but it doesn’t guarantee that they will be shown. You can test the rich snippets using Google’s Structured Data Testing Tool.
- How to Change Sorting of Reviews?
If you would like to change how reviews are sorted on product pages, it is possible to do so using the standard WordPress functionality. Go to Settings -> Discussion menu and find options “Break comments into pages with X top level comments per page and the last/first page displayed by default” and “Comments should be displayed with the older/newer comments at the top of each page”. You can control how reviews are sorted and displayed on product pages by modifying these options.
- Some of the social sharing apps are not working. Why is that?
This issue arises if your website is not publicly hosted. Facebook for example looks for the URL to generate the webpage’s preview for sharing.
- I want to add Syspro E-Commerce Social Login/ Syspro E-Commerce Social Sharing to a custom location on my page. How can I achieve that?
To add Syspro E-Commerce Social Login or Syspro E-Commerce Social Sharing icons to a custom location, use a Shortcode.
- I have added Syspro E-Commerce social sharing – Vertical widget to my page. How can I change its position in the page?
The vertical sharing widget for Syspro E-Commerce Social Sharing gives a couple of options to change its position in the page and also the space between icons. You can align the social sharing widget on the left or right side of the page. You can view these options from Appearance->Widgets or editing the widget options in Customizer.
- I want to upgrade to the Syspro E-Commerce Social Login standard/ premium plan. How can I upgrade?
Please contact us through the support form for the social login standard and premium add-on.
- I want user to select their role on registration
This feature is available in Custom registration add-on which allows the users to select their role during Registration and based on that the user will be given the privileges inside.
- For any other query/problem/request
Please email us at hello@syspro.my.
- Can I use this plugin to ship to multiple addresses?
No, the Advanced Shipping Packages plugin is only meant for scenarios in which you need to split the shipping packages. For shipping to multiple addresses take a look at Shipping Multiple Addresses.
- What happens to products outside shipping packages setup?
All products are in one package by default. Once you’re creating shipping packages using the extension those product can be split up within those new packages. If a product is not in a new package, this will remain in the default package and will be handled the same.
- Does this extension support product variations?
Yes, you can either select parent product to apply one discount for all variations or pick individual variations to set different discounts or include/exclude specific variations from a more general rule. You can also select products to discount by their attributes, tags or even custom field values.
- Can I set different discounts for different categories at the same time?
Yes, you can create multiple product pricing rules and configure different discounts for different categories. In addition, you can pick individual products that you may wish to exclude from the category rule.
- Can I offer discounts to subscribers/members of my site only?
Yes, you can use this extension to run promotions dedicated to subscribers or members of your site. The only requirement for your subscription/membership system is to use custom role, capability or user meta entry to tell members from non-members. For example, if you have a membership extension which changes user role to “member” when someone purchases a membership, you can use a role condition with value “member” to make sure that only members are eligible.
- How will my customers know about the sale, special offer etc?
When developing this extension, our initial focus was on actually making all the different pricing adjustments, discounts and fees work. You can make almost any pricing strategy work but usually your customers are going to see their savings after adding some product to cart or going through the checkout. After getting the actual logic work well, we shifted our attention to the tools that help your customers learn about your deals and sales – you can opt to display a quantity pricing table for bulk and tiered pricing rules or make product prices throughout the shop reflect simple pricing rules. More promotional tools are planned for future releases.
- Does it support … scenario?
The answer is yes. This has to do with how this extension is organized. It is not limited to a few settings that do very specific things, instead it offers multiple pricing/discount/fee methods with dozens of conditions and useful settings which can all be mixed and combined to come up with virtually any product pricing rule, cart discount or checkout fee. Have no doubt that such simple pricing rules as “buy 2 get 1 half price”, “buy 10+ with 15% discount” or “3 for RM9.99” are supported.
- Is it compatible with … extension?
More often than not this extension is compatible with other Syspro E-Commerce extensions as it uses standard price hooks to change prices and standard methods to add discounts/fees.
- Does it support decimal quantities?
Decimal quantities are not supported and will not be supported in the future. This is due to some technical solutions in the add-on that do not work well with decimal quantities. These solutions enable some great functionality which would not be possible otherwise.
- Does it support multiple currencies?
It depends on your specific needs. This extension is fully compatible with a few popular currency switcher add-on and will work fine out of the box. On the other hand, you won’t be able to set specific discounts for different currencies – you can only set them in base currency and get it converted automatically.
- I installed this extension but run into a problem – what shall I do?
Head straight to our support site! We have some self-help content that you can consult and will respond to your inquiry within 24 hours (business days only) if you opt to send us one.
- How to sort the entire database in Smart Manager?
Click on a specific column header in the grid to sort it in the entire database in Smart Manager. For removing the sort, keep clicking on the same column header till the ‘blue arrow’ (beside the column name) is gone, and by default Smart manager will list records sorted by ID in descending order.
- Can I edit serialized data in Smart Manager?
Yes, you can from Smart Manager version 4.1.0+.
- Can I bulk edit or upload featured images with Smart Manager?
Yes, you can bulk edit or upload featured image for multiple products.
- Can I undo Bulk Edit results?
No.
- I cannot see the “Description” column anywhere. How do I update the product description using Smart Manager?
Update Smart Manager to 4.0+ and you will be able to see it.
- Simple / Advanced Search functionality not working
Please make sure you are using the latest version of Smart Manager. Kindly deactivate and then reactivate Smart Manager once and then have a check with the Smart Manager search functionality. If the issue still persists, contact us.
- How to have Price / Sale Price column to show with more than one decimal point after the decimal separator? For example, I want Price to be displayed as 25.57 instead of 25.
There is a setting in WooCommerce which lets you set the number of decimal points to be shown in prices after the decimal separator.
- Go to your WordPress Dashboard > WooCommerce > Settings > General.
- There under Currency Options, you will find the Number of Decimals to be set. You can set it to any value you want and then have re-check with Smart Manager functionality.
- Does Smart Manager support custom columns that may be added using another plugin? If yes, then how to manage any custom field of any custom plugin?
Yes, Smart Manager supports custom columns added using another plugin (Version 4.0+ onwards).
You would need to save at least a single product with that custom plugin fields from WooCommerce edit product page. Then only Smart Manager will detect those custom fields and will display them in the dashboard.
- How can I update one product or products based on a particular category in Smart Manager if I have loads of products?
It is very easy to achieve this using Smart Manager. Use simple search or advanced search functionality to enter product or category name, enclose the name in double quotes for exact match. Then use Bulk Edit to perform all actions you want.
- Why am I not able to view all columns in Smart Manager? Can I customize Smart Manager by adding / removing columns?
To keep things easier to understand, Smart Manager shows the most important fields by default. You can show/hide additional columns. Here’s how. You can only show new fields from here. You cannot add new fields to this list.
- Updating variation parent price / sales price not working
Smart Manager is based on WooCommerce and the same e-commerce plugin sets the price / sales price of the variation parents automatically based on the price/sales price of its variations.
- What does the blue line indicate in the Products dashboard in Smart Manager?
Blue line beside the product name indicates product variations (child) of a variable product (parent).
Also, while updating Regular Price & Sale Price of variable parent product, it is handled by WooCommerce based on the variation child.
- Smart Manager is empty / Can’t see products in the grid
Please make sure you are using the latest version of Smart Manager. If still the issue persists, deactivate all other plugins except WooCommerce and Smart Manager and have a re-check the issue.
If the issue goes away, keep on activating other plugins one-by-one, to find out which plugin was conflicting and let us know about that plugin. If the issue still persists, contact us.
- Is Smart Manager WPML compatible?
Smart Manager is not fully WPML compatible. In other words, Smart Manager will display and let you manage the different translations of the product. However, it will not update all the translations on updation of any one of the translations for a given product.
- How do I upgrade a Lite version to a Pro version?
Follow the steps listed here
- What browsers does Smart Manager work with?
Smart Manager works best in Firefox and Chrome. It is not compatible with IE.
- Can I export data in CSV using Smart Manager?
Yes, you can. Export feature is available in the Pro version.
- Can I import data using Smart Manager?
Unfortunately, you cannot import data using Smart Manager.
- What do the Paid / Pro version give me?
Paid versions allow managing all post types, bulk edit, unlimited inline editing, advanced search, export CSV, duplicate products, print PDF invoices and a lot more.
View all Pro version features - What do I get in the Free / Lite version of Smart Manager?
Smart Manager provides you support for managing four post types in the free version – WooCommerce products and variations, orders, coupons, WordPress posts.
For these post types, you can perform inline editing (upto three records without saving), simple and advanced search using AND filters, and delete upto 50 records at once. View all Lite version features
- What is meant by Cart Abandonment?
While shopping, a user adds products to the cart. But if this user doesn’t complete the purchase on the checkout page, the cart is considered abandoned.
- How often carts get Abandoned? Is it Happening in My Shop?
According to research, 6 out of 10 visitors, leave the checkout page and do not complete the purchase. Even if you have motivated enough, 20% to 25% of the shoppers leave the purchase process.
- Do I Need Any Technical Experience to Use This Add-on?
Any E-Commerce shop owner selling anything online can use this add-on. You will not need any technical experience to start recovering your lost revenue. Once initiated the add-on will work automatically for you.
- Can I Send Coupons with Follow up Email?
Yes. You can generate and send unique, limited-time discount coupons. Though there is no compulsion of sending coupons. It’s completely optional.
- Can I Directly Take Users to Checkout Page, Exactly Where They Left Off?
Absolutely. A unique checkout link can be sent with a follow up email. This will take the shopper to their prefilled checkout page. This will make the purchase process easier for the shopper.
- Will This Add-on Add Any Extra Time in Website Loading?
Not at all. All the add-on data is stored in its own database table. It is a completely self-hosted add-on. It works smoothly and does not leave any impact on the performance of the website. So you don’t have to worry about the speed.
- Do I need to be logged to the website backend to get the notifications?
Yes, it is essential to be logged in your website backend to receive any notifications. Moreover, every type of notification must be created and configured first since the add-on doesn’t enable any for your shop by default.
- What is the difference between “A product is sold” and “A new order is placed”?
A product is sold is the type of notification showing when a specific product is sold. You can specify one or more products when you create the notification. Whereas, A new order is placed is the notification shown when an order is created.
- What do I get in this Lite version?
Spreadsheet like view of products, orders and posts. Search and navigation, limited inline editing, ability to delete multiple items at once
- Which browser to choose for the best performance?
Syspro E-Commerce Smart Manager works best in Chrome, Firefox. Currently it is not compatible with IE.
- Can I export data in CSV?
Yes, you can but the export feature is available in Pro version.
- What happens when an old order that was completed but the gets refunded and How does the plugin handle the points that were received from the refunded order?
There are total two ways for handling the refund request.
- Earn Points
Product Assigned Points: When a user makes a refund request for that product which has some of the assigned points then after refunding the amount, the earned points will be deducted from his/her account.
Per RM Spent Point: When a user makes a refund request for an order from which he/she earned points, then after refunding the amount, earned points will be deducted from his/her account.
- Deduct Points:
Product Purchase through Points: When a customer makes any refund request for that product which has been purchased free of cost(by using his/her points) then after refund request, deducted points will be refunded to his/her account.
- What is the difference between “Redeem Points Conversion” and “Per RM Points Conversion” and also what’s the use of “Enter Product Points”?
- About Redeem Points Conversion – In this setting Merchant can set the amount required for converting reward points to generate the coupon. For example, if you have set the value 1, the point will be equivalent to RM1 (for your site) and if any user has 50 points then he or she will get the coupon amount of RM50 after converting it from My Account section.
- About Per $ Points Conversion – Let’s take an example if Merchant has set the RM1 = 1point (for their site) and any customer will purchase any product with RM50 then he or she will be rewarded with 50 points.
- About Enter Product Points – From here Merchant can select some product and can set the Points for a particular product, and if any user will purchase that selected product he or she will be rewarded with those Points.
- I have installed Syspro Ultimate Points And Rewards plugin and all I get on the points page is a 404 error?
After activating Syspro Ultimate Points & Rewards extension, please save the permalinks.


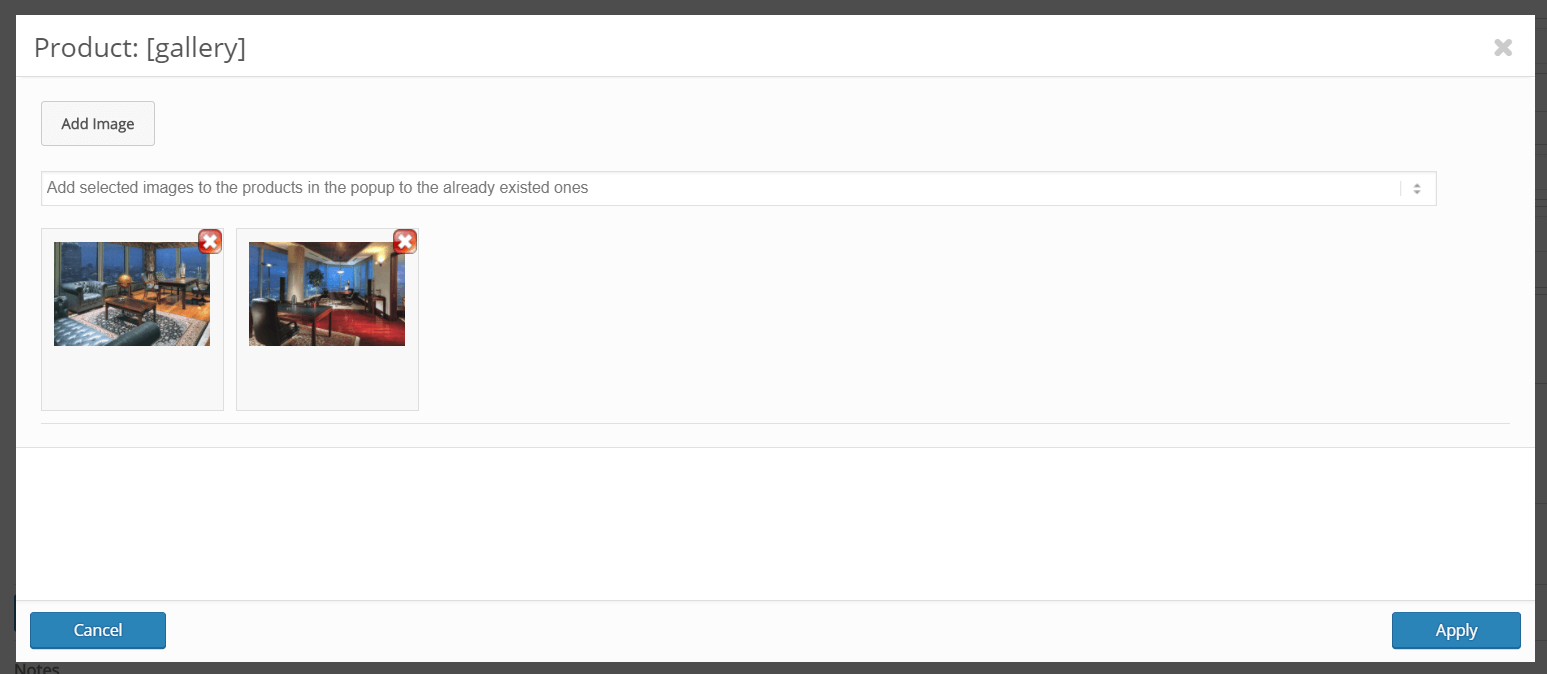


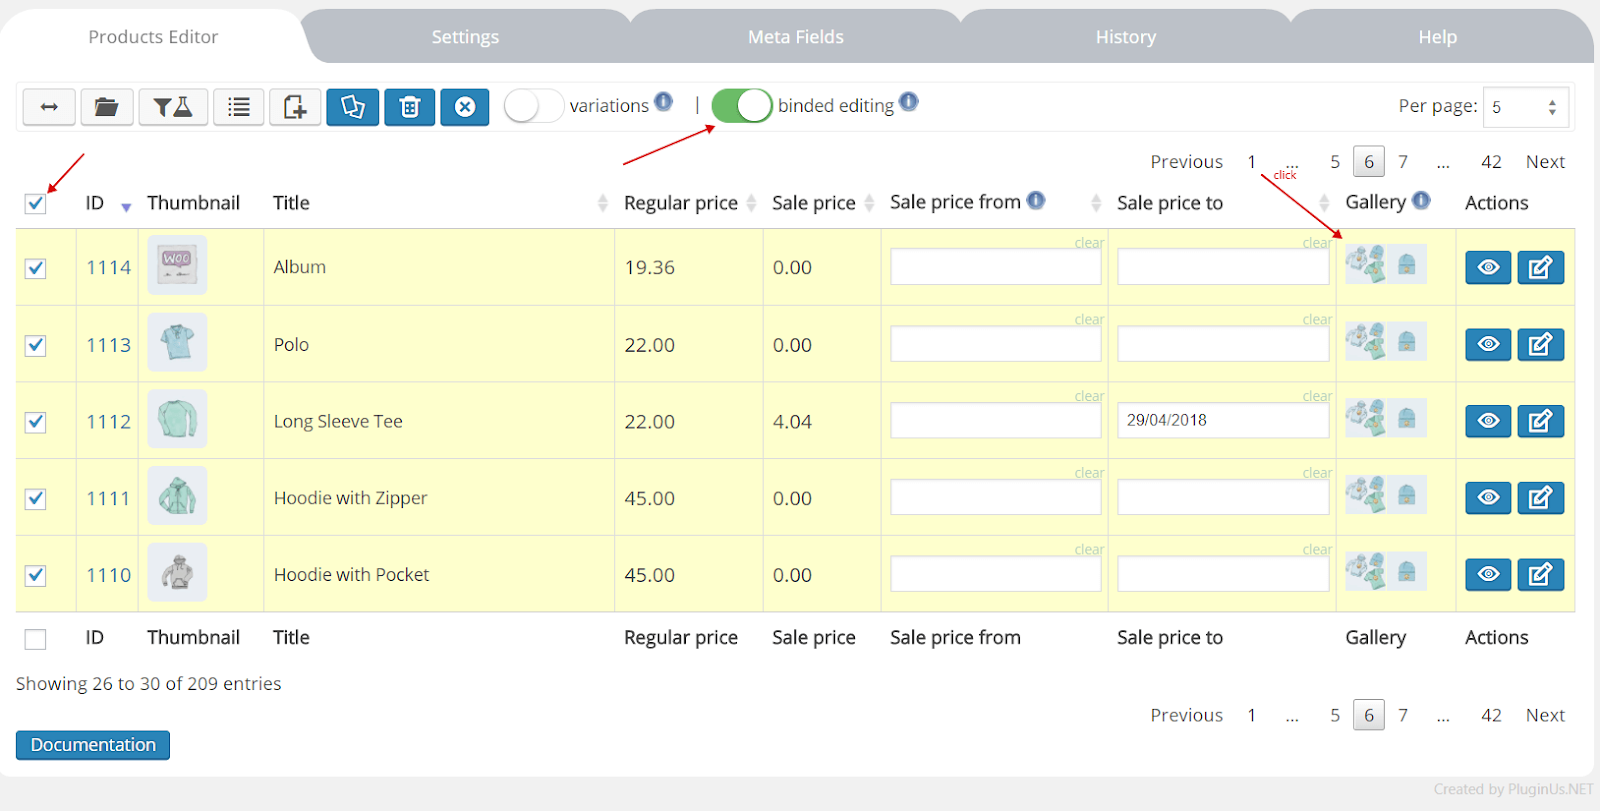


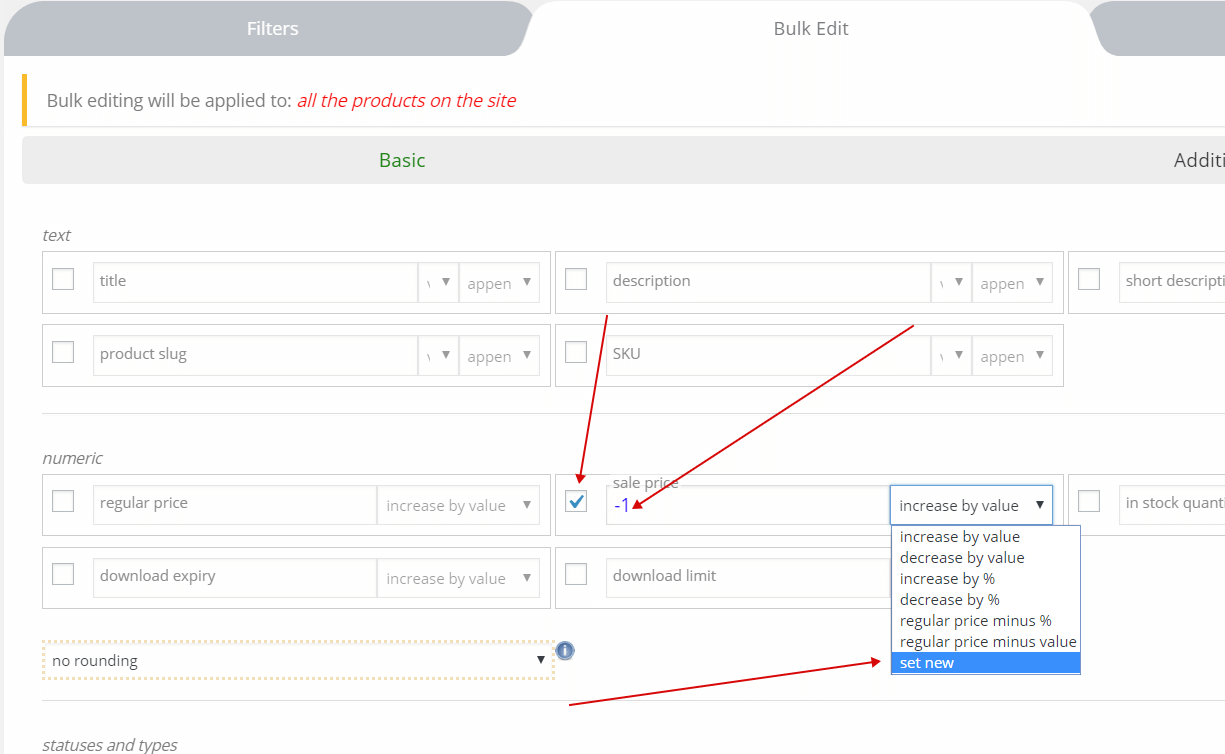


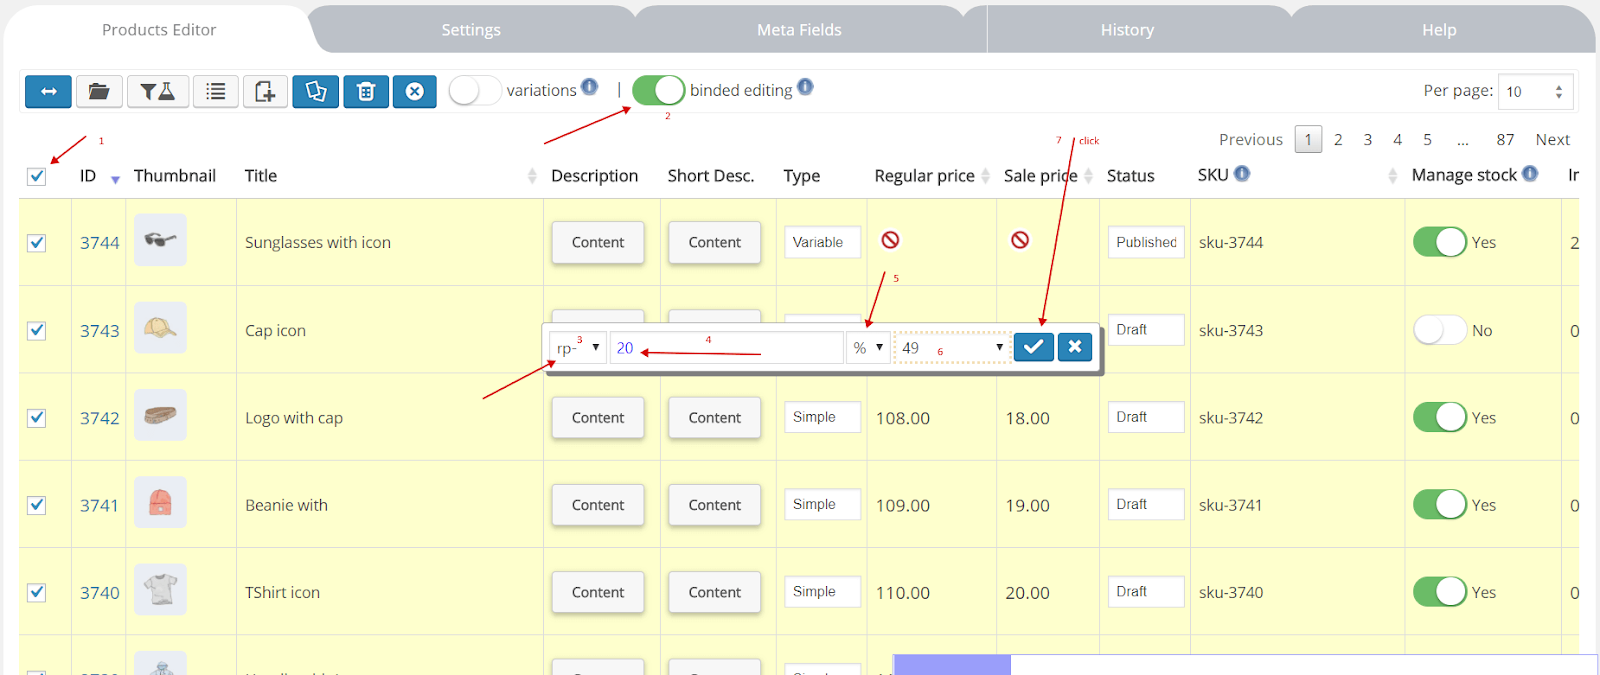


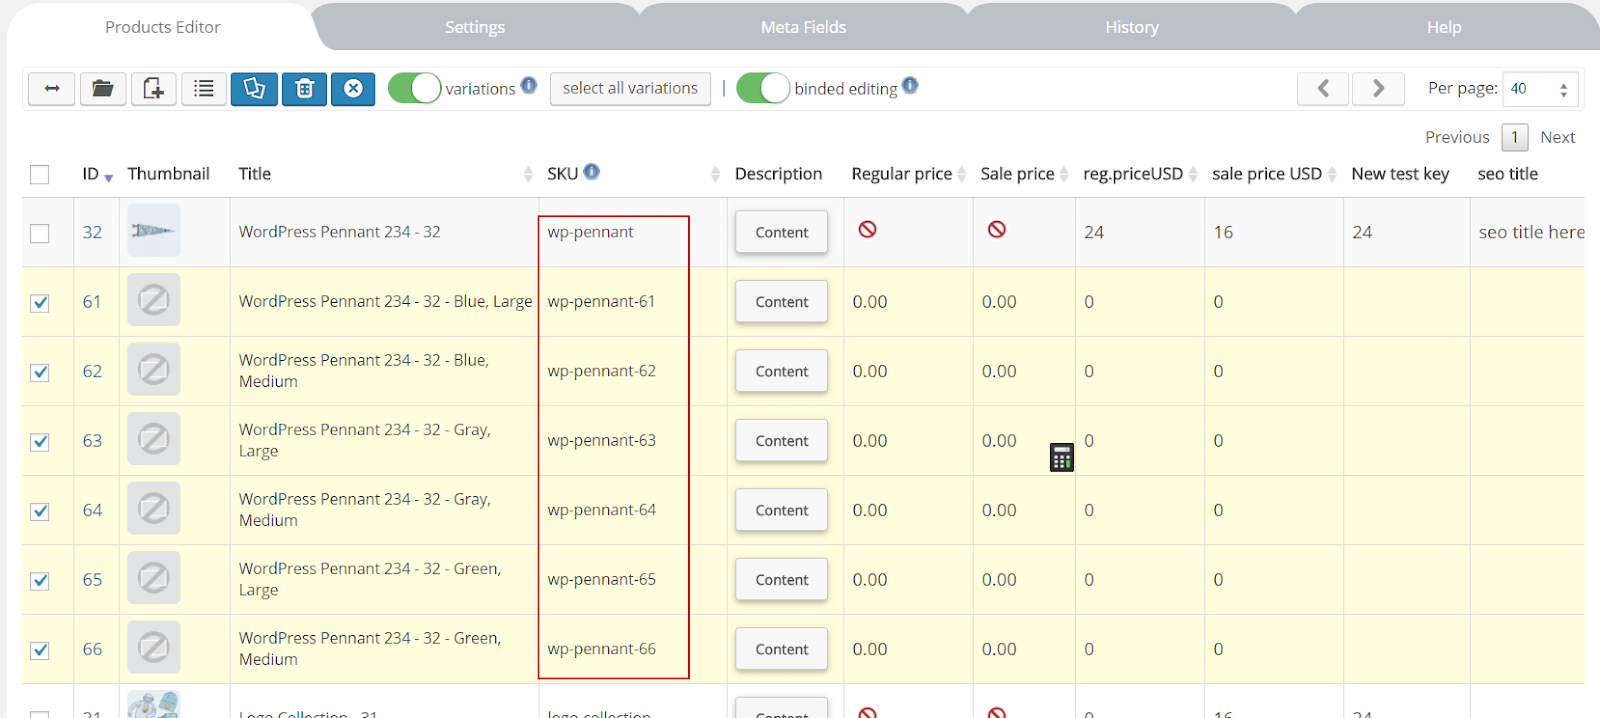

- Where can I get an X Signature Key?
You can get the X Signature Key at your Billplz Account Settings.
- Where can I get a Collection ID?
You can get the Collection ID at your Billplz >> Billing.
- Where can I get API Secret Key?
You can get the API Secret Key at your Billplz Account Settings.
- Where can I get an X Signature Key?
You can get the X Signature Key at your Billplz Account Settings.
- Where can I get a Collection ID?
You can get the Collection ID at your Billplz >> Billing.
- Where can I get API Secret Key?
You can get the API Secret Key at your Billplz Account Settings.
- Where can I get an X Signature Key?
You can get the X Signature Key at your Billplz Account Settings.
- Where can I get a Collection ID?
You can get the Collection ID at your Billplz >> Billing.
- Where can I get API Secret Key?
You can get the API Secret Key at your Billplz Account Settings.
- Can I use this plugin to ship to multiple addresses?
No, the Advanced Shipping Packages plugin is only meant for scenarios in which you need to split the shipping packages. For shipping to multiple addresses take a look at Shipping Multiple Addresses.
- What happens to products outside shipping packages setup?
All products are in one package by default. Once you’re creating shipping packages using the extension those product can be split up within those new packages. If a product is not in a new package, this will remain in the default package and will be handled the same.
- It can be set two currencies on the same time?
Into UAP system can be set one main Currency to manage the entire process. It can not be handled two currencies on the same time, payment gateways does not accept a such kind of workflow.
- I can not see the Login/Register forms
You may not see those forms if you are already Logged. As Admin you will see a warning message but regular users will see nothing.
Admin Info: Login Form is not showing up when you’re logged.Just logout or check the page into a new incognito browser window.
- Can not activate the License
If you’re not able to activate the license based on your <<Purchase Code>> check if cURL is enabled and properly set on your server. Also, be sure that your server is able to connect to other servers, such Envato API, and no denied permissions are provided.
- How to promote specific Products
This is what your Affiliates will do by going to their account page and generating a referrer code for your product. They can copy the Product link and generate an affiliate link via Account Page->Affiliate Links section. Then they will share this code on social networks, blogs, forums etc. and bring traffic to your website and product.
You could stimulate your affiliates by creating a good offer for a specific product so that they are more motivated and focused on that product. To learn more about offers read this article.
- Different time shows for Referrals
If different time shows up for referrals it means that the date of the server on which your website is installed on or/and the DataBase server is on a different Time Zone and needs to be changed. We recommend to get in touch with your hosting provider for a such change.
- Coupons does not work
This magic feature DOES NOT create new coupons. It simply assigns EXISTING coupons created in integrated systems (such UMP or WooCommerce) to an affiliate.
For more information read this article.
- Exclude specific products to provide Referrals
To exclude a specific product from providing referrals, follow these steps:
1. Create a new Offer
Go to UAP Dashboard -> Offers and create a new offer and in the offer amount set 0. Establish the date range to determine for how long it will be active, select the products and affiliates for which this offer is valid. If the offer amount is set to 0, this will override the usual amount they would make. For more information on offers read this article.
2. Change Used Referral Amount
Go to UAP Dashboard -> General Options -> General Settings and select LOWEST AMOUNT under the “Which Amount should be used for Referral?“. For more information about this, read this article. It is very important to set this up.
3. Empty Referrals (Optional)
Go to UAP Dashboard -> General Options -> General Settings and scroll down to Empty Referrals and disable it. This means it will not save all the payment information about referrals of 0$. Read this article for more information.
To sum this up, if for example you want to exclude “Product 01” from providing referrals to all of your affiliates, follow these steps: Create a new offer targeting all affiliates, for however long you want, select Product 01 and have it set to 0$. Then go to general options and select lowest amount and disable empty referrals.
- Can be affiliates charged during register step or periodically?
The short answer is no, because Ultimate Affiliate Pro is an affiliate system, in this type of system you pay your users for their hard work, you don’t charge them like on a membership system.
- What Campaigns is for?
The Campaigns is found on the frontend and it is used by your affiliates to better promote their strategy. As an admin you have little to no interaction with this feature, it is there to help your affiliates.
- How to exclude Shipping and Taxes from Referral calculation?
If you wish to exclude shipping and / or taxes from referral calculation simply head over to the UAP Dashboard -> General Options -> General Settings tab. Under Amount Value Settings you will find two buttons for Exclude Shipping and Exclude Tax.
- The registration doesnt work – Please complete all required fields
Be sure that other 3rd party plugins don’t affect the WP Register and Login process.
To see which plugins have been reported for affecting the WP and UMP workflow, read this article.
- How to disable “Bank Transfer” payout option?
To disable the Bank Transfer option, please go to the UAP Dashboard -> General Options -> Public Workflow tab. Here you will find the Disable Bank Transfer option, turn it on to disable it and click save to keep the changes.
- What “Empty Referrals” means?
Empty Referrals are referrals of 0$ for example. You have the option to save them, they will appear in the payments tab if so.
You can activate this option by going to the UAP Dashboard -> General Options -> General Settings tab.
- Automatically Affiliate option
You can activate this option by going to the UAP Dashboard -> General Options -> General Settings tab.
By activating this option all of your new users will automatically become affiliates.
- Which Amount should be used for Referral?
You can activate this option by going to the UAP Dashboard -> General Options -> General Settings tab.
This feature allows you to choose which amount is used if there are multiple ones set for the same action. A good example would be ranks & offers, your rank could give you 20% but the current offer gives you 50%. If you select the Biggest Amount, then the offer will be in effect since 50% > 20%, but if the Lowest Amount is selected, then it will remain at 20% despite the existing offer.
- I need some style Customization
For each showcase (Login form, Register Form, Account Page) there are some predefined templates that come with the installation of the UAP plugin. If you want to change them you can do so by using the Custom CSS box found in each showcase section.
There you can write your desired CSS code that will change the way each showcase will look like on the front-end side.
Some minimum CSS Knowledge will be required. Some tips and tricks can be found here.
The main steps are:
- Identify the CSS class of the html element that you want to customize. More about that can be found here.
- Go to the showcase page from the UMP dashboard and identify the Custom CSS box.
- Type your custom css code for that specific CSS Class using !important; after each one.
- Save and clear your cache system.
- How to identify the showcases structure
If you need to identify the register, login or account page structure for a custom CSS requirement, you can do that by using the available tools of your browser.
Firefox
- We recommend installing the free Firebug developer extension for Firefox. Download the extension and follow the installation instructions. You can find it here.
- Once installed, click on the Firebug icon in your Firefox browser menu, or go to Tools in the top menu bar and select Web Developer -> Firebug and click Open Firebug.
- Visit your showcase pages.
- Right click on the desired element and select Inspect Element with FireBug.
- Click on the HTML tab and check the right-side tab where Style is provided.
Chrome
- Visit your showcase pages.
- Go to the View menu in the top menu bar and scroll down to the Developer option.
- Click on Developer Tools.
- Right click on the desired element and select Inspect.
- Click on the Elements tab and check the right-side tab where Style is provided.
Once you’ve identified the HTML and CSS structure for your element, you can further use it for other customisations and configurations.
- Payout process
Go to UAP Dashboard -> Payments tab to see all of the payments.
To make a payment go to the All UnPaid Referrals sub-tab and select which referrals will be paid. After selecting the referrals click on the Pay selected Referrals button.
Next you will have to choose the payment method, please note that Bank Transfer is an offline alternative payment. Once everything is set, simply click on the Submit button.
Note: If your Stripe or PayPal settings are not correctly set up your payments can end up in the pending or fail state since they can not be processed. - How a logged user can become an Affiliate?
Your users can become an Affiliate in two different ways. If they are logged on your website you can have a page set up with the following shortcode . This will create a button as seen in the picture below. All they have to do is click this button and they will become an affiliate.
You can also go to the Users tab from WordPress, locate a specific user and edit. If you scroll down near the end you will see a button to turn this user into an affiliate, see the picture below for reference.
- Offers
You can create special Offers for certain products, these offers will override the rank amount of your affiliates. This means that through an offer your affiliates can earn more or less than their default amount based on how you set up the offer.
To create an offer, go to UAP Dashboard -> Offers and click on the add new button.
You can activate or deactivate it without needing to delete it. Name your offer and then set an Offer Amount which will replace the standard rank amount. Set up a date range by clicking on the field and then selecting the date.
Targeting
In this section you can choose the Source from which you will search for Products. For example if you choose Ultimate Membership Pro as a source, you can find all the UMP related products by typing in the name inside the product field. You can select more than one product here. Next you can choose to provide this offer for All of your affiliates by typing this inside the username field or selecting specific affiliates. Just like the product field, you can select more than one affiliate.
Once you are done simply click save.
Important
Depending on your offer your users can earn more or less than their usual standard rank amount. In order for this to work please go to UAP Dashboard -> General Options -> General Settings. Here you will see “Which Amount should be used for Referral?”, make sure that you select Biggest Amount if your users would earn more with the offer or Lowest Amount if they would earn less. Make sure to click the save button!
- Landing Commissions
You can create a landing commission which you can attach to any successful page (ex: Thank You Register page). When a user reaches this page, the affiliate will receive a certain commission based on the generated referral.
To create one, go to UAP Dashboard -> Landing Commissions and click on the add new button.
You can activate or deactivate it without needing to delete it. You must also provide a unique slug for your landing commission. Next you will have to enter a landing commission price based on which the referral amount will be calculated depending on the affiliate rank amount.
You can set the referral default status to verified or unverified, a referral description and the cookie expire time. When done click the save button and a new card will appear under the add new button. Copy the shortcode and use it on a successful page.
Example: You need to get users to fill in a short survey, after they submit their answers you can redirect them to a Thank You page and have the shortcode used here. If affiliate John redirects users to this survey, he will receive referral only for the users that finish the survey, because they land on the Thank You page.
- MLM Workflow Example
For a better understanding of how the MLM system works and provides rewards to affiliates, a common scenario is listed below:
MLM Settings
Matrix Depth(Levels) : 3
Amount For Each Level
- Level 1: 20%
- Level 2: 10%
- Level 3: 5%
John MLM Matrix sub-affiliates:
- Geo – Level 1
- Bob – Level 2
- Max – Level 3
Actions:
Max has Rank “Premium” with Amount: %25
Max refers a user that purchases a product of: $400
Rank Reward:
Max gets a referral of: $100
MLM Rewards:
- Bob gets: $20 (20% of $100)
- Geo gets: $10 (10% of $100)
- John gets: $5 (5% of $100)
- It is possible to Import users or other options into the Plugin?
If you want to import data from one website to another, there is no dedicated option available in UAP.
A solution may be to use one of the default import solutions provided by WordPress: WordPress Importer.
If you want to import users from a different affiliate system to UAP, you can do so if those users are WP users. UAP is linked to WP and any user that is added as a WP user will show up in the UAP system.
- Can I set multiple Register forms?
Register Form is a complex and important module from UAP which is strongly linked to other modules such as Notifications, Ranks, Conditional Logic fields, Subscription, WP Roles, etc.
In this case, only one main register form can be set.
- Already set Pages like Login,Register, Lost Password doesn’t work
If the main pages that were assigned as Affiliate Pages are not working as you expected, first check if those were set properly.
You can learn more about setting those pages by reading this article.
Those pages may show up differently or not at all, even if you have set common slugs such as: login/, lost-password/, register/. In this case, WordPress may require an update on permalinks.
To avoid interacting with other scripts, we recommend that you set custom slugs for those pages (my-lost-password, uap-login, register-page, etc).
- The registration doesnt work – Please complete all required fields
Be sure that other 3rd party plugins don’t affect the WP Register and Login process.
To see which plugins have been reported for affecting the WP and UAP workflow, read this article.
- Avatar is working properly but the standard user image/avatar is not replaced
The Avatar feature is custom built in UAP, and it only works inside the system. It is not meant to replace the standard Profile image or Gravatar which are displayed on other pages.
- The OptIn Subscription are not stored
New subscriber emails can be sent to an external email platform for follow-up on newsletter campaigns. If your subscribers are not stored in your list, this may be caused by a few things:
- Double-check your Opt-In credentials for the desired email platform destination (UAP Dashboard -> Magic Features -> Opt-in Settings).
- Check your destination list for restricted conditions, such as required fields (should be off).
- Check your destination list for a double opt-in requirement (should be off).
- Check if the Opt-In Subscription is enabled and properly set in the Register Form settings.
We recommend that you first try to create a fresh new list on the email platform of your choice, but with no additional options attached.
- The Upload file button on Register form is not working
If the upload file button on the Register form or the Avatar buttons don’t work, make sure that the jQuery library has not been altered or customized by 3rd party scripts installed in your WordPress environment (such as plugins or WP Themes).
Try checking the upload file button after deactivating the other plugins, or after changing the current WP Theme.
- Change reCaptcha language
Change reCaptcha language
- Created March 28, 2016
- Author WPIndeed
- Category Frequently Asked
The default language for reCaptcha script is English.
You can change that from Uap_Add_Edit_Affiliate.class.php file on line 674
- Error 500 Internal Server Error is showing up
Internal server errors are not specific to WordPress, they can also happen as a result of anything else running on your server as well.
500 Internal Server is an error from server side.
An internal server error is very generic, therefore it does not tell the developer anything. It does not specify the cause of the error or where the problem is.
Increase the PHP Memory Limit
Sometimes this error can show up if you are exhausting your PHP memory limit. Ask your hosting provider about your server settings and limitations. There may be a very small limit set there and any script that needs to process bigger jobs will be stopped.
Check Server Permissions
On some servers based on firewall conditions, or other restrictions, certain files (from subfolders, or with specific names) are restricted from being accessed via browser. Ask your hosting provider what error was stored in the server logs behind the generic “500 Server Error”.
- I can not activate the Plugin
The plugin is activated based on the purchase code verification, which is done directly on the Envato server.
It is possible that the Envato API is down, if that is the case, try to check again a little bit later.
If it’s still not working, please check on your server/website if the cURL option is enabled in your PHP settings.
Even with cURL enabled, based on security settings your server may refuse to send or receive data from the Envato server.
You can ask your hosting provider about it.
cURL is the only professional way that two servers connect to get data from one place to another.
- Native Fields can not be edited. I want to change the Label
The native WordPress fields (Username, Email, First Name, Last Name, Password, Confirm Password, etc.) can’t be edited or deleted. If you want to change the labels for those fields, you can do so by using the translation file.
The Ultimate Affiliate Pro plugin is translation ready, meaning you can add an additional language file (even English) to your language set on WP.
All the text elements that are not available to be managed from within the UAP Dashboard (native fields labels, buttons, etc), can be handled via the Translation file, the plugin being fully translation ready.
For English – uap-en_EN.mo & uap-en_EN.po
- Some words/texts needs to be changed. How to?
All the texts that can not be changed from the UAP Dashboard (native field labels, buttons, etc) can be modified through the translation file.
You can add an additional language file (even English) to your language set on WP.
For English: uap-en_EN.mo & uap-en_EN.po
- How can I translate the Plugin?
The Ultimate Affiliate Pro plugin is translation ready.
You can add an additional language file for your language set on WP.
Make sure that the plugin folder of the translation target is on your local machine before starting the translation.
Copy and rename the file with the relevant WordPress locale. For example, if you want to translate the file to French, rename the file to fr_FR.po. In the case of a plugin, rename it to uap-fr_FR.po, where uap is the name of the text domain that the plugin loads.
For French: uap-fr_FR.mo & uap-fr_FR.po
You can use the free PoEdit app to create and manage language files based on the default files available from the Ultimate Affiliate Pro plugin.
- Open the po translation file in Poedit, click update to update the translationsource.
- Open the catalog properties from Catalog > Properties and select the language,press ok.
- Now you can go through the source text and enter your translations.
- Click validate then save the translations, the po file will be updated and an mo filewill be generated.
- Upload the new or updated language files to your WordPress installation folder ultimate-affiliate-pro/languages/.
- Set your WordPress language by using a plugin such as WordPress localize, WPML, or manually update the WP_LANG constant in your WordPress config.php file.
There are many guides on how to add a new translation file to any WP Plugin or Theme:
https://make.wordpress.org/polyglots/handbook/
http://wordpress.stackexchange.com/questions/57219/how-to-translate-a-plugin-via-po-mo
If an important update was released and texts were added, you will need to update your language file.
The plugin’s custom name used in the translation file name is: uap
- A New version was released, how to Update the Plugin?
The safest way to update the plugin to a new version is via FTP Upload. Download the latest version, unzip the file and copy the folder to your website wp-content/plugins/ overwriting the current plugin folder.
Important features and fixes are released with each update. If your plugin version is very old, make sure to keep a back-up of your current version before updating to the latest plugin version.
- Parse error: syntax error, unexpected T_STRING
If you encounter any syntax errors while you are trying to install the plugin, it’s most probably that the PHP version installed on your server is a very old one. The current available PHP version is v.7.x, but for a proper workflow a PHP version starting with 5.3 is required.
Example of error:
Parse error: syntax error, unexpected T_STRING in /home/public_html/xxxx/wp-content/plugins/………/ on line
Contact your hosting provider and request a PHP update.
- Known Compatibility Issues
If you have installed our plugin and it’s not behaving as expected, this can be due to a number of reasons including some known compatibility issues with third party plugins.
To help troubleshoot, we recommend taking the following steps:
- Deactivate Jetpack as it may cause some issues.
- Deactivate any third party login plugin where the captcha functionality may cause conflicts.
- Deactivate any other third party plugins, not specifically advertised as compatible¹.
- A2 Optimized WP doesn’t let you login using the front-end form.
If you’re still experiencing any issues after attempting all of the above, please get in touch with us so we can look into it.
Due to the incredibly large offering of WordPress plugins, it’s nearly impossible to guarantee compatibility with all of them. That being said, we haven’t received many reports about compatibility issues.
Customers have also reported the following free plugins that have affected the UMP workflow: Bakery Custom Post Types, Contact Form 7 – Stripe Extension, WP Maintenance.
- Notifications do not work, please help!
The plugin comes with a few example notifications, but due to the vast number of different scenarios it was impossible to include them all by default.
We recommend creating notifications catered to your specific needs by using one of the examples as a template.
If your notifications are not sent, first check if your WordPress environment and your server are able to send emails. Notifications module is based on the standard WP function: wp_mail().
You should first check if your notifications are active and properly set.
In some cases the SMTP mail server refuses to send some emails based on destination or email content. Check if your SMTP mail server has no additional filters or restrictions, such as special links inside or long words.
- Where can I get an X Signature Key?
You can get the X Signature Key at your Billplz Account Settings.
- Where can I get a Collection ID?
You can get the Collection ID at your Billplz >> Billing.
- Where can I get API Secret Key?
You can get the API Secret Key at your Billplz Account Settings.
- Where can I get an X Signature Key?
You can get the X Signature Key at your Billplz Account Settings.
- Where can I get a Collection ID?
You can get the Collection ID at your Billplz >> Billing.
- Where can I get API Secret Key?
You can get the API Secret Key at your Billplz Account Settings.
- Where can I get an X Signature Key?
You can get the X Signature Key at your Billplz Account Settings.
- Where can I get a Collection ID?
You can get the Collection ID at your Billplz >> Billing.
- Where can I get API Secret Key?
You can get the API Secret Key at your Billplz Account Settings.
- Where can I get an X Signature Key?
You can get the X Signature Key at your Billplz Account Settings.
- Where can I get a Collection ID?
You can get the Collection ID at your Billplz >> Billing.
- Where can I get API Secret Key?
You can get the API Secret Key at your Billplz Account Settings.
- Bulk Remove Sale Dates
This operation is possible with enabled “binded editing” mode only, where products should be selected by checkboxes:
If necessary make filtration by your logicSet pagination value to the max necessarySelect products using checkboxes (press SHIFT keyboard to select from first to last)Enable binded editing modeClick ‘Clear’ button on any selected productWait until operation finished - Can I bulk increase multiplying product prices like ‘price x 2’ instead of by percentage?
Yes, but you will need to use percentage anyway, apply 200% in this case!
- Can I copy products title into slug field using bulk edit?
Yes! Use variable {TITLE} in the bulk editing form.
Hint: if clear the slug cell it will re-generated the slug using product title string!
- Change products price value for 15% in regular price
Yes! It is possible to manipulate with regular prices of Syspro E-Commerce products, and change products price value related to their current value.
Select products using checkboxes or filter them by any parameters you need
Open Bulk Editor form
Find field ‘regular price’ and check it by checkbox near
Enter 15 in the textinput and in the drop-down near it select ‘increase by %’
Click on ‘Do Bulk Edit’ and wait while the operation finish
- How to add to existing gallery 2 new images using bulk edit?
Task: 370 products with defined set of gallery images in each product. How to add 2 more images?
Enable column ‘Gallery’ in the tab Settings and press Save button thereBy Filters select the products by categories or other parametersOpen Bulk Edit tab -> tab AdditionalFind and enable there button ‘Images’Using button in the opened popup window add image(s) you want to add to the selected productsIn the drop-down select: ‘Add selected images to the products in the popup to the already existed ones’Press ‘Apply’ buttonPress ‘Do Bulk Edit’ and wait until operation finishedThe same algorithm works for images deleting.
Note: steps above are actual for the operations ‘add’ and ‘delete’ in: ‘Download files’, ‘Cross-sells’, ‘Up-sells’, ‘Grouped products’ - How to add Syspro E-Commerce products custom taxonomies
Custom taxonomies allows you to create such notions for your products as locations for example.
- How to detach completely an attribute from the product?
For example you decided to detach completely attribute Material from the variable products. Do next steps:
Using the functionality of the tab ‘Filters’ make filtering of the products by type: ‘Variable’ and also if necessary you can filter by more parametersIf you need to change only some products you can select them using checkboxes in the Products Editor or skip this step. Also you should know that you can do this operation without any filtering using product selection by checkboxes only.Go to tab ‘Bulk Edit’ and enable there in section taxonomies attribute ‘Product Material’Do not select any terms in the drop-down for the ‘materials’ there but select behavior in the near drop-down: ‘replace’Click on ‘Do Bulk Edit’ and wait until operation is finishedIf you want you can rollback changes in the tab History - How to edit product variations using bulk?
Using tab Filters filter all products by product type – variableIf you have a lot of variations per product (>10) set products per page no more than 5 to avoid server 500 error. And it is better to activate columns only which you need for your current bulk operation.On tools panel activate switcher ‘variations’Now if you open tab Bulk Edit all visible fields will be able to edit “products variations” only, ignoring their parent-products
- How to filter Syspro E-Commerce products by attachment of taxonomies/attributes to them
For such filtration there is no necessary select terms as it filters by taxonomy/attribute attachment to the product generally, and not for terms.
- How to order product variations using bulk?
Its possible using ‘Ordering’ tab of Variations Advanced Bulk Operations
- How to remove all products variations at all?
If you need to remove all products variations from all variables products of your shop:
In the Filter select product type ‘variable’ and filter by itAfter filtering on the tools panel click on button ‘Variations Advanced Bulk Operations’There go to tab Deleting and select ‘Delete all products variations’Click on ‘Start deleting’ button and wait until deleting finishedIf you need to delete the product variations from the products of any product category – in the tab Filter also select the category (or their combination) you need!
Also if there are only some products which you can see on one page – do not use Filtering – select variables-products using checkbox and do the same another described above. - How to remove images from the gallery of some products?
Two ways about how to clean the gallery of some products, and for this operation column ‘Gallery’ should be activated!
Way 1:Use checkboxes to select some productsEnable ‘binded editing’ switcherClick on Gallery button of any selected productIn the opened popup remove all images and press ‘Apply’ buttonWait until changes apply to all other selected productsWay 2:Use the Filter tab functionality where you should filter products by parameters you needThen go to tab Bulk Edit -> AdditionalSelect using checkbox Gallery fieldClick on Images button there and remove all images there if presented, or/and press ‘Apply’ buttonClick on ‘Do Bulk Edit’ button and wait until bulk operation for filtered products appliesOf course using way 2 it is possible to clean galleries of all products in the shop if to miss step one there (filtering) - How to remove sale prices by bulk operation
Do filtration or selection of the products if it necessary, then go to tab Bulk Edit, find field ‘Sale price’ and set there ‘-1’ and select operation ‘set new’
- How to remove selected downloads?
If you want to delete file from the products downloads use that file link with the next algorithm:
Select by checkboxes or/and make filtering of products from which you want to delete that download link(s)Go to Bulk Edit tab -> tab Advanced -> select ‘Downloads’ and open its popup thereSelect in the drop-down there option ‘Remove selected downloads’Press button ‘Add File’ and set files you want to deletePress ‘Apply’ button on popupClick on ‘Do Bulk Edit’ button and wait until operation finished - How to reset page cache in the browser
press CTRL+R
CTRL+F5
Ctrl+Shift+R
Apple + R or command + R (apple)
in Chrome browser the best way is:
Open the developer tools: Ctrl + Shift + I
Now, leaving the panel open, left click on the “Update” button (next to the address line) and do not release the button.
After a few seconds, you will see a drop-down menu in which there will be an item: Clearing the cache and hardware reboot.
- How to set different prices to the different variations? I need a different price for each size
Example of the task: user has products like posters with foreground color, background color and poster size. Colors here no matter, matters only size which makes the price. So we have: poster 10×12 for RM10, 15×20 for RM14, etc … How to set the price using bulk editing for each such product variation?
Answer:
Using tab Filters – filter “variable products” with category posters if such one existsIf you have about 50 variations per product set products per page 5 to avoid memory fail on the server side. In such cases better activate columns which you need for current operation only!On tools panel enable ‘variations’ switcherOpen tab “Bulk Edit” and select there attributes combination(s) you wantSet regular price value (and/or sale price value if you need)Click ‘Do Bulk Edit’ buttonWait until the operation finished - How to set sale prices lower than regular for 20%?
There is 2 ways: use binded editing or Bulk Editing.
First way:This way is good when you can do it for some products or variations on the same one page in the Products EditorSelect some productsEnable ‘binded editing’ switcherHover on any selected product sell price cell and click on calculator iconIn calculator select: rp- and in the text field there enter 20, and in the last drop-down select percentsSelect prices rounding if you need itClick on blue accept button on the calculator and wait until this bulk operation is finishedIf you did smth wrong you can roll back this operation in the tab History
Second way:In this way you can apply changes to all products on the site or to the filtered ones by your logic.So make products filtering by category or categories, or/and any other parameters if you need itGo to tab Bulk Edit and select field ‘Sale price’ thereEnter 20 in the textinputIn the drop-down select ‘regular price minus value’Click on ‘Do Bulk Edit’ button and wait until operation is finished - How to set the same value for some products on the same time
Binded editing feature will help:
Select first product you need using checkbox in the most left columnPress SHIFT button on your keyboard and without releasing it click on the last (last by your logic) product checkboxOn the tools panel enable ‘binded editing’Enter any value to any field of any selected product you needWait until operation is finishedHint: really this operation is bulk editing, so you can cancel it in tab Bulk Edit and then roll back it in tab History - How to swap one attribute to another without product variation deleting?
Task: I have 3000 variable products in the shop and I want to search attributes and set new attributes instead. For example items marked with the color attribute ‘Brown’ are searched and changed to ‘Red’ without data deletion – Brown should be replaced by Red and nothing more should be changed!
Yes, it is possible with tab Swap in Variations Advanced Bulk Operations
- How to toggle variations to be “enabled” or “disabled”
If you need to disable any variation(s) in variables products you can do next:
In the Filter select product type ‘variable’ and click on ‘Filter’ buttonOn tools panel enable switcher ‘variations’Now you can select (using checkbox in the first column) product variations which you want to disable OR if you have a lot of such variations in tab Bulk Edit check post status and select ‘Private’. Of course if that variation belongs to the products which belong to any category or any other attributes you can continue with filtering of variable products to avoid looking them in all variable products in the shop – so if you can use Filter for targeting – use Filter.Now main thing: select on the top of tab “Bulk Edit” all combinations of variations you want to disable using button ‘Add attributes combination to apply on’: select attributes you need and then if you going to disable 2 combinations click on that button 2 times, and in generated drop-downs below set combinations.After checking twice that you did all right click on ‘Do Bulk Edit’ and wait while operation will be finished
If you decided that you did something wrong – you can roll-back operation in tab History - How to work with the products which have a sale price?
I need to see and work with the products which have sale prices.
Using Filters find all products where the sale price greater than 1. - Is it possible to add new attribute terms in the existing attributes using bulk?
Yes! You can apply operation ‘Attaching’ using Variations Advanced Bulk Operations
- Is there a way to limit the role of Shop Manager?
Task: I want the Shop Manager to be able to update the prices and stock quantity only and nothing else.
Yes, you can, in tab Settings click columns you need using checkbox ‘visible for shop manager’ - Is there any way to add SKUs with variations?
Syspro E-Commerce Bulk Editor allows adding SKU to products variations of variable products.
For example, the main product with 10 variations – the main product SKU is wp-pennant and I would like to be able to add variations 1-10 like: wp-pennant-1, wp-pennant-2, wp-pennant-3, etc.
Nearly Yes. Instead of -1,-2,-3 can be applied variation ID or its menu order (but it is not the best idea as menu order is will be recounted after adding new variation), so it is possible to get such results as: wp-pennant-256, wp-pennant-475, wp-pennant-12
In the Products Editor enable variations switcherNow you can use bind editing OR bulk editing (see the screens)For both ways use syntax: {PARENT_SKU}-{ID} OR apply {PARENT_SKU}-{MENU_ORDER}Read more about variables here. - Is there any way to edit products together with my team at the same time?
Yes! Different users can edit products together at the same time using Syspro E-Commerce Products Editor not interfering with each other as each user has its own options in the add-on system.
Even more: site admin can allow or not allow to the “shop Managers” which products fields they can use in the tab Settings:
- What is meant by Cart Abandonment?
While shopping, a user adds products to the cart. But if this user doesn’t complete the purchase on the checkout page, the cart is considered abandoned.
- How often carts get Abandoned? Is it Happening in My Shop?
According to research, 6 out of 10 visitors, leave the checkout page and do not complete the purchase. Even if you have motivated enough, 20% to 25% of the shoppers leave the purchase process.
- Do I Need Any Technical Experience to Use This Add-on?
Any E-Commerce shop owner selling anything online can use this add-on. You will not need any technical experience to start recovering your lost revenue. Once initiated the add-on will work automatically for you.
- Can I Send Coupons with Follow up Email?
Yes. You can generate and send unique, limited-time discount coupons. Though there is no compulsion of sending coupons. It’s completely optional.
- Can I Directly Take Users to Checkout Page, Exactly Where They Left Off?
Absolutely. A unique checkout link can be sent with a follow up email. This will take the shopper to their prefilled checkout page. This will make the purchase process easier for the shopper.
- Will This Add-on Add Any Extra Time in Website Loading?
Not at all. All the add-on data is stored in its own database table. It is a completely self-hosted add-on. It works smoothly and does not leave any impact on the performance of the website. So you don’t have to worry about the speed.
- Where can I get an X Signature Key?
You can get the X Signature Key at your Billplz Account Settings.
- Where can I get a Collection ID?
You can get the Collection ID at your Billplz >> Billing.
- Where can I get API Secret Key?
You can get the API Secret Key at your Billplz Account Settings.
- I already have a website. Can I exchange with another website?
Existing websites can be exchanged with our more complete web package. Your old customer data can be imported into a new website. If you want to improve web graphics, you can contact us. Our team will arrange for you.
- In what language is my website?
You can choose one language either Malay or English. If you want to be bilingual, contact our team. Our team will arrange for you.
- What is a blog?
A blog is a space where you can write any articles and shares related to your product or service. This blog is important for SEO where outsiders can find your blog by typing keywords in your article.
- Will the report be prepared?
Yes we will provide after your website is ready. We also provide a training manual where we teach you how to update the website, download images to the gallery and else.
- What is an SSL Certificate?
- SSL certificate means Secure Sockets Layer for HTTPS abbreviation. Usually SSL will have a lock symbol on the URL. SSL is a standard security technology for setting up encrypted links between servers and clients such as web servers (websites) and browsers. SSL is an industry standard and is used by millions of websites in protecting their online transactions with their customers.
- Another meaning of SSL is the most widely used security protocol on websites today. It is basically a protocol that provides a secure connection (secure connection) between two machines operating through the internet or internal network.
- How do I upgrade the package later?
You can upgrade the package in the future by just contacting our team. We will discuss the budget and more information for the next package.
- What is Google Analytics?
Google Analytics is your visitor statistics so you can see the performance of your website and you can monitor the behavior of your customers. Also, you can plan a structured strategy for your business.
- How are photo albums managed?
Photo album according to the info you gave us and you can load as much as you want. Just leave it to us.
- Can a website increase the credibility of my business?
Yes, that is correct.
- The website provides your business identity and is a virtual proof that it exists.
- Users believe that having a website makes your business more reliable than just social media sites.
- Website is able to convey information quickly to visitors.
- Why do I need a website if I already have a Facebook?
Your business can be known by Google compared to Facebook. Facebook has a lot of competitors and not everyone will see and read your posts on Facebook. Unlike a website, other than you can change the layout, color, font that suits your taste, your business will also look more professional.
- Is this website the same as the landing page?
Website and landing page are not same. Website is more suitable for the whole company profile and landing page is more suitable for promoting ads about a single product. If you want to make a landing page, you can contact our team.
- Can a beautiful website increases sales?
Yes, a beautiful and a complete website can make customers like your service.
- Is it difficult to manage your own website?
Not difficult. You just need to know some info to make your website constantly updated or you can contact our team to manage your website.
- How do I update my own website?
We will provide manual and video training to make it easier for you to refer on how to update the website such as inserting pictures in the album. If you want us to manage your website, contact our team.
- Is the website built responsive on the phone?
Each website we build, will be adapted to 4 types of devices and screen resolutions, namely tablets, desktops, large screens, and small screens. Fonts and graphics will be adjusted according to the suitability of the device so that it is easy to access.
- How can visitors contact me?
We will put your address, as well as your phone number on the Contact Us page. You can share your website with your friends other contacts.
- What about customer database affairs?
The website we build can manage your customer database such as data storage to make it easier to monitor your customers and your customer contact details. That way, it will be easier for you to contact them.
- What is SEO?
SEO is an organic (unpaid) marketing tactic that can help in improving the ranking of your website in the search engine that is Google for search related to your business, helping to increase traffic and increase sales success rate. Your website will be exposed to the public naturally and you will no longer need to advertise your business.
- What is Payment Gateway?
Payment gateway is replaced by automatic transfer method where you no longer need to send manual slip and further facilitate business transactions. We support every bank of choice in Malaysia including cards and credit cards.
- What is a Server?
Hosting to store all web files and images and can operate 24 hours a day serving your web visitors.
- What is a Domain Name?
Domain name is the address of your website either Syarikatanda.com or Syarikatanda.my registered in your store name.
- Will it slow down my website?
Syspro Website Multilingual will have little impact on your site speed.
- What types of content can I translate?
Syspro Website Multilingual add-on works out of the box with website, custom post types, complex themes and site builders, so you’ll be able to translate any type of content.
- How do I start to translate my website?
After installing the add-on, select your secondary language and click “Translate Site” to start translating your entire site exactly as it looks in the front-end.
- Can you translate your E-Commerce store?
Yes, Syspro Website Multilingual works out of the box with E-Commerce. You can use it to build a multilingual E-Commerce store.
- Where are my translations stored?
All the translations are stored locally in your server’s database.
- What happens after my licence expires ?
When your licence expires the plugin will still continue to work as configured. However, you will lose access to updates and premium support. This includes new features, bug fixes, and full compatibility with the latest versions of WordPress and WooCommerce.
- Does TranslatePress work on WordPress Multisite?
Yes, TranslatePress works on multisite as well. You can either network activate the plugin, or do it individually for each sub-site.
It works to add languages on individual sub-sites in a network install (and choose the languages in which you translate each sub-site).It will NOT work to have each sub-site as a secondary language.
Note: The license key of the premium product needs to be added in the Main site -> Settings -> TranslatePress, not in the Network Dashboard.
- How can I translate an email that I customize in my Dashboard ?
This can be achieved using the Conditional Shortcode Based on Language.
You wrap the content for every language using the right shortcode and only the correct part will be emailed to the user.
Ex.
This content will be sent only to English users. - How can I make TranslatePress not process a custom URL ?
When the Force Language in Custom Links option is set to Yes, any custom link that you add to your website will get processed by TranslatePress to add the language to it.
If you want TP to ignore an URL, you can append this hash to it: #TRPLINKPROCESSED
Example: Let’s say the URL we want to be ignored is this one:
https://mysite.com/ignored-url
To make this work we add the hash from above so the link we will insert is:
- How do I change the Default Language ?
You might want to make the language you translated your website into the first one.
To do this, go to Settings -> TranslatePress and set the Use subdirectory for default language option to Yes. Then, using drag and drop, drag the language you want to be the default one to the top.
A better way of handling this is to use the Automatic Detection of User Language add-on. This will redirect the user to the correct language based on his IP or browser settings.
Ex.
- How do I add a dropdown language selector to my menu ?
When you’re adding or modifying a menu and TranslatePress is active, you’ll find the defined languages under the Language Switcher tab. You can use these elements to create the dropdown menu, exactly as you would create any other dropdown menu on your website.
Ex:
- My Google Translation API key doesn’t work
If you’re having trouble with your Google API key, please make sure that you followed correctly our guide for generating it.
Be extra careful at Step 4 since this is the cause of issues most of the time.
- Is the DeepL API free ?
No, the package that contains API access is listed and can be purchased for 4.99€ + usage fees.
More information about the DeepL API package can be found here: https://www.deepl.com/pro.html#developer.
- Is the Google Translation API free ?
No, the Google Translation API is not free, they charge 20$ per million characters that you translate. You can read more about this here.
However, Google is offering a Free Trial option that gives you access to 300$ over 12 months that can be used towards the Google Translation API. This means that you can use it for free, within this limit, because TranslatePress is storing the translations locally. The data is retrieved from Google only once, then it’s being served from your own database.
To access this trial, you can follow this link: https://console.cloud.google.com/freetrial
- How can I show different versions of a video based on the current language ?
This can be achieved using the Conditional Shortcode Based on Language.
You add both versions of the video to the content and wrap them up with the shortcode using the correct languages.
Ex.
- I cannot select some strings from the page to translate
It’s possible that some strings cannot be clicked through our visual interface.
If this is the case, you should try to look for them inside the Strings List that’s available under the current language at the top of the translation interface.
- I don’t see the Licence tab to add my serial key
The licence tab only appears after installing one of the paid add-ons.
So first go to your TranslatePress Account page, download, install and activate one of the add-ons and the tab will show afterwards. - I want to access the extended profile data?
If you want to access extended user data, please upgrade to the premium plugin and follow the steps mentioned below.
- Login to miniOrange dashboard (https://login.xecurify.com) with your miniOrange account credentials.
- Go to Social analytics->Social Applications Usage Summary, click on Search and then click on View under Additional Information.
- You will find user details fetched by our Plugin for each login attempt there.
Note: Make sure you have enabled the extended attribute check from the plugin. Also, your app needs to have permissions from user to collect extended attributes.
- Why should I register?
We ask our customers to register with miniOrange because we take care of creating applications for you so that you don’t have to worry about creating applications in each social network.
Also, registration helps us to be in contact with our customers. In case you need any help, we can help you with step by step instructions.
By registering for our plugin, you can also upgrade to our Premium plans with ease. Our premium plans come with a lot more features tailored for providing your users with a seamless login experience.
Please Note: You can go through our Privacy Policy for how we use your information. We don’t sell your information to any third-party organization.
- I cannot see some icons in preview or on blog even though I have selected them in the plugin setting.
Please check if you have an Adblock extension installed on your browser where you are checking the plugin. If you do, the Adblock extension will have a setting to block social buttons. Uncheck this option.
If you don’t have Adblock installed and still face this issue, please contact us using the support form on the right or mail us at info@xecurify.com
- Email share is not working. Why?
Email share is the plugin is enabled through mailto. mailto is generally configured through desktop or browser if it is not working, mailto is not setup or improperly configured.
To set it up properly, search for “mailto settings” followed by your operating system’s name where you have your browser installed.
- There is no option of instagram in social sharing. Why?
Instagram has made a conscious effort to not allow sharing from external sources to fight spam and low quantity photos at this point in time, uploading via Instagram’s API from external sources is not possible.
- Why is sharing with some applications not working?
This issue arises if your website is not publicly hosted. facebook, for example, looks for URI to generate its preview for sharing. That does not work on the localhost or any privately hosted URI.
- It is possible to show sharing icons below the post content?
You can put social sharing icons before the content, after the content or both before and after the content. Go to the sharing tab, check the blog post checkbox and select one of three(before, after, both)options available. save settings.
- My user get the following message-“There was an error in registration. please contact your administration “. What should I do?
This message is thrown by WordPress when there is an error in user registration.
1.To see the actual error thrown by wordpress,go to \wordpress\wp-content\plugins\miniorange-login-openid\class-mo-openid-login-widget.php file.
2.Search for the line:
//print_r($user_id);3.Change it to
print_r($user_id);4. Save the file and try logging again. please send us the error you while logging in through the support forum to your right.
- I forgot the password of my miniorange account. How can I reset it ?
There are two cases to according to the page you see –
1. Login to the miniorange screen: you should click on forgot password link. you will get your new password on your email address which you have registered with miniorange. now you can login with the new password.
2. Register with miniorange screen: Enter your email ID and any random password in the password and confirm password input box. This will redirect you to login with miniorange screen. Now follow the first step.
- After entering OTP, I get invalid OTP. What should I do?
Use the Resend OTP option to get an additional OTP. please make sure you did not enter the first OTP you received if you selected Resend OTP option to get an additional OTP. Enter the latest OTP since the previous ones expire once you click on Resend OTP.
If OTP sent on your email address are not working, please verify your account using your mobile number. you will get an OTP on your mobile number which you need to enter on the page. If none of the works. please contact using the support form on the right.
- I did not recieve OTP. What should I do?
The OTP send as an email to your email address with which you have registered with miniorange. If you can’t see the email from miniorange in your emails, please make sure to check your SPAM folder.
If you don’t see an email even in the SPAM folder, please verify your account using your mobile number. you will get an OTP on your mobile number which you need to enter on the page. If none of the works. please contact using the support form on the right.
- I want to change the email address with which I access my account. How can I do that?
You will have to register in miniorange again with your new email id. please deactivate and activate the plugin by going to Plugins -> Installed Plugins and then go to the social login plugin to register again. This will enable you to access miniorange dashboard with a new email address.
For any further queries, please submit a query on the right-hand side in our support section.
- My users get the following message -“Registration has been disabled for this site. Please contact your administrator.” What should I do?
This means you must have unchecked the check-box of auto-register in the Social Login tab. Please check it. This will allow new users to be able to register to your site.
- I am getting an error while logging in with Facebook. This URL Is Blocked. The URL http://social.xecurify.com/moas/openid-connect/client-app/callback has been blocked from Facebook.
You can set up the custom app for Facebook in the social login plugin so that the issue is altogether avoided. We have contacted Facebook regarding the blocked URL issue. We are awaiting their response.
Steps to set up custom app:
1. Go to the Custom app tab in the WordPress social login plugin.
2. Click on the Add Application button.
3. Select the facebook app in the dropdown list and follow the instructions to set up the app.
Instructions to configure Custom Facebook App :
1. Go to Facebook developers console https://developers.facebook.com/apps/. Login with your facebook developer account.
2. Click on Create a New App/Add new App button.
3. Enter Display Name and click on Create App ID.
4. Click on Products from the left pane of the page and select Facebook Login and click on Set Up button.
5. Click on Web. Enter your site URL into Site URL option then click on Save.
6. Goto Settings -> Basic from the left pane of the page, Enter App Domain (eg. example.com), your privacy policy URL in Privacy Policy URL and select Category of your website. Then click on Save Changes.
7. From the left pane, select Facebook Login -> Settings.
8.Under Client OAuth Settings, enter {YouWebsiteURL}/openidcallback/{appname} (eg: login.xecurify/openidcallback/facebook ) in Valid OAuth redirect URIs and click Save Changes button.
9. Change your app status from In Development to Live by clicking on OFF (sliding button) beside Status option of the top right corner. Then, click on the Confirm button.
10. Go to Settings –> Basic. Copy the App ID and App Secret and Paste into the Facebook custom app tab in the plugin.
11. Input email, public_profile as scope.
12. Click on the Save settings button.
Please contact us at info@xecurify.com if you need help with the setup.
- How do I center the social login icons?
1.If you are making changes to a PHP file.
Go to the PHP file which invokes your page/post and insert the following html snippet. Also, increase the margin-left value as per your requirement. Save the file.
<div style="margin-left:100px;"><?php echo do_shortcode('[miniorange_social_login]')?></div>2.If you are making changes to an HTML file.
Go to the HTML file which invokes your page/post and insert the following html snippet. Also, increase the margin-left value as per your requirement. Save the file.
<div style="margin-left:100px;">[miniorange_social_login]')</div> - Why do my users get a message that it is not secure to proceed?
Your website must be starting with http://. Now generally that’s not an issue but our service uses https://( s stands for secure). You get a warning from the browser that the information is being passed insecurely. This happens after you log in to social media application and are coming back to your website. The warning is triggered from the browser since the data passes from https:// to http://, i.e. from a secure site to non-secure site.
We make sure that the information(email, name, username) getting passed from social media application to your website is encrypted with a key which is unique to you. So, even if the there is a warning of sending information without security, that information is encrypted.
To remove this warning, you can add an SSL certificate to your website to change it to https OR use your own custom app
- I am not able to fetch extended attributes. How do I access extended attributes?
Check the option of Extended Attributes in the Social Login tab. Then in the miniOrange dashboard, go to Social analytics-> Social Applications Usage Summary, click on Search and then click on View under Additional Information to see extended attributes of users who login using your app. You can also download it as a csv there.
Note: Your app needs to have permission from users to collect extended attributes. - Can I configure my own apps for Google, Facebook and Twitter?
Yes, it is possible to configure your own app. That is available in the Standard and Premium plans.
Please contact us using the Support form if you want to purchase these plans.
- After logout I am redirected to blank page?
Your theme and Social Login plugin may conflict during logout. To resolve it you need to uncheck Enable Logout Redirection checkbox under Display Option of Social Login tab.
- How can I redirect to my blog page after login?
You can select one of the options from Redirect URL after login of Display Option section under Social Login tab.
1. Same page where user logged in
2. Homepage
3. Account Dsahboard
4. Custom URL – Example: https://www.example.com
- Social login icons are not added to login/registration form.
Your login/registration form may not be wordpress’s default login/registration form. In this case you can add social login icons to custom login/registration form using ‘social login shortcode’ [miniorange_social_login]. Refer to ‘Shortcode’ tab to add customizations to Shortcode.
- How can i put social login icons on a page without using widgets?
You can add social login icons to any page or custom login page using ‘social login shortcode’ [miniorange_social_login]. Refer to ‘Shortcode‘ tab to add customizations to Shortcode.
- How to add login icons to frontend login page?
You can add social login icons to frontend login page using our shortcode [miniorange_social_login]. Refer to ‘Shortcode’ tab to add customizations to Shortcode.
- I want to access the extended profile data?
If you want to access extended user data, please upgrade to the premium plugin and follow the steps mentioned below.
- Login to miniOrange dashboard (https://login.xecurify.com) with your miniOrange account credentials.
- Go to Social analytics->Social Applications Usage Summary, click on Search and then click on View under Additional Information.
- You will find user details fetched by our Plugin for each login attempt there.
Note: Make sure you have enabled the extended attribute check from the plugin. Also, your app needs to have permissions from user to collect extended attributes.
- How do I logout from the plugin and login with a different email address?
Deactivate the plugin from WordPress dashboard and activate again. Now go to the account setup tab of the plugin and login with the new email.
- Facebook sharing is showing the wrong image. How do I change the image?
The image is selected by Facebook and it is a part of Facebook sharing feature. We provide Facebook with webpage URL. It generates the entire preview of webpage using that URL.
To set an image for the page, set it as a meta tag in of your webpage.
< meta property=”og:image” content=”http://example.com/image.jpg” >
You can further debug the issue with Facebook’s tool – https://developers.facebook.com/tools/debug/og/object
- Will pages in your website dashboard be cached?
No, your website dashboard pages are not cached. The cache functionality is only meant to cache frontend pages.
- How do I serve cached pages to people using a phone or tablet?
You can generate a separate cache by selecting ”Generate separate files for mobile devices” in the page cache settings. This cache setting is only necessary if you use a specific theme for mobile devices, or for certain AMP plugins.
- What is the maximum number of pages I can cache?
There is no limit to the number of pages you can cache. The only limit is the space on your server and the maximum number of subdirectories allowed by your server, as caching will write files in subdirectories following the permalink structure.
If you were to reach a caching limit, it probably means that your server is not fit for the size of your website and caching needs.
- Can I make certain parts of the page stay dynamic when cache is enabled?
The cached page is sent to the user before most of your website is loaded. The add-on aren’t loaded yet, making it impossible for them to change the cached content at every request.
- Will caching slow down my server?
No, caching will actually reduce the load on your server, by reducing the amount of PHP and mysql used. You might see a peak in resource usage when using the cache preloader, as this functionality will create the cache files for all your pages in a short amount of time. But once this is done, performance should increase and the load on your server will decrease. Every single major site uses caching to serve cached pages faster by using fewer resources.
- How do I prevent Syspro Website Optimize from caching a certain page?
To prevent a page from being cached, you can add the URL to the field “URLs to exclude from cache” in the cache “Advanced settings” tab. If you are developing a plugin and want to prevent a page from being cached, you can define the “DONOTCACHEPAGE” constant on the pages you need. Any request where “DONOTCACHEPAGE” is defined will not be cached.
- How do I cache only the home page?
Add /.+ to the cache option “URLs to exclude from cache” on the advanced settings tab.
- What frequency should I choose for the cache preloading schedule?
Choosing a frequency for the cache preloading schedule will depend on factors such as the frequency at which the website content is updated, the number of pages in the cache, the resources of the server and more.
For example a site with hundreds of pages will require more resources to preload its cache. So choosing a high frequency will mean that the cache will be recreated often, and the resource usage will be higher.
On a website where updates aren’t as frequent, you can even disable the cache preloading schedule, or set a high cache lifespan and set the cache preloading schedule to follow it.
- What is “cache preloading”?
Usually, a page is cached when a user visits it. So the first user visiting won’t be served a cached version of the page, and will wait longer than the next users. The cache preloading functionality will go through all your pages and posts, and simulate a visit by a user, allowing Syspro Website Optimize to cache the pages before anyone visits them. Your first visitor will thus be served a cached version of the page, increasing its performance.
- Will the comments work even when page caching is enabled?
Yes, when using our website’s commenting system, your users will still be able to post comments. Every time a comment is approved, the cache for that page or post will be cleared, allowing the next visitor to see an up to date list of comments.
- Do I need a special setup to use the caching feature?
No, if your website works properly, Syspro Website Optimize will be able to cache your pages and posts.
- How do I know my webpage is being cached (or why it isn’t)?
If cache is enabled, and in order to see if your page is cached, use the “View Source” function in your web browser to view the page source. However, note that if you are using a further service that minifies HTML (e.g. Cloudflare). Also note that if you do not preload the cache, a page or post will have to be visited once for the cache file to be generated.
- Why should I use a caching add-on on my website?
You think your site is fast without caching? A caching add-on will make your website even faster. A faster cached website will increase SEO, it will improve your visitors experience. Caching will also save your server’s resources.
- What is caching, or page caching?
“Caching”, from Wikipedia: “In computing, a cache is a hardware or software component that stores data so that future requests for that data can be served faster; the data stored in a cache might be the result of an earlier computation or a copy of data stored elsewhere. A cache hit occurs when the requested data can be found in a cache, while a cache miss occurs when it cannot.” — Syspro Website Optimize cache does this by saving the page computed by your website on the disk. When a user visits a page, Syspro Website Optimize will serve the cached page before your website is loaded. If the page wasn’t cached before, it will be computed by your website, and Syspro Website Optimize will then save the result to the cache.
- Which optimization will make the biggest difference?
This depends on your setup (theme, number and quality of add-on used, etc…), but generally, caching will make the biggest visible difference to your website’s performance.
- Can you help me restore my database?
Not unless you have an existing backup. Please ensure that you make a backup of your entire database before using Syspro Website Optimize for the first time, and when you upgrade to a major new version of it.
- Is optimizing my database safe?
Yes; optimizing does not involve any “tricks” or poking around in dangerous ways. It involves running routine clean-up operations using well-defined, common MySQL commands. Nevertheless, we always recommend backups, which cover every possibility; not just database malfunctions, but hackers, human errors, etc.
- What savings can I expect to make?
This is a “how long is string?” sort of question. It depends completely on your site – how big it is, how many users interact on it, how long it has been running, and when you last optimised it. However, the savings and speed-ups can be substantial; it is always worth making sure that your database is optimised.
- Isn’t it better to use a dedicated caching add-on to cache my site?
Our caching tests and feedback from real-world users show that the caching feature alone can make your site faster than any other cache add-on or optimization. See these speed test results.
- Do I need to be logged to the website backend to get the notifications?
Yes, it is essential to be logged in your website backend to receive any notifications. Moreover, every type of notification must be created and configured first since the add-on doesn’t enable any for your shop by default.
- What is the difference between “A product is sold” and “A new order is placed”?
A product is sold is the type of notification showing when a specific product is sold. You can specify one or more products when you create the notification. Whereas, A new order is placed is the notification shown when an order is created.
- I already have a website. Can I exchange with another website?
Existing websites can be exchanged with our more complete web package. Your old customer data can be imported into a new website. If you want to improve web graphics, you can contact us. Our team will arrange for you.
- In what language is my website?
You can choose one language either Malay or English. If you want to be bilingual, contact our team. Our team will arrange for you.
- What is a blog?
A blog is a space where you can write any articles and shares related to your product or service. This blog is important for SEO where outsiders can find your blog by typing keywords in your article.
- Will the report be prepared?
Yes we will provide after your website is ready. We also provide a training manual where we teach you how to update the website, download images to the gallery and else.
- What is an SSL Certificate?
- SSL certificate means Secure Sockets Layer for HTTPS abbreviation. Usually SSL will have a lock symbol on the URL. SSL is a standard security technology for setting up encrypted links between servers and clients such as web servers (websites) and browsers. SSL is an industry standard and is used by millions of websites in protecting their online transactions with their customers.
- Another meaning of SSL is the most widely used security protocol on websites today. It is basically a protocol that provides a secure connection (secure connection) between two machines operating through the internet or internal network.
- How do I upgrade the package later?
You can upgrade the package in the future by just contacting our team. We will discuss the budget and more information for the next package.
- What is Google Analytics?
Google Analytics is your visitor statistics so you can see the performance of your website and you can monitor the behavior of your customers. Also, you can plan a structured strategy for your business.
- How are photo albums managed?
Photo album according to the info you gave us and you can load as much as you want. Just leave it to us.
- Can a website increase the credibility of my business?
Yes, that is correct.
- The website provides your business identity and is a virtual proof that it exists.
- Users believe that having a website makes your business more reliable than just social media sites.
- Website is able to convey information quickly to visitors.
- Why do I need a website if I already have a Facebook?
Your business can be known by Google compared to Facebook. Facebook has a lot of competitors and not everyone will see and read your posts on Facebook. Unlike a website, other than you can change the layout, color, font that suits your taste, your business will also look more professional.
- Is this website the same as the landing page?
Website and landing page are not same. Website is more suitable for the whole company profile and landing page is more suitable for promoting ads about a single product. If you want to make a landing page, you can contact our team.
- Can a beautiful website increases sales?
Yes, a beautiful and a complete website can make customers like your service.
- Is it difficult to manage your own website?
Not difficult. You just need to know some info to make your website constantly updated or you can contact our team to manage your website.
- How do I update my own website?
We will provide manual and video training to make it easier for you to refer on how to update the website such as inserting pictures in the album. If you want us to manage your website, contact our team.
- Is the website built responsive on the phone?
Each website we build, will be adapted to 4 types of devices and screen resolutions, namely tablets, desktops, large screens, and small screens. Fonts and graphics will be adjusted according to the suitability of the device so that it is easy to access.
- How can visitors contact me?
We will put your address, as well as your phone number on the Contact Us page. You can share your website with your friends other contacts.
- What about customer database affairs?
The website we build can manage your customer database such as data storage to make it easier to monitor your customers and your customer contact details. That way, it will be easier for you to contact them.
- What is SEO?
SEO is an organic (unpaid) marketing tactic that can help in improving the ranking of your website in the search engine that is Google for search related to your business, helping to increase traffic and increase sales success rate. Your website will be exposed to the public naturally and you will no longer need to advertise your business.
- What is Payment Gateway?
Payment gateway is replaced by automatic transfer method where you no longer need to send manual slip and further facilitate business transactions. We support every bank of choice in Malaysia including cards and credit cards.
- What is a Server?
Hosting to store all web files and images and can operate 24 hours a day serving your web visitors.
- What is a Domain Name?
Domain name is the address of your website either Syarikatanda.com or Syarikatanda.my registered in your store name.
- How to Change Store Name in Plugin and at Cusrev.com
If name of your store has changed, there are two ways to update it.
Update store name in your account at cusrev.com
If you have an account at cusrev.com, there is an option to update your store name there.
- Log in to your account at cusrev.com. If you don’t have an account, you can create a new one.
- If you have multiple stores linked to your account, make sure that the right store is selected in the top right corner.
- Navigate to Store Settings page.
- Update your store name in the Name field.
Update store name in our WooCommerce plugin
If you don’t have an account at cusrev.com, it is also possible to update the store name from our WordPress plugin.
- Navigate to the plugin’s settings in WordPress admin area (Reviews > Settings > Review Reminder).
- Update your store name in the Shop Name field and save settings.
- If you display verified copies of your reviews at cusrev.com, then you also need to go to the Trust Badges tab and re-save settings there.
- How to Stop Receiving Emails About New Reviews
Our plugin helps shops to receive a lot of authentic reviews. After a customer submits an aggregated review form, the plugin sends an email with a summary of reviews for each product in the order. The email is sent to the email address that is specified in Email for Notifications field on Review Reminder tab of the plugin’s settings.
In addition to this summarized email, the standard WordPress might also send several notification emails about new reviews (comments). The standard WordPress notifications are sent for each product, so if an order includes multiple products, WordPress will send an email per product.
These WordPress notifications can be annoying, if customers place large orders (e.g., for 15-20 products). It is possible to disable WordPress notification in the standard WordPress settings (Settings > Discussion > Email me whenever). Tick or untick checkboxes for notification emails as necessary and WordPress will stop sending an individual email about each new review.
Please bear in mind that WooCommerce reviews are based on WordPress comments. So, if you disable notification emails for reviews, it will also disable notification emails for comments on non-WooCommerce pages/posts. A possible solution to have all email notifications enabled but still keep your mailbox organized and tidy is to create an email filtering rule in your mailbox. The filtering rule can automatically move all notification emails in a special folder of your mailbox to avoid flooding the inbox with notifications.
- Does Your Plugin Use XMLRPC.PHP?
WordPress provides XML-RPC interface for remote management of the website. It allows you to access your website from custom admin software and mobile applications, rather than through a browser.
Our plugin requires REST API but it does not use XML-RPC interface. You can safely disable XML-RPC and use our plugin.
- Is it Possible to Collect Shop Reviews Only?
The plugin was build to invite customers to reviews products bought in WooCommerce powered stores. However, not all stores sell products. In these cases, it is more reasonable to ask customers provide only store-level feedback without reviewing specific products.
The professional version of the plugin offers the advanced review form editor that enables additional customization of the review forms. One of the options supported by the advanced editor is removal of product-related questions from the review forms. So, it is possible to create review forms that have only store-related questions.
The advanced review form editor is available in My Account area of www.cusrev.com. If you don’t have an account at cusrev.com yet, create a free account to preview features offered by the advanced review form editor.
- How to Delete Reviews?
You have the full control over reviews on your site. If you would like to delete a review, please use Trash button on the Reviews page in the plugin’s menu.
If you enable Trust Badges and opt in for publication of verified copies of all reviews on www.cusrev.com, the plugin will publish verified copies of reviews on www.cusrev.com in addition to saving them into your WooCommerce database. Verified copies of reviews published on www.cusrev.com cannot be deleted because it will compromise their authenticity and undermine trust.
If you disable Trust Badges option, all verified copies of all reviews related to your shop will be immediately hidden and the page of your shop on www.cusrev.com will be deleted.
- How Can Customers Update Their Reviews?
Sometimes customers might want to modify their own bad reviews. For example, after a resolution has been made or if the complaint is not related to the product, among other things. If a review was submitted in response to a review invitation via an aggregated review form, the customer can modify their review using the same link from the original invitation. Please ask them to click the “Review” link in the email one more time and update their review.
If a customer cannot find the original review reminder (invitation), it is possible to re-send them the review reminder. Re-sending of review reminders is available in the Pro version of the plugin. Unfortunately, it is not possible to re-send review reminders with the Free version because of the limit of one reminder per order (see this article for more information).
- Is It Possible to Moderate Reviews?
You have a full control over moderation of reviews on your site. There is a checkbox Moderation of Reviews on the Review Reminder tab in the plugin’s settings. If you enable this checkbox, all reviews submitted via aggregated review forms will need to be manually reviewed and approved before publication on your site.
If you enable Trust Badges and opt in for publication of verified copies of all reviews on www.cusrev.com, you won’t be able to moderate copies of reviews published on www.cusrev.com. However, you still will be able to moderate these reviews on your site. Shop owners cannot moderate verified copies of reviews on www.cusrev.com because this will compromise their authenticity and undermine trust. If you work with a customer and resolve their issue, the customer has a possibility to update their review. You can also post a public response to a review as explained here: how to reply to reviews.
If you disable Trust Badges option, all verified copies of all reviews related to your shop will be immediately hidden and the page of your shop on www.cusrev.com will be deleted.
WooCommerce reviews submitted directly on pages of individual products on your site can also be moderated. This is controlled by Before a comment appears option in the standard WordPress settings (menu path Settings > Discussion).
- Does the Plugin Create Schema Markup for Reviews?
As Moz.com defines it, Schema.org (often called Schema) is a semantic vocabulary of tags (or microdata) that you can add to your HTML to improve the way search engines read and represent your page in SERPs.
The standard WooCommerce functionality already includes structured data mark up to display your product reviews effectively within organic search results. You don’t need any additional plugins for this.
Our plugin extends the standard functionality and adds some extra mark up to help search engines properly crawl your shop (the standard WooCommerce functionality doesn’t provide schema mark up for reviews with pictures).
It is important to understand that having a valid structured data mark up in place makes your website eligible for organic stars in Google but it doesn’t guarantee that they will be shown. You can test the rich snippets using Google’s Structured Data Testing Tool.
- I found a bug in the add-on. How to get it fixed?
Please create a new topic at the support forum and provide detailed information with a screenshot.
- Will collected reviews be shown as stars in Google?
The standard Syspro E-Commerce functionality already includes structured data mark up to display your product reviews effectively within organic search results. This add-on extends the standard functionality and adds some extra mark up to help search engines properly crawl your shop. It is important to understand that having a valid structured data mark up in place makes your website eligible for organic stars in Google but it doesn’t guarantee that they will be shown. You can test the rich snippets using Google’s Structured Data Testing Tool.
- How to Change Sorting of Reviews?
If you would like to change how reviews are sorted on product pages, it is possible to do so using the standard WordPress functionality. Go to Settings -> Discussion menu and find options “Break comments into pages with X top level comments per page and the last/first page displayed by default” and “Comments should be displayed with the older/newer comments at the top of each page”. You can control how reviews are sorted and displayed on product pages by modifying these options.
- Does this extension support product variations?
Yes, you can either select parent product to apply one discount for all variations or pick individual variations to set different discounts or include/exclude specific variations from a more general rule. You can also select products to discount by their attributes, tags or even custom field values.
- Can I set different discounts for different categories at the same time?
Yes, you can create multiple product pricing rules and configure different discounts for different categories. In addition, you can pick individual products that you may wish to exclude from the category rule.
- Can I offer discounts to subscribers/members of my site only?
Yes, you can use this extension to run promotions dedicated to subscribers or members of your site. The only requirement for your subscription/membership system is to use custom role, capability or user meta entry to tell members from non-members. For example, if you have a membership extension which changes user role to “member” when someone purchases a membership, you can use a role condition with value “member” to make sure that only members are eligible.
- How will my customers know about the sale, special offer etc?
When developing this extension, our initial focus was on actually making all the different pricing adjustments, discounts and fees work. You can make almost any pricing strategy work but usually your customers are going to see their savings after adding some product to cart or going through the checkout. After getting the actual logic work well, we shifted our attention to the tools that help your customers learn about your deals and sales – you can opt to display a quantity pricing table for bulk and tiered pricing rules or make product prices throughout the shop reflect simple pricing rules. More promotional tools are planned for future releases.
- Does it support … scenario?
The answer is yes. This has to do with how this extension is organized. It is not limited to a few settings that do very specific things, instead it offers multiple pricing/discount/fee methods with dozens of conditions and useful settings which can all be mixed and combined to come up with virtually any product pricing rule, cart discount or checkout fee. Have no doubt that such simple pricing rules as “buy 2 get 1 half price”, “buy 10+ with 15% discount” or “3 for RM9.99” are supported.
- Is it compatible with … extension?
More often than not this extension is compatible with other Syspro E-Commerce extensions as it uses standard price hooks to change prices and standard methods to add discounts/fees.
- Does it support decimal quantities?
Decimal quantities are not supported and will not be supported in the future. This is due to some technical solutions in the add-on that do not work well with decimal quantities. These solutions enable some great functionality which would not be possible otherwise.
- Does it support multiple currencies?
It depends on your specific needs. This extension is fully compatible with a few popular currency switcher add-on and will work fine out of the box. On the other hand, you won’t be able to set specific discounts for different currencies – you can only set them in base currency and get it converted automatically.
- I installed this extension but run into a problem – what shall I do?
Head straight to our support site! We have some self-help content that you can consult and will respond to your inquiry within 24 hours (business days only) if you opt to send us one.
- I already have a website. Can I exchange with another website?
Existing websites can be exchanged with our more complete web package. Your old customer data can be imported into a new website. If you want to improve web graphics, you can contact us. Our team will arrange for you.
- In what language is my website?
You can choose one language either Malay or English. If you want to be bilingual, contact our team. Our team will arrange for you.
- What is a blog?
A blog is a space where you can write any articles and shares related to your product or service. This blog is important for SEO where outsiders can find your blog by typing keywords in your article.
- Will the report be prepared?
Yes we will provide after your website is ready. We also provide a training manual where we teach you how to update the website, download images to the gallery and else.
- What is an SSL Certificate?
- SSL certificate means Secure Sockets Layer for HTTPS abbreviation. Usually SSL will have a lock symbol on the URL. SSL is a standard security technology for setting up encrypted links between servers and clients such as web servers (websites) and browsers. SSL is an industry standard and is used by millions of websites in protecting their online transactions with their customers.
- Another meaning of SSL is the most widely used security protocol on websites today. It is basically a protocol that provides a secure connection (secure connection) between two machines operating through the internet or internal network.
- How do I upgrade the package later?
You can upgrade the package in the future by just contacting our team. We will discuss the budget and more information for the next package.
- What is Google Analytics?
Google Analytics is your visitor statistics so you can see the performance of your website and you can monitor the behavior of your customers. Also, you can plan a structured strategy for your business.
- How are photo albums managed?
Photo album according to the info you gave us and you can load as much as you want. Just leave it to us.
- Can a website increase the credibility of my business?
Yes, that is correct.
- The website provides your business identity and is a virtual proof that it exists.
- Users believe that having a website makes your business more reliable than just social media sites.
- Website is able to convey information quickly to visitors.
- Why do I need a website if I already have a Facebook?
Your business can be known by Google compared to Facebook. Facebook has a lot of competitors and not everyone will see and read your posts on Facebook. Unlike a website, other than you can change the layout, color, font that suits your taste, your business will also look more professional.
- Is this website the same as the landing page?
Website and landing page are not same. Website is more suitable for the whole company profile and landing page is more suitable for promoting ads about a single product. If you want to make a landing page, you can contact our team.
- Can a beautiful website increases sales?
Yes, a beautiful and a complete website can make customers like your service.
- Is it difficult to manage your own website?
Not difficult. You just need to know some info to make your website constantly updated or you can contact our team to manage your website.
- How do I update my own website?
We will provide manual and video training to make it easier for you to refer on how to update the website such as inserting pictures in the album. If you want us to manage your website, contact our team.
- Is the website built responsive on the phone?
Each website we build, will be adapted to 4 types of devices and screen resolutions, namely tablets, desktops, large screens, and small screens. Fonts and graphics will be adjusted according to the suitability of the device so that it is easy to access.
- How can visitors contact me?
We will put your address, as well as your phone number on the Contact Us page. You can share your website with your friends other contacts.
- What about customer database affairs?
The website we build can manage your customer database such as data storage to make it easier to monitor your customers and your customer contact details. That way, it will be easier for you to contact them.
- What is SEO?
SEO is an organic (unpaid) marketing tactic that can help in improving the ranking of your website in the search engine that is Google for search related to your business, helping to increase traffic and increase sales success rate. Your website will be exposed to the public naturally and you will no longer need to advertise your business.
- What is Payment Gateway?
Payment gateway is replaced by automatic transfer method where you no longer need to send manual slip and further facilitate business transactions. We support every bank of choice in Malaysia including cards and credit cards.
- What is a Server?
Hosting to store all web files and images and can operate 24 hours a day serving your web visitors.
- What is a Domain Name?
Domain name is the address of your website either Syarikatanda.com or Syarikatanda.my registered in your store name.
- It can be set two currencies on the same time?
Into UAP system can be set one main Currency to manage the entire process. It can not be handled two currencies on the same time, payment gateways does not accept a such kind of workflow.
- I can not see the Login/Register forms
You may not see those forms if you are already Logged. As Admin you will see a warning message but regular users will see nothing.
Admin Info: Login Form is not showing up when you’re logged.Just logout or check the page into a new incognito browser window.
- Can not activate the License
If you’re not able to activate the license based on your <<Purchase Code>> check if cURL is enabled and properly set on your server. Also, be sure that your server is able to connect to other servers, such Envato API, and no denied permissions are provided.
- How to promote specific Products
This is what your Affiliates will do by going to their account page and generating a referrer code for your product. They can copy the Product link and generate an affiliate link via Account Page->Affiliate Links section. Then they will share this code on social networks, blogs, forums etc. and bring traffic to your website and product.
You could stimulate your affiliates by creating a good offer for a specific product so that they are more motivated and focused on that product. To learn more about offers read this article.
- Different time shows for Referrals
If different time shows up for referrals it means that the date of the server on which your website is installed on or/and the DataBase server is on a different Time Zone and needs to be changed. We recommend to get in touch with your hosting provider for a such change.
- Coupons does not work
This magic feature DOES NOT create new coupons. It simply assigns EXISTING coupons created in integrated systems (such UMP or WooCommerce) to an affiliate.
For more information read this article.
- Exclude specific products to provide Referrals
To exclude a specific product from providing referrals, follow these steps:
1. Create a new Offer
Go to UAP Dashboard -> Offers and create a new offer and in the offer amount set 0. Establish the date range to determine for how long it will be active, select the products and affiliates for which this offer is valid. If the offer amount is set to 0, this will override the usual amount they would make. For more information on offers read this article.
2. Change Used Referral Amount
Go to UAP Dashboard -> General Options -> General Settings and select LOWEST AMOUNT under the “Which Amount should be used for Referral?“. For more information about this, read this article. It is very important to set this up.
3. Empty Referrals (Optional)
Go to UAP Dashboard -> General Options -> General Settings and scroll down to Empty Referrals and disable it. This means it will not save all the payment information about referrals of 0$. Read this article for more information.
To sum this up, if for example you want to exclude “Product 01” from providing referrals to all of your affiliates, follow these steps: Create a new offer targeting all affiliates, for however long you want, select Product 01 and have it set to 0$. Then go to general options and select lowest amount and disable empty referrals.
- Can be affiliates charged during register step or periodically?
The short answer is no, because Ultimate Affiliate Pro is an affiliate system, in this type of system you pay your users for their hard work, you don’t charge them like on a membership system.
- What Campaigns is for?
The Campaigns is found on the frontend and it is used by your affiliates to better promote their strategy. As an admin you have little to no interaction with this feature, it is there to help your affiliates.
- How to exclude Shipping and Taxes from Referral calculation?
If you wish to exclude shipping and / or taxes from referral calculation simply head over to the UAP Dashboard -> General Options -> General Settings tab. Under Amount Value Settings you will find two buttons for Exclude Shipping and Exclude Tax.
- The registration doesnt work – Please complete all required fields
Be sure that other 3rd party plugins don’t affect the WP Register and Login process.
To see which plugins have been reported for affecting the WP and UMP workflow, read this article.
- How to disable “Bank Transfer” payout option?
To disable the Bank Transfer option, please go to the UAP Dashboard -> General Options -> Public Workflow tab. Here you will find the Disable Bank Transfer option, turn it on to disable it and click save to keep the changes.
- What “Empty Referrals” means?
Empty Referrals are referrals of 0$ for example. You have the option to save them, they will appear in the payments tab if so.
You can activate this option by going to the UAP Dashboard -> General Options -> General Settings tab.
- Automatically Affiliate option
You can activate this option by going to the UAP Dashboard -> General Options -> General Settings tab.
By activating this option all of your new users will automatically become affiliates.
- Which Amount should be used for Referral?
You can activate this option by going to the UAP Dashboard -> General Options -> General Settings tab.
This feature allows you to choose which amount is used if there are multiple ones set for the same action. A good example would be ranks & offers, your rank could give you 20% but the current offer gives you 50%. If you select the Biggest Amount, then the offer will be in effect since 50% > 20%, but if the Lowest Amount is selected, then it will remain at 20% despite the existing offer.
- I need some style Customization
For each showcase (Login form, Register Form, Account Page) there are some predefined templates that come with the installation of the UAP plugin. If you want to change them you can do so by using the Custom CSS box found in each showcase section.
There you can write your desired CSS code that will change the way each showcase will look like on the front-end side.
Some minimum CSS Knowledge will be required. Some tips and tricks can be found here.
The main steps are:
- Identify the CSS class of the html element that you want to customize. More about that can be found here.
- Go to the showcase page from the UMP dashboard and identify the Custom CSS box.
- Type your custom css code for that specific CSS Class using !important; after each one.
- Save and clear your cache system.
- How to identify the showcases structure
If you need to identify the register, login or account page structure for a custom CSS requirement, you can do that by using the available tools of your browser.
Firefox
- We recommend installing the free Firebug developer extension for Firefox. Download the extension and follow the installation instructions. You can find it here.
- Once installed, click on the Firebug icon in your Firefox browser menu, or go to Tools in the top menu bar and select Web Developer -> Firebug and click Open Firebug.
- Visit your showcase pages.
- Right click on the desired element and select Inspect Element with FireBug.
- Click on the HTML tab and check the right-side tab where Style is provided.
Chrome
- Visit your showcase pages.
- Go to the View menu in the top menu bar and scroll down to the Developer option.
- Click on Developer Tools.
- Right click on the desired element and select Inspect.
- Click on the Elements tab and check the right-side tab where Style is provided.
Once you’ve identified the HTML and CSS structure for your element, you can further use it for other customisations and configurations.
- Payout process
Go to UAP Dashboard -> Payments tab to see all of the payments.
To make a payment go to the All UnPaid Referrals sub-tab and select which referrals will be paid. After selecting the referrals click on the Pay selected Referrals button.
Next you will have to choose the payment method, please note that Bank Transfer is an offline alternative payment. Once everything is set, simply click on the Submit button.
Note: If your Stripe or PayPal settings are not correctly set up your payments can end up in the pending or fail state since they can not be processed. - How a logged user can become an Affiliate?
Your users can become an Affiliate in two different ways. If they are logged on your website you can have a page set up with the following shortcode . This will create a button as seen in the picture below. All they have to do is click this button and they will become an affiliate.
You can also go to the Users tab from WordPress, locate a specific user and edit. If you scroll down near the end you will see a button to turn this user into an affiliate, see the picture below for reference.
- Offers
You can create special Offers for certain products, these offers will override the rank amount of your affiliates. This means that through an offer your affiliates can earn more or less than their default amount based on how you set up the offer.
To create an offer, go to UAP Dashboard -> Offers and click on the add new button.
You can activate or deactivate it without needing to delete it. Name your offer and then set an Offer Amount which will replace the standard rank amount. Set up a date range by clicking on the field and then selecting the date.
Targeting
In this section you can choose the Source from which you will search for Products. For example if you choose Ultimate Membership Pro as a source, you can find all the UMP related products by typing in the name inside the product field. You can select more than one product here. Next you can choose to provide this offer for All of your affiliates by typing this inside the username field or selecting specific affiliates. Just like the product field, you can select more than one affiliate.
Once you are done simply click save.
Important
Depending on your offer your users can earn more or less than their usual standard rank amount. In order for this to work please go to UAP Dashboard -> General Options -> General Settings. Here you will see “Which Amount should be used for Referral?”, make sure that you select Biggest Amount if your users would earn more with the offer or Lowest Amount if they would earn less. Make sure to click the save button!
- Landing Commissions
You can create a landing commission which you can attach to any successful page (ex: Thank You Register page). When a user reaches this page, the affiliate will receive a certain commission based on the generated referral.
To create one, go to UAP Dashboard -> Landing Commissions and click on the add new button.
You can activate or deactivate it without needing to delete it. You must also provide a unique slug for your landing commission. Next you will have to enter a landing commission price based on which the referral amount will be calculated depending on the affiliate rank amount.
You can set the referral default status to verified or unverified, a referral description and the cookie expire time. When done click the save button and a new card will appear under the add new button. Copy the shortcode and use it on a successful page.
Example: You need to get users to fill in a short survey, after they submit their answers you can redirect them to a Thank You page and have the shortcode used here. If affiliate John redirects users to this survey, he will receive referral only for the users that finish the survey, because they land on the Thank You page.
- MLM Workflow Example
For a better understanding of how the MLM system works and provides rewards to affiliates, a common scenario is listed below:
MLM Settings
Matrix Depth(Levels) : 3
Amount For Each Level
- Level 1: 20%
- Level 2: 10%
- Level 3: 5%
John MLM Matrix sub-affiliates:
- Geo – Level 1
- Bob – Level 2
- Max – Level 3
Actions:
Max has Rank “Premium” with Amount: %25
Max refers a user that purchases a product of: $400
Rank Reward:
Max gets a referral of: $100
MLM Rewards:
- Bob gets: $20 (20% of $100)
- Geo gets: $10 (10% of $100)
- John gets: $5 (5% of $100)
- It is possible to Import users or other options into the Plugin?
If you want to import data from one website to another, there is no dedicated option available in UAP.
A solution may be to use one of the default import solutions provided by WordPress: WordPress Importer.
If you want to import users from a different affiliate system to UAP, you can do so if those users are WP users. UAP is linked to WP and any user that is added as a WP user will show up in the UAP system.
- Can I set multiple Register forms?
Register Form is a complex and important module from UAP which is strongly linked to other modules such as Notifications, Ranks, Conditional Logic fields, Subscription, WP Roles, etc.
In this case, only one main register form can be set.
- Already set Pages like Login,Register, Lost Password doesn’t work
If the main pages that were assigned as Affiliate Pages are not working as you expected, first check if those were set properly.
You can learn more about setting those pages by reading this article.
Those pages may show up differently or not at all, even if you have set common slugs such as: login/, lost-password/, register/. In this case, WordPress may require an update on permalinks.
To avoid interacting with other scripts, we recommend that you set custom slugs for those pages (my-lost-password, uap-login, register-page, etc).
- The registration doesnt work – Please complete all required fields
Be sure that other 3rd party plugins don’t affect the WP Register and Login process.
To see which plugins have been reported for affecting the WP and UAP workflow, read this article.
- Avatar is working properly but the standard user image/avatar is not replaced
The Avatar feature is custom built in UAP, and it only works inside the system. It is not meant to replace the standard Profile image or Gravatar which are displayed on other pages.
- The OptIn Subscription are not stored
New subscriber emails can be sent to an external email platform for follow-up on newsletter campaigns. If your subscribers are not stored in your list, this may be caused by a few things:
- Double-check your Opt-In credentials for the desired email platform destination (UAP Dashboard -> Magic Features -> Opt-in Settings).
- Check your destination list for restricted conditions, such as required fields (should be off).
- Check your destination list for a double opt-in requirement (should be off).
- Check if the Opt-In Subscription is enabled and properly set in the Register Form settings.
We recommend that you first try to create a fresh new list on the email platform of your choice, but with no additional options attached.
- The Upload file button on Register form is not working
If the upload file button on the Register form or the Avatar buttons don’t work, make sure that the jQuery library has not been altered or customized by 3rd party scripts installed in your WordPress environment (such as plugins or WP Themes).
Try checking the upload file button after deactivating the other plugins, or after changing the current WP Theme.
- Change reCaptcha language
Change reCaptcha language
- Created March 28, 2016
- Author WPIndeed
- Category Frequently Asked
The default language for reCaptcha script is English.
You can change that from Uap_Add_Edit_Affiliate.class.php file on line 674
- Error 500 Internal Server Error is showing up
Internal server errors are not specific to WordPress, they can also happen as a result of anything else running on your server as well.
500 Internal Server is an error from server side.
An internal server error is very generic, therefore it does not tell the developer anything. It does not specify the cause of the error or where the problem is.
Increase the PHP Memory Limit
Sometimes this error can show up if you are exhausting your PHP memory limit. Ask your hosting provider about your server settings and limitations. There may be a very small limit set there and any script that needs to process bigger jobs will be stopped.
Check Server Permissions
On some servers based on firewall conditions, or other restrictions, certain files (from subfolders, or with specific names) are restricted from being accessed via browser. Ask your hosting provider what error was stored in the server logs behind the generic “500 Server Error”.
- I can not activate the Plugin
The plugin is activated based on the purchase code verification, which is done directly on the Envato server.
It is possible that the Envato API is down, if that is the case, try to check again a little bit later.
If it’s still not working, please check on your server/website if the cURL option is enabled in your PHP settings.
Even with cURL enabled, based on security settings your server may refuse to send or receive data from the Envato server.
You can ask your hosting provider about it.
cURL is the only professional way that two servers connect to get data from one place to another.
- Native Fields can not be edited. I want to change the Label
The native WordPress fields (Username, Email, First Name, Last Name, Password, Confirm Password, etc.) can’t be edited or deleted. If you want to change the labels for those fields, you can do so by using the translation file.
The Ultimate Affiliate Pro plugin is translation ready, meaning you can add an additional language file (even English) to your language set on WP.
All the text elements that are not available to be managed from within the UAP Dashboard (native fields labels, buttons, etc), can be handled via the Translation file, the plugin being fully translation ready.
For English – uap-en_EN.mo & uap-en_EN.po
- Some words/texts needs to be changed. How to?
All the texts that can not be changed from the UAP Dashboard (native field labels, buttons, etc) can be modified through the translation file.
You can add an additional language file (even English) to your language set on WP.
For English: uap-en_EN.mo & uap-en_EN.po
- How can I translate the Plugin?
The Ultimate Affiliate Pro plugin is translation ready.
You can add an additional language file for your language set on WP.
Make sure that the plugin folder of the translation target is on your local machine before starting the translation.
Copy and rename the file with the relevant WordPress locale. For example, if you want to translate the file to French, rename the file to fr_FR.po. In the case of a plugin, rename it to uap-fr_FR.po, where uap is the name of the text domain that the plugin loads.
For French: uap-fr_FR.mo & uap-fr_FR.po
You can use the free PoEdit app to create and manage language files based on the default files available from the Ultimate Affiliate Pro plugin.
- Open the po translation file in Poedit, click update to update the translationsource.
- Open the catalog properties from Catalog > Properties and select the language,press ok.
- Now you can go through the source text and enter your translations.
- Click validate then save the translations, the po file will be updated and an mo filewill be generated.
- Upload the new or updated language files to your WordPress installation folder ultimate-affiliate-pro/languages/.
- Set your WordPress language by using a plugin such as WordPress localize, WPML, or manually update the WP_LANG constant in your WordPress config.php file.
There are many guides on how to add a new translation file to any WP Plugin or Theme:
https://make.wordpress.org/polyglots/handbook/
http://wordpress.stackexchange.com/questions/57219/how-to-translate-a-plugin-via-po-mo
If an important update was released and texts were added, you will need to update your language file.
The plugin’s custom name used in the translation file name is: uap
- A New version was released, how to Update the Plugin?
The safest way to update the plugin to a new version is via FTP Upload. Download the latest version, unzip the file and copy the folder to your website wp-content/plugins/ overwriting the current plugin folder.
Important features and fixes are released with each update. If your plugin version is very old, make sure to keep a back-up of your current version before updating to the latest plugin version.
- Parse error: syntax error, unexpected T_STRING
If you encounter any syntax errors while you are trying to install the plugin, it’s most probably that the PHP version installed on your server is a very old one. The current available PHP version is v.7.x, but for a proper workflow a PHP version starting with 5.3 is required.
Example of error:
Parse error: syntax error, unexpected T_STRING in /home/public_html/xxxx/wp-content/plugins/………/ on line
Contact your hosting provider and request a PHP update.
- Known Compatibility Issues
If you have installed our plugin and it’s not behaving as expected, this can be due to a number of reasons including some known compatibility issues with third party plugins.
To help troubleshoot, we recommend taking the following steps:
- Deactivate Jetpack as it may cause some issues.
- Deactivate any third party login plugin where the captcha functionality may cause conflicts.
- Deactivate any other third party plugins, not specifically advertised as compatible¹.
- A2 Optimized WP doesn’t let you login using the front-end form.
If you’re still experiencing any issues after attempting all of the above, please get in touch with us so we can look into it.
Due to the incredibly large offering of WordPress plugins, it’s nearly impossible to guarantee compatibility with all of them. That being said, we haven’t received many reports about compatibility issues.
Customers have also reported the following free plugins that have affected the UMP workflow: Bakery Custom Post Types, Contact Form 7 – Stripe Extension, WP Maintenance.
- Notifications do not work, please help!
The plugin comes with a few example notifications, but due to the vast number of different scenarios it was impossible to include them all by default.
We recommend creating notifications catered to your specific needs by using one of the examples as a template.
If your notifications are not sent, first check if your WordPress environment and your server are able to send emails. Notifications module is based on the standard WP function: wp_mail().
You should first check if your notifications are active and properly set.
In some cases the SMTP mail server refuses to send some emails based on destination or email content. Check if your SMTP mail server has no additional filters or restrictions, such as special links inside or long words.
- My favorite carrier is not in the list, can I add it?
The right way to do that is to open a ticket in our support desk and specify in it: carrier name, carrier URL and a valid tracking code (even if expired). Yet, as a temporary solution, you can add the carrier you prefer manually in the class.carriers.php file that you find in the plugin directory and harking back to one of the existing ones for the right way to add it.
N.B. Any change you make in the code scripts will be overwritten, and therefore deleted, in the next update. For this reason, we suggest you send us the data concerning the carrier you’re interested in, so that we can add them in the plugin and include them in the first following update.
- How can I get support if my WooCommerce plugin is not working?
If you have problems with our plugins or something is not working as it should, first follow this preliminary steps:
- Test the plugin with a WordPress default theme, to be sure that the error is not caused by the theme you are currently using.
- Deactivate all plugins you are using and check if the problem is still occurring.
- Ensure that you plugin version, your theme version and your WordPress and WooCommerce version (if required) are updated and that the problem you are experiencing has not already been solved in a later plugin update.
If none of the previous listed actions helps you solve the problem, then, submit a ticket in the forum and describe your problem accurately, specify WordPress and WooCommerce versions you are using and any other information that might help us solve your problem as quickly as possible.
- I always use the same carrier to ship my WooCommerce orders, may I set it as default carrier?
Yes, sure, you can set the carrier name in the settings of YITH WooCommerce Order Tracking and for each new WooCommerce order you will find the field “carrier name” automatically filled with your default carrier.
- Can I customize the message I want to sent to customers?
You can set your own text for your WooCommerce orders using the specific option available in YITH WooCommerce Order Tracking. You can also use some optional placeholders to specify carrier’s name, tracking code and shipping date.
- How can I try the full-featured plugin?
If you want to see a demonstration version of the premium version of YITH WooCommerce Order Tracking, you can see that in this page. Browse it and try all options available so that you can see how your plugin looks like.
- What is the difference between “A product is sold” and “A new order is placed”?
A product is sold is the type of notification showing when a specific product is sold. You can specify one or more products when you create the notification. Whereas, A new order is placed is the notification shown when an order is created.
- Do I need to be logged to the website backend to get the notifications?
Yes, it is essential to be logged in your website backend to receive any notifications. Moreover, every type of notification must be created and configured first since the add-on doesn’t enable any for your shop by default.
- Drip Content Main Settings
When creating or editing a page in WordPress, you have the option to release content at regular intervals by creating a schedule for your content with Membership Pro – Drip Content. This can be found in the right hand side of the screen of any page, by default you will see this message:
You will first have to set for which users this page is active by using the Ultimate Membership Pro – Locker also found on the right hand side. You can choose to display or block the page for: All, Registered, Unregistered and any of your levels. Multiple types can be selected.
After setting up the Locker, you will now have access to Membership Pro – Drip Content. You will be able to turn it on / off for the users set up in the locker.
You will then have the option to pick the Release Time by using the slider to select one of three options:
- Instantly Subscription – after the user receives subscription access;
- After Subscription – determine after how many days / weeks / months to grant access to users;
- On Specific Date – use this date picker to select on which desired date the page will become available;
Below this you will find Expiration Time which can be set by using the slider exactly like release time:
- Never – once available, the content will not expire;
- After certain Period – determine after how many days / weeks / months access to the page will expire;
- On Specific Date – use this date picker to select on which desired date access to the page will expire;
- I want to add HTML content inside Email templates
In order to add HTML content inside Email templates, please go to UMP Dashboard -> Notifications and create a new notification or edit an existing one.
In the WP text editor switch from visual to text as shown in the screenshot below and add your html content here.
Note: Some html elements may be parsed by the WordPress Text Editor. - How to set a Trial for my Level
To create a Trial for a level you will need to go to UMP Dashboard -> Levels. Next we will create a new level, in our example we will have the slug: premium_01 and label: Premium.
Level Access
In this section set the Access Type to Regular Period and set up your own duration.
Billing Options
Next we will take a look at the billing options and what to set.
Payment Type: Payment
Level Price: you choose how much it costs
Billing Recurrences: On Going
Trial Period Price: you can set it to 0 to make the trial free, otherwise set up your custom amount.
Trial Period Type: here you will have two options Certain Period and Couple cycles subscription payments. With certain period you can choose how long this trial will last, you can pick from days, weeks, months, years. With the second option you can choose how many bill cycles have the trial period price after which the following ones use the level price.
Example:
For a Period of 2 weeks with the Level Price of 25$, Trial Period Price of 10$, Trial Period Type set to Couple cycles subscription payments and Trial Couple Cycles set to 1, the following will happen:
Your users will pay 10$ for the first 2 weeks, after which they will be charged with 25$ every two weeks. - I can not see the Login/Register forms
You may not see those forms if you are already Logged. As Admin you will see a warning message but regular users will see nothing.
Admin Info: Login Form is not showing up when you’re logged.Just logout or check the page into a new incognito browser window.
- Why does Stripe transaction show as pending after being approved?
Means the payment have been proceeded via Stripe but there was NO Payment confirmation sent to the system. If your payment was completed on Stripe platform but not confirmed into UMP system, check your settings that have been required and especially be sure that you’ve set the WebHook properly, being the way system and Stripe communicates. . Most probably you didn’t set the WebHook into your Stripe Account like is required. Keep in mind you have set stripe on Test mode to setup Wehhook on this way too.
- Why I’m redirected to Subscription Plan when access the Register Page?
Ultimate Membership Pro system redirects visitors to Subscription Plan when the Register page is accessed because into the Register Form settings have been specified to work with “Subscription Plan”. So, user is redirected first to pick a plan before the the register step, being a required condition to have assigned a level first.
If you do not want a such approach just change the “Choose Subscription Type” option from Register Form settings.
- Is it UMP a Multilingual environment?
UMP system does not provide a bilingual environment but it can be translated into any language.
For a such approach, you may need a proper multilingual script that will be able to manage translations of input/textarea fields. - It can be set two currencies on the same time?
Into UMP system can be set one main Currency to manage the entire process. It can not be handled two currencies on the same time, payment gateways does not accept a such kind of workflow.
- Different time shows for Orders and Levels
If different time shows up for orders or levels it means that the date of the server on which your website is installed on or/and the DataBase server is on a different Time Zone and needs to be changed. We recommend to get in touch with your hosting provider for a such change.
- Coupon Codes not working with Stripe Payment
For recurring subscriptions if the coupon was set to apply the discount just once, it means that it will provide a different price only for the first payment.
Stripe and Braintree only accept either 0% or 100% of the price for the initial payment.
This means that the discount can not be provided for this kind of coupon if it will be paid via Stripe or Braintree.
This is a condition and limitation from Stripe and Braintree, not from the UMP system.
- Can not activate the License
If you’re not able to activate the license based on your <<Purchase Code>> check if cURL is enabled and properly set on your server. Also, be sure that your server is able to connect to other servers, such Envato API, and no denied permissions are provided.
- Login Error: Invalid Email Address or Password entered
If this type of error shows up even if the credentials are correct, or if the login form doesn’t perform the login process, check to see if other scripts affect the login process to WordPress.
Some themes provide by default a login option and if it’s active on the same page as the UMP Login Form, it may affect the login process.
Try to deactivate all other scripts and change to a different WP Theme to see if it works.
- I need some style Customization
For each showcase (Login form, Register Form, Subscription Plan, Account Page) there are some predefined templates that come with the installation of the UMP plugin. If you want to change them you can do so by using the Custom CSS box found in each showcase section.
There you can write your desired CSS code that will change the way each showcase will look like on the front-end side.
Some minimum CSS Knowledge will be required. Some tips and tricks can be found here.
The main steps are:
- Identify the CSS class of the html element that you want to customize. More about that can be found here.
- Go to the showcase page from the UMP dashboard and identify the Custom CSS box.
- Type your custom css code for that specific CSS Class using !important; after each one.
- Save and clear your cache system.
- Custom Special Fields
Custom Special Fields – are used by the system to accomplish certain special features and are provided by default. They can not be deleted or added by the website admin.
- ihc_avatar – provides a special avatar option in the forms where users can upload their avatar image.
- ihc_coupon – is a special input field that provides the option for users to insert a coupon code for discounts. If there are no coupons set in the system, this field will not show up.
- ihc_social_media – provides the perfect way to link users’ WP accounts to their social accounts for an easier login approach. If there is no social login option activated this field will not show up.
- payment_select – provides a way for your users to select which payment gateway to use for their payments. More than one payment gateway needs to be active for this field to show up.
- ihc_invitation_code_field – is a special input field that requires an invitiation code in order to allow the user to register in the system. If the Invitation Code module is disabled or there are no invitation codes, then this field will not show up.
- ihc_dynamic_price – allows your users to choose the price they will pay for all subscription levels and/or specific levels. You can set up the minimum and maximum price. If the Level Dynamic Price module is disabled, this field will not show up. If the module is disabled for a certain level, then users that have selected that level will not see this field. For the time being, ihc_dynamic_price is only available during the Register step.
- What is the Public Individual Page?
In the Ultimate Membership Pro system you have an additional module called: Members List which will provide a way to display members’ profiles on public.
Depending on your settings, you can activate the Public Individual Page option which lets you display an individual page for each profile. It is accessed by clicking on a member’s item from the members list showcase. To do this, you need to set a specific Visitor Inside User Page using the
shortcode.Visitor Inside User Page is not mandatory if the Public Individual Page functionality from Members List is not required.
- Is it possible to Import users or other options in the Plugin?
If you want to import data from one website to another, there is a dedicated module available in UMP.
This can be found by going to Extensions -> Import Users&Levels.
An additional solution may be to use one of the default import solutions provided by WordPress: WordPress Importer.
If you want to import users from a different membership system to UMP, you can do so if those users are WP users. UMP is linked to WP and any user that is added as a WP user will show up in the UMP system.
- Can I set multiple Register forms?
Register Form is a complex and important module from UMP which is strongly linked to other modules such as Payment, Double Email Verification, Notifications, Levels, Conditional Logic Fields, Subscription, WP Roles, etc.
Although only one register form may be used, each field can be set to show up only for specific levels. Based on what level is selected from the subscription plan, the visitor may see a “different” register form, with unique fields.
- Already set Pages like Login,Register, Lost Password doesn’t work
If the main pages that were assigned as Membership Pages are not working as you expected, first check if those were set properly.
You can learn more about setting those pages by reading this article.
Those pages may show up differently or not at all, even if you have set common slugs such as: login/, lost-password/, register/. In this case, WordPress may require an update on permalinks.
To avoid interacting with other scripts, we recommend that you set custom slugs for those pages (my-lost-password, ump-login, register-page, etc).
- Charging tax on any membership
The Ultimate Membership Pro system doesn’t manage taxes and invoices. These are handled by the the payment services that are integrated in the membership system as Payment Gateways.
- RedirectLinks: Can I use External Links for redirect?
Yes you can, and we made sure that it’s very easy. Simply head over to the UMP Dashboard -> Extensions -> Redirect Links module and add your desired redirects.
There you simply add an identification name for your external link and the link itself. Once they are stored, you will find that custom redirect in any drop-down menu where a redirect is requested.
- The registration doesnt work – Please complete all required fields
Be sure that other 3rd party plugins don’t affect the WP Register and Login process.
- New Account email/Welcome email Notification is not sent
There are two different welcome notifications from the register process that are sent to users:
- New Account – when the user is able to login.
- New Account Review Request – when the user is set by default to pending.
Based on your settings, especially in the Register Form section, make sure that you have the proper notification active.
- New users are not set on Pending even if the WP default role is set properly
This may happen because of setting up a specific WP role to be assigned to certain levels. Specific WP Roles set on levels will override the default WP role set in the register form.
- The Stripe Payment is invoked, even if the registration form is not completed
This kind of behaviour may occur only when it comes to required fields and stripe payment gateway.
Stripe – works based on JS calls, providing a popup box where customers need to fill their payment details (Card Number, Expiration Date, etc).Because it is a JS action, it cannot be processed until after the registration form is submitted. Even if the Stripe box shows up before the registration form is completed, the customer will be charged only when the register process will have concluded and the new user stored.
Stripe details are not requested twice, therefore there should be no worry about the charging procedure.
- Avatar is working properly but the standard user image/avatar is not replaced
The Avatar feature is custom built in UMP, and it only works inside the system. It is not meant to replace the standard Profile image or Gravatar which are displayed on other pages.
- Users are not receiving Double Email Verification
There can be several reasons as to why this is happening:
- Check if double email verification is properly set. You may want to check out the following article.
- Verify that your WordPress environment and your server are able to send regular emails.
- Check the spam folder.
- The OptIn Subscription are not stored
New subscriber emails can be sent to an external email platform for follow-up on newsletter campaigns. If your subscribers are not stored in your list, this may be caused by a few things:
- Double-check your Opt-In credentials for the desired email platform destination (Extensions -> Opt-in Settings).
- Check your destination list for restricted conditions, such as required fields (should be off).
- Check your destination list for a double opt-in requirement (should be off).
- Check if the Opt-In Subscription is enabled and properly set in the Register Form settings.
We recommend that you first try to create a fresh new list on the email platform of your choice, but with no additional options attached. - How to set a Multi Payments option?
If you want to provide your customers a multi payment option, you need to go through the following steps:
- Activate multiple payment gateways from the Payment Services tab by completing the payment settings and turning the activation button on.
- Activate the custom field payment_select from the Showcases->Register Form->Custom Fields page by checking where you want this field to appear (“On Register Page” and/or “On Account Page”).
Tip: By editing the special payment_select field you can choose the template showcase and also set additional options: labels, sub-label, etc.You might also want to look over the additional options found in the General Options->Payments page.
- The Upload file button on Register form is not working
If the upload file button on the Register form or the Avatar buttons don’t work, make sure that the jQuery library has not been altered or customized by 3rd party scripts installed in your WordPress environment (such as plugins or WP Themes).
Try checking the upload file button after deactivating the other plugins, or after changing the current WP Theme.
- Inside Locker is showing up but the content is not restricted
If the Inside Locker box is showing up, that means that you’ve already properly set up the Inside Locker Template and the restrict conditions, but the restricted content is not properly set.
If you want to restrict specific content (text, button, images, videos) on a certain page, you need to place that content between the Inside Locker shortcode tabs.
You can set the content inside manually, or when you wanna add an Inside Locker over a specific Content, just select that content inside the Page content with dragging the mouse and after that Add the Inside Content using the red-button: MP Locker. The shortcode will be set automatically on a proper way.
When you want to add an Inside Locker over specific content, just select the content with your mouse and after that use the MP Locker red button. The shortcodes will be placed automatically and in the correct position.
- Change reCaptcha language
The default language for the reCaptcha script is English.
You can change that in the UserAddEdit.class.php file on line 975, utilities.php file on line 904 or you can search for recaptcha/api.js?hl= in both files.
- Error 500 Internal Server Error is showing up
Internal server errors are not specific to WordPress, they can also happen as a result of anything else running on your server as well.
500 Internal Server is an error from server side.An internal server error is very generic, therefore it does not tell the developer anything. It does not specify the cause of the error or where the problem is.
Increase the PHP Memory Limit
Sometimes this error can show up if you are exhausting your PHP memory limit. Ask your hosting provider about your server settings and limitations. There may be a very small limit set there and any script that needs to process bigger jobs will be stopped.
Check Server Permissions
On some servers based on firewall conditions, or other restrictions, certain files (from subfolders, or with specific names) are restricted from being accessed via browser. Ask your hosting provider what error was stored in the server logs behind the generic “500 Server Error”.
- Can I add another Payment Gateway or use an external script?
Ultimate Membership Pro has multiple payment gateways included which automatically manage recurring payments and are able to confirm any completed payment on external payment platforms.
Each payment gateway is linked to multiple modules such as: Register, Subscriptions, Coupons, Transactions, Levels, etc.
Adding a new payment option is a very complex job, therefore not on option for the customer. External scripts can not replace the available payment gateways from UMP.
- I can not activate the Plugin
The plugin is activated based on the purchase code verification, which is done directly on the Envato server.
It is possible that the Envato API is down, if that is the case, try to check again a little bit later.
If it’s still not working, please check on your server/website if the cURL option is enabled in your PHP settings.
Even with cURL enabled, based on security settings your server may refuse to send or receive data from the Envato server.
You can ask your hosting provider about it.cURL is the only professional way that two servers connect to get data from one place to another.
- Native Fields can not be edited. I want to change the Label
The native WordPress fields (Username, Email, First Name, Last Name, Password, Confirm Password, etc.) can’t be edited or deleted. If you want to change the labels for those fields, you can do so by using the translation file.
The Ultimate Membership Pro plugin is translation ready, meaning you can add an additional language file (even English) to your language set on WP.
All the text elements that are not available to be managed from within the UMP Dashboard (native fields labels, buttons, etc), can be handled via the Translation file, the plugin being fully translation ready.
For English – ihc-en_EN.mo & ihc-en_EN.po
To learn more, please head over to this link.
- Some words/texts needs to be changed. How to?
All the texts that can not be changed from the UMP Dashboard (native field labels, buttons, etc) can be modified through the translation file.
You can add an additional language file (even English) to your language set on WP.
For English: ihc-en_EN.mo & ihc-en_EN.po
A full guide on how to add a new language file can be found here.
- How can I translate the Plugin?
The Ultimate Membership Pro plugin is coming by default with English interface but fully translation ready. You may translate the entire Front-end and Back-end section based on your needs.
Part of existent strings and custom messages are directly manageable from UMP Dashboard interface and not via language files. So look into UMP Dashboard first for all available options.You can add an additional language file for your language set on WP.
Make sure that the plugin folder of the translation target is on your local machine before starting the translation.
Copy and rename the file with the relevant WordPress locale. For example, if you want to translate the file to French, rename the file to fr_FR.po. In the case of a plugin, rename it to ihc-fr_FR.po, where ihc is the name of the text domain that the plugin loads.
For French: ihc-fr_FR.mo & ihc-fr_FR.po
1. Using PoEdit standalone app
You can use the free PoEdit app to create and manage language files based on the default files available from the Ultimate Membership Pro plugin.
- Open the po translation file in Poedit, click update to update the translation
source. - Open the catalog properties from Catalog > Properties and select the language,
press ok. - Now you can go through the source text and enter your translations.
- Click validate then save the translations, the po file will be updated and an mo file
will be generated. - Upload the new or updated language files to your WordPress installation folder indeed-membership-pro/languages/.
- Set your WordPress language by using a plugin such as WordPress localize, WPML, or manually update the WP_LANG constant in your WordPress config.php file.
2. Using LocoTranslate plugin
https://wordpress.org/plugins/loco-translate/
You can easily manage translations over Ultimate Membership Pro directly from WordPress Dashboard.
- Install Loco Translate free plugin
- Change default Loco Translate Settings by increasing “Skip PHP files larger than“.
- Open Loco Translate -> Plugins section and search for Ultimate Membership Pro
- Edit ihc.pot Template file and proceed a “Sync” action in order to be sure that all available strings are included. You must “Save” changes before leave current file setup.
- Create or open your language file and use “Sync” button to have all available strings inside.
- Translate all available strings
There are many guides on how to add a new translation file to any WP Plugin or Theme:
https://make.wordpress.org/polyglots/handbook/
http://themekraft.com/add-your-own-language-files-to-wordpress-plugins-with-poedit/
http://wordpress.stackexchange.com/questions/57219/how-to-translate-a-plugin-via-po-mo
If an important update was released and texts were added, you will need to update your language file.
The plugin’s custom name used in the translation file name is: ihc - Open the po translation file in Poedit, click update to update the translation
- A New version was released, how to Update the Plugin?
If you have received an update notification and you want to update the plugin to the latest version, first you need to download the newest uploaded file. You must log in your CodeCanyon account and head over to:
http://codecanyon.net/downloads
The safest way to update the plugin to a new version is via FTP Upload. Download the latest version, unzip the file and copy the folder to your website wp-content/plugins/ overwriting the current plugin folder.
Important features and fixes are released with each update. If your plugin version is very old, make sure to keep a back-up of your current version before updating to the latest plugin version. - Parse error: syntax error, unexpected T_STRING
If you encounter any syntax errors while you are trying to install the plugin, it’s most probably that the PHP version installed on your server is a very old one. The current available PHP version is v.7.x, but for a proper workflow a PHP version starting with 5.3 is required.
Example of error:
Parse error: syntax error, unexpected T_STRING in /home/public_html/xxxx/wp-content/plugins/indeed-membership-pro/utilities.php on lineContact your hosting provider and request a PHP update.
- Set PayPal on Sandbox but I’m not receiving payment confirmation
SandBox from PayPal is a testing environment for managing payments without being charged. For a proper workflow, you will need a Merchant sandbox Account and a Buyer Sandbox Account.
If you haven’t received payment confirmation and the level hasn’t activated yet, don’t worry. Sandbox does not work as fast as the live system, and some delays may occur from time to time.It’s recommended that you run a few tests using the live PayPal environment, but with insignificant prices (ex: $0.01) for a foolproof simulation. If you’re still experiencing issues, please drop us a quick line and we’ll see how we can help.
- User cancelled payment, still has access to content?
If a user has registered but cancelled the process right before setting up payment, the user does not have access to paid content. They are however registered as a subscriber.
In fact, here’s a breakdown of exactly everything that happens behind the scenes:
Signup Phase:
- Upon signup, the user completes his registration and is forwarded to the payment section
- At this stage, the user is assigned their access level
- Activation occurs automatically once payment is confirmed during the Confirmation Phase
Confirmation Phase:
- If you check the Subscription tab, you can verify the payment status of specific levels
- If the user hasn’t completed the payment, you’ll notice that their status is set to [Hold]
- At this stage, the user’s WP-Role is set to [Pending] and manual admin activation is required
- If the payment was not completed, the user’s role is changed to [Subscriber]
- If a user is demoted to [Subscriber] they can only continue payment with assistance from the admin
In short, as stated above, there’s no real need to worry! Unless the user has completed payment, they are unable to access any paid content for their respective signup level.
- Known Compatibility Issues
If you have installed our plugin and it’s not behaving as expected, this can be due to a number of reasons including some known compatibility issues with third party plugins.
To help troubleshoot, we recommend taking the following steps:
- Deactivate Jetpack as it may cause some issues.
- Deactivate any third party login plugin where the captcha functionality may cause conflicts.
- Deactivate any other third party plugins, not specifically advertised as compatible¹.
- A2 Optimized WP doesn’t let you login using the front-end form.
- Zoho Campaign Plugin affects the register form style and VC elements.
If you’re still experiencing any issues after attempting all of the above, please get in touch with us so we can look into it.
Due to the incredibly large offering of WordPress plugins, it’s nearly impossible to guarantee compatibility with all of them. That being said, we haven’t received many reports about compatibility issues.Customers have also reported the following free plugins that have affected the UMP workflow: Bakery Custom Post Types, Contact Form 7 – Stripe Extension, WP Maintenance.
- Notifications do not work, please help!
The plugin comes with a few example notifications, but due to the vast number of different scenarios it was impossible to include them all by default.
We recommend creating notifications catered to your specific needs by using one of the examples as a template.
If your notifications are not sent, first check if your WordPress environment and your server are able to send emails. Notifications module is based on the standard WP function: wp_mail().You should first check if your notifications are active and properly set. For more information, please follow the next topic: How to send Notifications?
In some cases the SMTP mail server refuses to send some emails based on destination or email content. Check if your SMTP mail server has no additional filters or restrictions, such as special links inside or long words.
- Set everything up correctly, but everything is visible to all users?
No need to panic!
If you have set up a paid membership tier or a content locker and want to check out what it looks like, you need to keep in mind that you’re logged in as an admin user, with the highest privileges. This means that you should be able to see everything, at all times, and the plugin is working as intended.
In order to see the plugin functionality in action, you need to do one of two things:
- Log out of your Admin Account and browse to the respective page
- Open an Incognito Window (Chrome) or Private tab (Firefox) and browse to the respective page
Alternatively, you can create a test user, with a lower access level than the one you’re trying to test, and sign in as that user. You will notice the functionality magically works as expected!
This approach is particularly useful if you have a really complex tier-system and want to make sure that everything is set up properly, without a shadow of a doubt.
- Will it slow down my website?
Syspro Website Multilingual will have little impact on your site speed.
- What types of content can I translate?
Syspro Website Multilingual add-on works out of the box with website, custom post types, complex themes and site builders, so you’ll be able to translate any type of content.
- How do I start to translate my website?
After installing the add-on, select your secondary language and click “Translate Site” to start translating your entire site exactly as it looks in the front-end.
- Can you translate your E-Commerce store?
Yes, Syspro Website Multilingual works out of the box with E-Commerce. You can use it to build a multilingual E-Commerce store.
- Where are my translations stored?
All the translations are stored locally in your server’s database.
- What happens after my licence expires ?
When your licence expires the plugin will still continue to work as configured. However, you will lose access to updates and premium support. This includes new features, bug fixes, and full compatibility with the latest versions of WordPress and WooCommerce.
- Does TranslatePress work on WordPress Multisite?
Yes, TranslatePress works on multisite as well. You can either network activate the plugin, or do it individually for each sub-site.
It works to add languages on individual sub-sites in a network install (and choose the languages in which you translate each sub-site).It will NOT work to have each sub-site as a secondary language.
Note: The license key of the premium product needs to be added in the Main site -> Settings -> TranslatePress, not in the Network Dashboard.
- How can I translate an email that I customize in my Dashboard ?
This can be achieved using the Conditional Shortcode Based on Language.
You wrap the content for every language using the right shortcode and only the correct part will be emailed to the user.
Ex.
This content will be sent only to English users. - How can I make TranslatePress not process a custom URL ?
When the Force Language in Custom Links option is set to Yes, any custom link that you add to your website will get processed by TranslatePress to add the language to it.
If you want TP to ignore an URL, you can append this hash to it: #TRPLINKPROCESSED
Example: Let’s say the URL we want to be ignored is this one:
https://mysite.com/ignored-url
To make this work we add the hash from above so the link we will insert is:
- How do I change the Default Language ?
You might want to make the language you translated your website into the first one.
To do this, go to Settings -> TranslatePress and set the Use subdirectory for default language option to Yes. Then, using drag and drop, drag the language you want to be the default one to the top.
A better way of handling this is to use the Automatic Detection of User Language add-on. This will redirect the user to the correct language based on his IP or browser settings.
Ex.
- How do I add a dropdown language selector to my menu ?
When you’re adding or modifying a menu and TranslatePress is active, you’ll find the defined languages under the Language Switcher tab. You can use these elements to create the dropdown menu, exactly as you would create any other dropdown menu on your website.
Ex:
- My Google Translation API key doesn’t work
If you’re having trouble with your Google API key, please make sure that you followed correctly our guide for generating it.
Be extra careful at Step 4 since this is the cause of issues most of the time.
- Is the DeepL API free ?
No, the package that contains API access is listed and can be purchased for 4.99€ + usage fees.
More information about the DeepL API package can be found here: https://www.deepl.com/pro.html#developer.
- Is the Google Translation API free ?
No, the Google Translation API is not free, they charge 20$ per million characters that you translate. You can read more about this here.
However, Google is offering a Free Trial option that gives you access to 300$ over 12 months that can be used towards the Google Translation API. This means that you can use it for free, within this limit, because TranslatePress is storing the translations locally. The data is retrieved from Google only once, then it’s being served from your own database.
To access this trial, you can follow this link: https://console.cloud.google.com/freetrial
- How can I show different versions of a video based on the current language ?
This can be achieved using the Conditional Shortcode Based on Language.
You add both versions of the video to the content and wrap them up with the shortcode using the correct languages.
Ex.
- I cannot select some strings from the page to translate
It’s possible that some strings cannot be clicked through our visual interface.
If this is the case, you should try to look for them inside the Strings List that’s available under the current language at the top of the translation interface.
- I don’t see the Licence tab to add my serial key
The licence tab only appears after installing one of the paid add-ons.
So first go to your TranslatePress Account page, download, install and activate one of the add-ons and the tab will show afterwards. - I want to access the extended profile data?
If you want to access extended user data, please upgrade to the premium plugin and follow the steps mentioned below.
- Login to miniOrange dashboard (https://login.xecurify.com) with your miniOrange account credentials.
- Go to Social analytics->Social Applications Usage Summary, click on Search and then click on View under Additional Information.
- You will find user details fetched by our Plugin for each login attempt there.
Note: Make sure you have enabled the extended attribute check from the plugin. Also, your app needs to have permissions from user to collect extended attributes.
- Why should I register?
We ask our customers to register with miniOrange because we take care of creating applications for you so that you don’t have to worry about creating applications in each social network.
Also, registration helps us to be in contact with our customers. In case you need any help, we can help you with step by step instructions.
By registering for our plugin, you can also upgrade to our Premium plans with ease. Our premium plans come with a lot more features tailored for providing your users with a seamless login experience.
Please Note: You can go through our Privacy Policy for how we use your information. We don’t sell your information to any third-party organization.
- I cannot see some icons in preview or on blog even though I have selected them in the plugin setting.
Please check if you have an Adblock extension installed on your browser where you are checking the plugin. If you do, the Adblock extension will have a setting to block social buttons. Uncheck this option.
If you don’t have Adblock installed and still face this issue, please contact us using the support form on the right or mail us at info@xecurify.com
- Email share is not working. Why?
Email share is the plugin is enabled through mailto. mailto is generally configured through desktop or browser if it is not working, mailto is not setup or improperly configured.
To set it up properly, search for “mailto settings” followed by your operating system’s name where you have your browser installed.
- There is no option of instagram in social sharing. Why?
Instagram has made a conscious effort to not allow sharing from external sources to fight spam and low quantity photos at this point in time, uploading via Instagram’s API from external sources is not possible.
- Why is sharing with some applications not working?
This issue arises if your website is not publicly hosted. facebook, for example, looks for URI to generate its preview for sharing. That does not work on the localhost or any privately hosted URI.
- It is possible to show sharing icons below the post content?
You can put social sharing icons before the content, after the content or both before and after the content. Go to the sharing tab, check the blog post checkbox and select one of three(before, after, both)options available. save settings.
- My user get the following message-“There was an error in registration. please contact your administration “. What should I do?
This message is thrown by WordPress when there is an error in user registration.
1.To see the actual error thrown by wordpress,go to \wordpress\wp-content\plugins\miniorange-login-openid\class-mo-openid-login-widget.php file.
2.Search for the line:
//print_r($user_id);3.Change it to
print_r($user_id);4. Save the file and try logging again. please send us the error you while logging in through the support forum to your right.
- I forgot the password of my miniorange account. How can I reset it ?
There are two cases to according to the page you see –
1. Login to the miniorange screen: you should click on forgot password link. you will get your new password on your email address which you have registered with miniorange. now you can login with the new password.
2. Register with miniorange screen: Enter your email ID and any random password in the password and confirm password input box. This will redirect you to login with miniorange screen. Now follow the first step.
- After entering OTP, I get invalid OTP. What should I do?
Use the Resend OTP option to get an additional OTP. please make sure you did not enter the first OTP you received if you selected Resend OTP option to get an additional OTP. Enter the latest OTP since the previous ones expire once you click on Resend OTP.
If OTP sent on your email address are not working, please verify your account using your mobile number. you will get an OTP on your mobile number which you need to enter on the page. If none of the works. please contact using the support form on the right.
- I did not recieve OTP. What should I do?
The OTP send as an email to your email address with which you have registered with miniorange. If you can’t see the email from miniorange in your emails, please make sure to check your SPAM folder.
If you don’t see an email even in the SPAM folder, please verify your account using your mobile number. you will get an OTP on your mobile number which you need to enter on the page. If none of the works. please contact using the support form on the right.
- I want to change the email address with which I access my account. How can I do that?
You will have to register in miniorange again with your new email id. please deactivate and activate the plugin by going to Plugins -> Installed Plugins and then go to the social login plugin to register again. This will enable you to access miniorange dashboard with a new email address.
For any further queries, please submit a query on the right-hand side in our support section.
- My users get the following message -“Registration has been disabled for this site. Please contact your administrator.” What should I do?
This means you must have unchecked the check-box of auto-register in the Social Login tab. Please check it. This will allow new users to be able to register to your site.
- I am getting an error while logging in with Facebook. This URL Is Blocked. The URL http://social.xecurify.com/moas/openid-connect/client-app/callback has been blocked from Facebook.
You can set up the custom app for Facebook in the social login plugin so that the issue is altogether avoided. We have contacted Facebook regarding the blocked URL issue. We are awaiting their response.
Steps to set up custom app:
1. Go to the Custom app tab in the WordPress social login plugin.
2. Click on the Add Application button.
3. Select the facebook app in the dropdown list and follow the instructions to set up the app.
Instructions to configure Custom Facebook App :
1. Go to Facebook developers console https://developers.facebook.com/apps/. Login with your facebook developer account.
2. Click on Create a New App/Add new App button.
3. Enter Display Name and click on Create App ID.
4. Click on Products from the left pane of the page and select Facebook Login and click on Set Up button.
5. Click on Web. Enter your site URL into Site URL option then click on Save.
6. Goto Settings -> Basic from the left pane of the page, Enter App Domain (eg. example.com), your privacy policy URL in Privacy Policy URL and select Category of your website. Then click on Save Changes.
7. From the left pane, select Facebook Login -> Settings.
8.Under Client OAuth Settings, enter {YouWebsiteURL}/openidcallback/{appname} (eg: login.xecurify/openidcallback/facebook ) in Valid OAuth redirect URIs and click Save Changes button.
9. Change your app status from In Development to Live by clicking on OFF (sliding button) beside Status option of the top right corner. Then, click on the Confirm button.
10. Go to Settings –> Basic. Copy the App ID and App Secret and Paste into the Facebook custom app tab in the plugin.
11. Input email, public_profile as scope.
12. Click on the Save settings button.
Please contact us at info@xecurify.com if you need help with the setup.
- How do I center the social login icons?
1.If you are making changes to a PHP file.
Go to the PHP file which invokes your page/post and insert the following html snippet. Also, increase the margin-left value as per your requirement. Save the file.
<div style="margin-left:100px;"><?php echo do_shortcode('[miniorange_social_login]')?></div>2.If you are making changes to an HTML file.
Go to the HTML file which invokes your page/post and insert the following html snippet. Also, increase the margin-left value as per your requirement. Save the file.
<div style="margin-left:100px;">[miniorange_social_login]')</div> - Why do my users get a message that it is not secure to proceed?
Your website must be starting with http://. Now generally that’s not an issue but our service uses https://( s stands for secure). You get a warning from the browser that the information is being passed insecurely. This happens after you log in to social media application and are coming back to your website. The warning is triggered from the browser since the data passes from https:// to http://, i.e. from a secure site to non-secure site.
We make sure that the information(email, name, username) getting passed from social media application to your website is encrypted with a key which is unique to you. So, even if the there is a warning of sending information without security, that information is encrypted.
To remove this warning, you can add an SSL certificate to your website to change it to https OR use your own custom app
- I am not able to fetch extended attributes. How do I access extended attributes?
Check the option of Extended Attributes in the Social Login tab. Then in the miniOrange dashboard, go to Social analytics-> Social Applications Usage Summary, click on Search and then click on View under Additional Information to see extended attributes of users who login using your app. You can also download it as a csv there.
Note: Your app needs to have permission from users to collect extended attributes. - Can I configure my own apps for Google, Facebook and Twitter?
Yes, it is possible to configure your own app. That is available in the Standard and Premium plans.
Please contact us using the Support form if you want to purchase these plans.
- After logout I am redirected to blank page?
Your theme and Social Login plugin may conflict during logout. To resolve it you need to uncheck Enable Logout Redirection checkbox under Display Option of Social Login tab.
- How can I redirect to my blog page after login?
You can select one of the options from Redirect URL after login of Display Option section under Social Login tab.
1. Same page where user logged in
2. Homepage
3. Account Dsahboard
4. Custom URL – Example: https://www.example.com
- Social login icons are not added to login/registration form.
Your login/registration form may not be wordpress’s default login/registration form. In this case you can add social login icons to custom login/registration form using ‘social login shortcode’ [miniorange_social_login]. Refer to ‘Shortcode’ tab to add customizations to Shortcode.
- How can i put social login icons on a page without using widgets?
You can add social login icons to any page or custom login page using ‘social login shortcode’ [miniorange_social_login]. Refer to ‘Shortcode‘ tab to add customizations to Shortcode.
- How to add login icons to frontend login page?
You can add social login icons to frontend login page using our shortcode [miniorange_social_login]. Refer to ‘Shortcode’ tab to add customizations to Shortcode.
- I want to access the extended profile data?
If you want to access extended user data, please upgrade to the premium plugin and follow the steps mentioned below.
- Login to miniOrange dashboard (https://login.xecurify.com) with your miniOrange account credentials.
- Go to Social analytics->Social Applications Usage Summary, click on Search and then click on View under Additional Information.
- You will find user details fetched by our Plugin for each login attempt there.
Note: Make sure you have enabled the extended attribute check from the plugin. Also, your app needs to have permissions from user to collect extended attributes.
- How do I logout from the plugin and login with a different email address?
Deactivate the plugin from WordPress dashboard and activate again. Now go to the account setup tab of the plugin and login with the new email.
- Facebook sharing is showing the wrong image. How do I change the image?
The image is selected by Facebook and it is a part of Facebook sharing feature. We provide Facebook with webpage URL. It generates the entire preview of webpage using that URL.
To set an image for the page, set it as a meta tag in of your webpage.
< meta property=”og:image” content=”http://example.com/image.jpg” >
You can further debug the issue with Facebook’s tool – https://developers.facebook.com/tools/debug/og/object
- Will pages in your website dashboard be cached?
No, your website dashboard pages are not cached. The cache functionality is only meant to cache frontend pages.
- How do I serve cached pages to people using a phone or tablet?
You can generate a separate cache by selecting ”Generate separate files for mobile devices” in the page cache settings. This cache setting is only necessary if you use a specific theme for mobile devices, or for certain AMP plugins.
- What is the maximum number of pages I can cache?
There is no limit to the number of pages you can cache. The only limit is the space on your server and the maximum number of subdirectories allowed by your server, as caching will write files in subdirectories following the permalink structure.
If you were to reach a caching limit, it probably means that your server is not fit for the size of your website and caching needs.
- Can I make certain parts of the page stay dynamic when cache is enabled?
The cached page is sent to the user before most of your website is loaded. The add-on aren’t loaded yet, making it impossible for them to change the cached content at every request.
- Will caching slow down my server?
No, caching will actually reduce the load on your server, by reducing the amount of PHP and mysql used. You might see a peak in resource usage when using the cache preloader, as this functionality will create the cache files for all your pages in a short amount of time. But once this is done, performance should increase and the load on your server will decrease. Every single major site uses caching to serve cached pages faster by using fewer resources.
- How do I prevent Syspro Website Optimize from caching a certain page?
To prevent a page from being cached, you can add the URL to the field “URLs to exclude from cache” in the cache “Advanced settings” tab. If you are developing a plugin and want to prevent a page from being cached, you can define the “DONOTCACHEPAGE” constant on the pages you need. Any request where “DONOTCACHEPAGE” is defined will not be cached.
- How do I cache only the home page?
Add /.+ to the cache option “URLs to exclude from cache” on the advanced settings tab.
- What frequency should I choose for the cache preloading schedule?
Choosing a frequency for the cache preloading schedule will depend on factors such as the frequency at which the website content is updated, the number of pages in the cache, the resources of the server and more.
For example a site with hundreds of pages will require more resources to preload its cache. So choosing a high frequency will mean that the cache will be recreated often, and the resource usage will be higher.
On a website where updates aren’t as frequent, you can even disable the cache preloading schedule, or set a high cache lifespan and set the cache preloading schedule to follow it.
- What is “cache preloading”?
Usually, a page is cached when a user visits it. So the first user visiting won’t be served a cached version of the page, and will wait longer than the next users. The cache preloading functionality will go through all your pages and posts, and simulate a visit by a user, allowing Syspro Website Optimize to cache the pages before anyone visits them. Your first visitor will thus be served a cached version of the page, increasing its performance.
- Will the comments work even when page caching is enabled?
Yes, when using our website’s commenting system, your users will still be able to post comments. Every time a comment is approved, the cache for that page or post will be cleared, allowing the next visitor to see an up to date list of comments.
- Do I need a special setup to use the caching feature?
No, if your website works properly, Syspro Website Optimize will be able to cache your pages and posts.
- How do I know my webpage is being cached (or why it isn’t)?
If cache is enabled, and in order to see if your page is cached, use the “View Source” function in your web browser to view the page source. However, note that if you are using a further service that minifies HTML (e.g. Cloudflare). Also note that if you do not preload the cache, a page or post will have to be visited once for the cache file to be generated.
- Why should I use a caching add-on on my website?
You think your site is fast without caching? A caching add-on will make your website even faster. A faster cached website will increase SEO, it will improve your visitors experience. Caching will also save your server’s resources.
- What is caching, or page caching?
“Caching”, from Wikipedia: “In computing, a cache is a hardware or software component that stores data so that future requests for that data can be served faster; the data stored in a cache might be the result of an earlier computation or a copy of data stored elsewhere. A cache hit occurs when the requested data can be found in a cache, while a cache miss occurs when it cannot.” — Syspro Website Optimize cache does this by saving the page computed by your website on the disk. When a user visits a page, Syspro Website Optimize will serve the cached page before your website is loaded. If the page wasn’t cached before, it will be computed by your website, and Syspro Website Optimize will then save the result to the cache.
- Which optimization will make the biggest difference?
This depends on your setup (theme, number and quality of add-on used, etc…), but generally, caching will make the biggest visible difference to your website’s performance.
- Can you help me restore my database?
Not unless you have an existing backup. Please ensure that you make a backup of your entire database before using Syspro Website Optimize for the first time, and when you upgrade to a major new version of it.
- Is optimizing my database safe?
Yes; optimizing does not involve any “tricks” or poking around in dangerous ways. It involves running routine clean-up operations using well-defined, common MySQL commands. Nevertheless, we always recommend backups, which cover every possibility; not just database malfunctions, but hackers, human errors, etc.
- What savings can I expect to make?
This is a “how long is string?” sort of question. It depends completely on your site – how big it is, how many users interact on it, how long it has been running, and when you last optimised it. However, the savings and speed-ups can be substantial; it is always worth making sure that your database is optimised.
- Isn’t it better to use a dedicated caching add-on to cache my site?
Our caching tests and feedback from real-world users show that the caching feature alone can make your site faster than any other cache add-on or optimization. See these speed test results.
- Bulk Remove Sale Dates
This operation is possible with enabled “binded editing” mode only, where products should be selected by checkboxes:
If necessary make filtration by your logicSet pagination value to the max necessarySelect products using checkboxes (press SHIFT keyboard to select from first to last)Enable binded editing modeClick ‘Clear’ button on any selected productWait until operation finished - Can I bulk increase multiplying product prices like ‘price x 2’ instead of by percentage?
Yes, but you will need to use percentage anyway, apply 200% in this case!
- Can I copy products title into slug field using bulk edit?
Yes! Use variable {TITLE} in the bulk editing form.
Hint: if clear the slug cell it will re-generated the slug using product title string!
- Change products price value for 15% in regular price
Yes! It is possible to manipulate with regular prices of Syspro E-Commerce products, and change products price value related to their current value.
Select products using checkboxes or filter them by any parameters you need
Open Bulk Editor form
Find field ‘regular price’ and check it by checkbox near
Enter 15 in the textinput and in the drop-down near it select ‘increase by %’
Click on ‘Do Bulk Edit’ and wait while the operation finish
- How to add to existing gallery 2 new images using bulk edit?
Task: 370 products with defined set of gallery images in each product. How to add 2 more images?
Enable column ‘Gallery’ in the tab Settings and press Save button thereBy Filters select the products by categories or other parametersOpen Bulk Edit tab -> tab AdditionalFind and enable there button ‘Images’Using button in the opened popup window add image(s) you want to add to the selected productsIn the drop-down select: ‘Add selected images to the products in the popup to the already existed ones’Press ‘Apply’ buttonPress ‘Do Bulk Edit’ and wait until operation finishedThe same algorithm works for images deleting.
Note: steps above are actual for the operations ‘add’ and ‘delete’ in: ‘Download files’, ‘Cross-sells’, ‘Up-sells’, ‘Grouped products’ - How to add Syspro E-Commerce products custom taxonomies
Custom taxonomies allows you to create such notions for your products as locations for example.
- How to detach completely an attribute from the product?
For example you decided to detach completely attribute Material from the variable products. Do next steps:
Using the functionality of the tab ‘Filters’ make filtering of the products by type: ‘Variable’ and also if necessary you can filter by more parametersIf you need to change only some products you can select them using checkboxes in the Products Editor or skip this step. Also you should know that you can do this operation without any filtering using product selection by checkboxes only.Go to tab ‘Bulk Edit’ and enable there in section taxonomies attribute ‘Product Material’Do not select any terms in the drop-down for the ‘materials’ there but select behavior in the near drop-down: ‘replace’Click on ‘Do Bulk Edit’ and wait until operation is finishedIf you want you can rollback changes in the tab History - How to edit product variations using bulk?
Using tab Filters filter all products by product type – variableIf you have a lot of variations per product (>10) set products per page no more than 5 to avoid server 500 error. And it is better to activate columns only which you need for your current bulk operation.On tools panel activate switcher ‘variations’Now if you open tab Bulk Edit all visible fields will be able to edit “products variations” only, ignoring their parent-products
- How to filter Syspro E-Commerce products by attachment of taxonomies/attributes to them
For such filtration there is no necessary select terms as it filters by taxonomy/attribute attachment to the product generally, and not for terms.
- How to order product variations using bulk?
Its possible using ‘Ordering’ tab of Variations Advanced Bulk Operations
- How to remove all products variations at all?
If you need to remove all products variations from all variables products of your shop:
In the Filter select product type ‘variable’ and filter by itAfter filtering on the tools panel click on button ‘Variations Advanced Bulk Operations’There go to tab Deleting and select ‘Delete all products variations’Click on ‘Start deleting’ button and wait until deleting finishedIf you need to delete the product variations from the products of any product category – in the tab Filter also select the category (or their combination) you need!
Also if there are only some products which you can see on one page – do not use Filtering – select variables-products using checkbox and do the same another described above. - How to remove images from the gallery of some products?
Two ways about how to clean the gallery of some products, and for this operation column ‘Gallery’ should be activated!
Way 1:Use checkboxes to select some productsEnable ‘binded editing’ switcherClick on Gallery button of any selected productIn the opened popup remove all images and press ‘Apply’ buttonWait until changes apply to all other selected productsWay 2:Use the Filter tab functionality where you should filter products by parameters you needThen go to tab Bulk Edit -> AdditionalSelect using checkbox Gallery fieldClick on Images button there and remove all images there if presented, or/and press ‘Apply’ buttonClick on ‘Do Bulk Edit’ button and wait until bulk operation for filtered products appliesOf course using way 2 it is possible to clean galleries of all products in the shop if to miss step one there (filtering) - How to remove sale prices by bulk operation
Do filtration or selection of the products if it necessary, then go to tab Bulk Edit, find field ‘Sale price’ and set there ‘-1’ and select operation ‘set new’
- How to remove selected downloads?
If you want to delete file from the products downloads use that file link with the next algorithm:
Select by checkboxes or/and make filtering of products from which you want to delete that download link(s)Go to Bulk Edit tab -> tab Advanced -> select ‘Downloads’ and open its popup thereSelect in the drop-down there option ‘Remove selected downloads’Press button ‘Add File’ and set files you want to deletePress ‘Apply’ button on popupClick on ‘Do Bulk Edit’ button and wait until operation finished - How to reset page cache in the browser
press CTRL+R
CTRL+F5
Ctrl+Shift+R
Apple + R or command + R (apple)
in Chrome browser the best way is:
Open the developer tools: Ctrl + Shift + I
Now, leaving the panel open, left click on the “Update” button (next to the address line) and do not release the button.
After a few seconds, you will see a drop-down menu in which there will be an item: Clearing the cache and hardware reboot.
- How to set different prices to the different variations? I need a different price for each size
Example of the task: user has products like posters with foreground color, background color and poster size. Colors here no matter, matters only size which makes the price. So we have: poster 10×12 for RM10, 15×20 for RM14, etc … How to set the price using bulk editing for each such product variation?
Answer:
Using tab Filters – filter “variable products” with category posters if such one existsIf you have about 50 variations per product set products per page 5 to avoid memory fail on the server side. In such cases better activate columns which you need for current operation only!On tools panel enable ‘variations’ switcherOpen tab “Bulk Edit” and select there attributes combination(s) you wantSet regular price value (and/or sale price value if you need)Click ‘Do Bulk Edit’ buttonWait until the operation finished - How to set sale prices lower than regular for 20%?
There is 2 ways: use binded editing or Bulk Editing.
First way:This way is good when you can do it for some products or variations on the same one page in the Products EditorSelect some productsEnable ‘binded editing’ switcherHover on any selected product sell price cell and click on calculator iconIn calculator select: rp- and in the text field there enter 20, and in the last drop-down select percentsSelect prices rounding if you need itClick on blue accept button on the calculator and wait until this bulk operation is finishedIf you did smth wrong you can roll back this operation in the tab History
Second way:In this way you can apply changes to all products on the site or to the filtered ones by your logic.So make products filtering by category or categories, or/and any other parameters if you need itGo to tab Bulk Edit and select field ‘Sale price’ thereEnter 20 in the textinputIn the drop-down select ‘regular price minus value’Click on ‘Do Bulk Edit’ button and wait until operation is finished - How to set the same value for some products on the same time
Binded editing feature will help:
Select first product you need using checkbox in the most left columnPress SHIFT button on your keyboard and without releasing it click on the last (last by your logic) product checkboxOn the tools panel enable ‘binded editing’Enter any value to any field of any selected product you needWait until operation is finishedHint: really this operation is bulk editing, so you can cancel it in tab Bulk Edit and then roll back it in tab History - How to swap one attribute to another without product variation deleting?
Task: I have 3000 variable products in the shop and I want to search attributes and set new attributes instead. For example items marked with the color attribute ‘Brown’ are searched and changed to ‘Red’ without data deletion – Brown should be replaced by Red and nothing more should be changed!
Yes, it is possible with tab Swap in Variations Advanced Bulk Operations
- How to toggle variations to be “enabled” or “disabled”
If you need to disable any variation(s) in variables products you can do next:
In the Filter select product type ‘variable’ and click on ‘Filter’ buttonOn tools panel enable switcher ‘variations’Now you can select (using checkbox in the first column) product variations which you want to disable OR if you have a lot of such variations in tab Bulk Edit check post status and select ‘Private’. Of course if that variation belongs to the products which belong to any category or any other attributes you can continue with filtering of variable products to avoid looking them in all variable products in the shop – so if you can use Filter for targeting – use Filter.Now main thing: select on the top of tab “Bulk Edit” all combinations of variations you want to disable using button ‘Add attributes combination to apply on’: select attributes you need and then if you going to disable 2 combinations click on that button 2 times, and in generated drop-downs below set combinations.After checking twice that you did all right click on ‘Do Bulk Edit’ and wait while operation will be finished
If you decided that you did something wrong – you can roll-back operation in tab History - How to work with the products which have a sale price?
I need to see and work with the products which have sale prices.
Using Filters find all products where the sale price greater than 1. - Is it possible to add new attribute terms in the existing attributes using bulk?
Yes! You can apply operation ‘Attaching’ using Variations Advanced Bulk Operations
- Is there a way to limit the role of Shop Manager?
Task: I want the Shop Manager to be able to update the prices and stock quantity only and nothing else.
Yes, you can, in tab Settings click columns you need using checkbox ‘visible for shop manager’ - Is there any way to add SKUs with variations?
Syspro E-Commerce Bulk Editor allows adding SKU to products variations of variable products.
For example, the main product with 10 variations – the main product SKU is wp-pennant and I would like to be able to add variations 1-10 like: wp-pennant-1, wp-pennant-2, wp-pennant-3, etc.
Nearly Yes. Instead of -1,-2,-3 can be applied variation ID or its menu order (but it is not the best idea as menu order is will be recounted after adding new variation), so it is possible to get such results as: wp-pennant-256, wp-pennant-475, wp-pennant-12
In the Products Editor enable variations switcherNow you can use bind editing OR bulk editing (see the screens)For both ways use syntax: {PARENT_SKU}-{ID} OR apply {PARENT_SKU}-{MENU_ORDER}Read more about variables here. - Is there any way to edit products together with my team at the same time?
Yes! Different users can edit products together at the same time using Syspro E-Commerce Products Editor not interfering with each other as each user has its own options in the add-on system.
Even more: site admin can allow or not allow to the “shop Managers” which products fields they can use in the tab Settings:
- How to Change Store Name in Plugin and at Cusrev.com
If name of your store has changed, there are two ways to update it.
Update store name in your account at cusrev.com
If you have an account at cusrev.com, there is an option to update your store name there.
- Log in to your account at cusrev.com. If you don’t have an account, you can create a new one.
- If you have multiple stores linked to your account, make sure that the right store is selected in the top right corner.
- Navigate to Store Settings page.
- Update your store name in the Name field.
Update store name in our WooCommerce plugin
If you don’t have an account at cusrev.com, it is also possible to update the store name from our WordPress plugin.
- Navigate to the plugin’s settings in WordPress admin area (Reviews > Settings > Review Reminder).
- Update your store name in the Shop Name field and save settings.
- If you display verified copies of your reviews at cusrev.com, then you also need to go to the Trust Badges tab and re-save settings there.
- How to Stop Receiving Emails About New Reviews
Our plugin helps shops to receive a lot of authentic reviews. After a customer submits an aggregated review form, the plugin sends an email with a summary of reviews for each product in the order. The email is sent to the email address that is specified in Email for Notifications field on Review Reminder tab of the plugin’s settings.
In addition to this summarized email, the standard WordPress might also send several notification emails about new reviews (comments). The standard WordPress notifications are sent for each product, so if an order includes multiple products, WordPress will send an email per product.
These WordPress notifications can be annoying, if customers place large orders (e.g., for 15-20 products). It is possible to disable WordPress notification in the standard WordPress settings (Settings > Discussion > Email me whenever). Tick or untick checkboxes for notification emails as necessary and WordPress will stop sending an individual email about each new review.
Please bear in mind that WooCommerce reviews are based on WordPress comments. So, if you disable notification emails for reviews, it will also disable notification emails for comments on non-WooCommerce pages/posts. A possible solution to have all email notifications enabled but still keep your mailbox organized and tidy is to create an email filtering rule in your mailbox. The filtering rule can automatically move all notification emails in a special folder of your mailbox to avoid flooding the inbox with notifications.
- Does Your Plugin Use XMLRPC.PHP?
WordPress provides XML-RPC interface for remote management of the website. It allows you to access your website from custom admin software and mobile applications, rather than through a browser.
Our plugin requires REST API but it does not use XML-RPC interface. You can safely disable XML-RPC and use our plugin.
- Is it Possible to Collect Shop Reviews Only?
The plugin was build to invite customers to reviews products bought in WooCommerce powered stores. However, not all stores sell products. In these cases, it is more reasonable to ask customers provide only store-level feedback without reviewing specific products.
The professional version of the plugin offers the advanced review form editor that enables additional customization of the review forms. One of the options supported by the advanced editor is removal of product-related questions from the review forms. So, it is possible to create review forms that have only store-related questions.
The advanced review form editor is available in My Account area of www.cusrev.com. If you don’t have an account at cusrev.com yet, create a free account to preview features offered by the advanced review form editor.
- How to Delete Reviews?
You have the full control over reviews on your site. If you would like to delete a review, please use Trash button on the Reviews page in the plugin’s menu.
If you enable Trust Badges and opt in for publication of verified copies of all reviews on www.cusrev.com, the plugin will publish verified copies of reviews on www.cusrev.com in addition to saving them into your WooCommerce database. Verified copies of reviews published on www.cusrev.com cannot be deleted because it will compromise their authenticity and undermine trust.
If you disable Trust Badges option, all verified copies of all reviews related to your shop will be immediately hidden and the page of your shop on www.cusrev.com will be deleted.
- How Can Customers Update Their Reviews?
Sometimes customers might want to modify their own bad reviews. For example, after a resolution has been made or if the complaint is not related to the product, among other things. If a review was submitted in response to a review invitation via an aggregated review form, the customer can modify their review using the same link from the original invitation. Please ask them to click the “Review” link in the email one more time and update their review.
If a customer cannot find the original review reminder (invitation), it is possible to re-send them the review reminder. Re-sending of review reminders is available in the Pro version of the plugin. Unfortunately, it is not possible to re-send review reminders with the Free version because of the limit of one reminder per order (see this article for more information).
- Is It Possible to Moderate Reviews?
You have a full control over moderation of reviews on your site. There is a checkbox Moderation of Reviews on the Review Reminder tab in the plugin’s settings. If you enable this checkbox, all reviews submitted via aggregated review forms will need to be manually reviewed and approved before publication on your site.
If you enable Trust Badges and opt in for publication of verified copies of all reviews on www.cusrev.com, you won’t be able to moderate copies of reviews published on www.cusrev.com. However, you still will be able to moderate these reviews on your site. Shop owners cannot moderate verified copies of reviews on www.cusrev.com because this will compromise their authenticity and undermine trust. If you work with a customer and resolve their issue, the customer has a possibility to update their review. You can also post a public response to a review as explained here: how to reply to reviews.
If you disable Trust Badges option, all verified copies of all reviews related to your shop will be immediately hidden and the page of your shop on www.cusrev.com will be deleted.
WooCommerce reviews submitted directly on pages of individual products on your site can also be moderated. This is controlled by Before a comment appears option in the standard WordPress settings (menu path Settings > Discussion).
- Does the Plugin Create Schema Markup for Reviews?
As Moz.com defines it, Schema.org (often called Schema) is a semantic vocabulary of tags (or microdata) that you can add to your HTML to improve the way search engines read and represent your page in SERPs.
The standard WooCommerce functionality already includes structured data mark up to display your product reviews effectively within organic search results. You don’t need any additional plugins for this.
Our plugin extends the standard functionality and adds some extra mark up to help search engines properly crawl your shop (the standard WooCommerce functionality doesn’t provide schema mark up for reviews with pictures).
It is important to understand that having a valid structured data mark up in place makes your website eligible for organic stars in Google but it doesn’t guarantee that they will be shown. You can test the rich snippets using Google’s Structured Data Testing Tool.
- I found a bug in the add-on. How to get it fixed?
Please create a new topic at the support forum and provide detailed information with a screenshot.
- Will collected reviews be shown as stars in Google?
The standard Syspro E-Commerce functionality already includes structured data mark up to display your product reviews effectively within organic search results. This add-on extends the standard functionality and adds some extra mark up to help search engines properly crawl your shop. It is important to understand that having a valid structured data mark up in place makes your website eligible for organic stars in Google but it doesn’t guarantee that they will be shown. You can test the rich snippets using Google’s Structured Data Testing Tool.
- How to Change Sorting of Reviews?
If you would like to change how reviews are sorted on product pages, it is possible to do so using the standard WordPress functionality. Go to Settings -> Discussion menu and find options “Break comments into pages with X top level comments per page and the last/first page displayed by default” and “Comments should be displayed with the older/newer comments at the top of each page”. You can control how reviews are sorted and displayed on product pages by modifying these options.
- Some of the social sharing apps are not working. Why is that?
This issue arises if your website is not publicly hosted. Facebook for example looks for the URL to generate the webpage’s preview for sharing.
- I want to add Syspro E-Commerce Social Login/ Syspro E-Commerce Social Sharing to a custom location on my page. How can I achieve that?
To add Syspro E-Commerce Social Login or Syspro E-Commerce Social Sharing icons to a custom location, use a Shortcode.
- I have added Syspro E-Commerce social sharing – Vertical widget to my page. How can I change its position in the page?
The vertical sharing widget for Syspro E-Commerce Social Sharing gives a couple of options to change its position in the page and also the space between icons. You can align the social sharing widget on the left or right side of the page. You can view these options from Appearance->Widgets or editing the widget options in Customizer.
- I want to upgrade to the Syspro E-Commerce Social Login standard/ premium plan. How can I upgrade?
Please contact us through the support form for the social login standard and premium add-on.
- I want user to select their role on registration
This feature is available in Custom registration add-on which allows the users to select their role during Registration and based on that the user will be given the privileges inside.
- For any other query/problem/request
Please email us at hello@syspro.my.
- Can I use this plugin to ship to multiple addresses?
No, the Advanced Shipping Packages plugin is only meant for scenarios in which you need to split the shipping packages. For shipping to multiple addresses take a look at Shipping Multiple Addresses.
- What happens to products outside shipping packages setup?
All products are in one package by default. Once you’re creating shipping packages using the extension those product can be split up within those new packages. If a product is not in a new package, this will remain in the default package and will be handled the same.
- Does this extension support product variations?
Yes, you can either select parent product to apply one discount for all variations or pick individual variations to set different discounts or include/exclude specific variations from a more general rule. You can also select products to discount by their attributes, tags or even custom field values.
- Can I set different discounts for different categories at the same time?
Yes, you can create multiple product pricing rules and configure different discounts for different categories. In addition, you can pick individual products that you may wish to exclude from the category rule.
- Can I offer discounts to subscribers/members of my site only?
Yes, you can use this extension to run promotions dedicated to subscribers or members of your site. The only requirement for your subscription/membership system is to use custom role, capability or user meta entry to tell members from non-members. For example, if you have a membership extension which changes user role to “member” when someone purchases a membership, you can use a role condition with value “member” to make sure that only members are eligible.
- How will my customers know about the sale, special offer etc?
When developing this extension, our initial focus was on actually making all the different pricing adjustments, discounts and fees work. You can make almost any pricing strategy work but usually your customers are going to see their savings after adding some product to cart or going through the checkout. After getting the actual logic work well, we shifted our attention to the tools that help your customers learn about your deals and sales – you can opt to display a quantity pricing table for bulk and tiered pricing rules or make product prices throughout the shop reflect simple pricing rules. More promotional tools are planned for future releases.
- Does it support … scenario?
The answer is yes. This has to do with how this extension is organized. It is not limited to a few settings that do very specific things, instead it offers multiple pricing/discount/fee methods with dozens of conditions and useful settings which can all be mixed and combined to come up with virtually any product pricing rule, cart discount or checkout fee. Have no doubt that such simple pricing rules as “buy 2 get 1 half price”, “buy 10+ with 15% discount” or “3 for RM9.99” are supported.
- Is it compatible with … extension?
More often than not this extension is compatible with other Syspro E-Commerce extensions as it uses standard price hooks to change prices and standard methods to add discounts/fees.
- Does it support decimal quantities?
Decimal quantities are not supported and will not be supported in the future. This is due to some technical solutions in the add-on that do not work well with decimal quantities. These solutions enable some great functionality which would not be possible otherwise.
- Does it support multiple currencies?
It depends on your specific needs. This extension is fully compatible with a few popular currency switcher add-on and will work fine out of the box. On the other hand, you won’t be able to set specific discounts for different currencies – you can only set them in base currency and get it converted automatically.
- I installed this extension but run into a problem – what shall I do?
Head straight to our support site! We have some self-help content that you can consult and will respond to your inquiry within 24 hours (business days only) if you opt to send us one.
- How to sort the entire database in Smart Manager?
Click on a specific column header in the grid to sort it in the entire database in Smart Manager. For removing the sort, keep clicking on the same column header till the ‘blue arrow’ (beside the column name) is gone, and by default Smart manager will list records sorted by ID in descending order.
- Can I edit serialized data in Smart Manager?
Yes, you can from Smart Manager version 4.1.0+.
- Can I bulk edit or upload featured images with Smart Manager?
Yes, you can bulk edit or upload featured image for multiple products.
- Can I undo Bulk Edit results?
No.
- I cannot see the “Description” column anywhere. How do I update the product description using Smart Manager?
Update Smart Manager to 4.0+ and you will be able to see it.
- Simple / Advanced Search functionality not working
Please make sure you are using the latest version of Smart Manager. Kindly deactivate and then reactivate Smart Manager once and then have a check with the Smart Manager search functionality. If the issue still persists, contact us.
- How to have Price / Sale Price column to show with more than one decimal point after the decimal separator? For example, I want Price to be displayed as 25.57 instead of 25.
There is a setting in WooCommerce which lets you set the number of decimal points to be shown in prices after the decimal separator.
- Go to your WordPress Dashboard > WooCommerce > Settings > General.
- There under Currency Options, you will find the Number of Decimals to be set. You can set it to any value you want and then have re-check with Smart Manager functionality.
- Does Smart Manager support custom columns that may be added using another plugin? If yes, then how to manage any custom field of any custom plugin?
Yes, Smart Manager supports custom columns added using another plugin (Version 4.0+ onwards).
You would need to save at least a single product with that custom plugin fields from WooCommerce edit product page. Then only Smart Manager will detect those custom fields and will display them in the dashboard.
- How can I update one product or products based on a particular category in Smart Manager if I have loads of products?
It is very easy to achieve this using Smart Manager. Use simple search or advanced search functionality to enter product or category name, enclose the name in double quotes for exact match. Then use Bulk Edit to perform all actions you want.
- Why am I not able to view all columns in Smart Manager? Can I customize Smart Manager by adding / removing columns?
To keep things easier to understand, Smart Manager shows the most important fields by default. You can show/hide additional columns. Here’s how. You can only show new fields from here. You cannot add new fields to this list.
- Updating variation parent price / sales price not working
Smart Manager is based on WooCommerce and the same e-commerce plugin sets the price / sales price of the variation parents automatically based on the price/sales price of its variations.
- What does the blue line indicate in the Products dashboard in Smart Manager?
Blue line beside the product name indicates product variations (child) of a variable product (parent).
Also, while updating Regular Price & Sale Price of variable parent product, it is handled by WooCommerce based on the variation child.
- Smart Manager is empty / Can’t see products in the grid
Please make sure you are using the latest version of Smart Manager. If still the issue persists, deactivate all other plugins except WooCommerce and Smart Manager and have a re-check the issue.
If the issue goes away, keep on activating other plugins one-by-one, to find out which plugin was conflicting and let us know about that plugin. If the issue still persists, contact us.
- Is Smart Manager WPML compatible?
Smart Manager is not fully WPML compatible. In other words, Smart Manager will display and let you manage the different translations of the product. However, it will not update all the translations on updation of any one of the translations for a given product.
- How do I upgrade a Lite version to a Pro version?
Follow the steps listed here
- What browsers does Smart Manager work with?
Smart Manager works best in Firefox and Chrome. It is not compatible with IE.
- Can I export data in CSV using Smart Manager?
Yes, you can. Export feature is available in the Pro version.
- Can I import data using Smart Manager?
Unfortunately, you cannot import data using Smart Manager.
- What do the Paid / Pro version give me?
Paid versions allow managing all post types, bulk edit, unlimited inline editing, advanced search, export CSV, duplicate products, print PDF invoices and a lot more.
View all Pro version features - What do I get in the Free / Lite version of Smart Manager?
Smart Manager provides you support for managing four post types in the free version – WooCommerce products and variations, orders, coupons, WordPress posts.
For these post types, you can perform inline editing (upto three records without saving), simple and advanced search using AND filters, and delete upto 50 records at once. View all Lite version features
- What is meant by Cart Abandonment?
While shopping, a user adds products to the cart. But if this user doesn’t complete the purchase on the checkout page, the cart is considered abandoned.
- How often carts get Abandoned? Is it Happening in My Shop?
According to research, 6 out of 10 visitors, leave the checkout page and do not complete the purchase. Even if you have motivated enough, 20% to 25% of the shoppers leave the purchase process.
- Do I Need Any Technical Experience to Use This Add-on?
Any E-Commerce shop owner selling anything online can use this add-on. You will not need any technical experience to start recovering your lost revenue. Once initiated the add-on will work automatically for you.
- Can I Send Coupons with Follow up Email?
Yes. You can generate and send unique, limited-time discount coupons. Though there is no compulsion of sending coupons. It’s completely optional.
- Can I Directly Take Users to Checkout Page, Exactly Where They Left Off?
Absolutely. A unique checkout link can be sent with a follow up email. This will take the shopper to their prefilled checkout page. This will make the purchase process easier for the shopper.
- Will This Add-on Add Any Extra Time in Website Loading?
Not at all. All the add-on data is stored in its own database table. It is a completely self-hosted add-on. It works smoothly and does not leave any impact on the performance of the website. So you don’t have to worry about the speed.
- Do I need to be logged to the website backend to get the notifications?
Yes, it is essential to be logged in your website backend to receive any notifications. Moreover, every type of notification must be created and configured first since the add-on doesn’t enable any for your shop by default.
- What is the difference between “A product is sold” and “A new order is placed”?
A product is sold is the type of notification showing when a specific product is sold. You can specify one or more products when you create the notification. Whereas, A new order is placed is the notification shown when an order is created.
- What do I get in this Lite version?
Spreadsheet like view of products, orders and posts. Search and navigation, limited inline editing, ability to delete multiple items at once
- Which browser to choose for the best performance?
Syspro E-Commerce Smart Manager works best in Chrome, Firefox. Currently it is not compatible with IE.
- Can I export data in CSV?
Yes, you can but the export feature is available in Pro version.
- What happens when an old order that was completed but the gets refunded and How does the plugin handle the points that were received from the refunded order?
There are total two ways for handling the refund request.
- Earn Points
Product Assigned Points: When a user makes a refund request for that product which has some of the assigned points then after refunding the amount, the earned points will be deducted from his/her account.
Per RM Spent Point: When a user makes a refund request for an order from which he/she earned points, then after refunding the amount, earned points will be deducted from his/her account.
- Deduct Points:
Product Purchase through Points: When a customer makes any refund request for that product which has been purchased free of cost(by using his/her points) then after refund request, deducted points will be refunded to his/her account.
- What is the difference between “Redeem Points Conversion” and “Per RM Points Conversion” and also what’s the use of “Enter Product Points”?
- About Redeem Points Conversion – In this setting Merchant can set the amount required for converting reward points to generate the coupon. For example, if you have set the value 1, the point will be equivalent to RM1 (for your site) and if any user has 50 points then he or she will get the coupon amount of RM50 after converting it from My Account section.
- About Per $ Points Conversion – Let’s take an example if Merchant has set the RM1 = 1point (for their site) and any customer will purchase any product with RM50 then he or she will be rewarded with 50 points.
- About Enter Product Points – From here Merchant can select some product and can set the Points for a particular product, and if any user will purchase that selected product he or she will be rewarded with those Points.
- I have installed Syspro Ultimate Points And Rewards plugin and all I get on the points page is a 404 error?
After activating Syspro Ultimate Points & Rewards extension, please save the permalinks.
- I already have a website. Can I exchange with another website?
Existing websites can be exchanged with our more complete web package. Your old customer data can be imported into a new website. If you want to improve web graphics, you can contact us. Our team will arrange for you.
- In what language is my website?
You can choose one language either Malay or English. If you want to be bilingual, contact our team. Our team will arrange for you.
- What is a blog?
A blog is a space where you can write any articles and shares related to your product or service. This blog is important for SEO where outsiders can find your blog by typing keywords in your article.
- Will the report be prepared?
Yes we will provide after your website is ready. We also provide a training manual where we teach you how to update the website, download images to the gallery and else.
- What is an SSL Certificate?
- SSL certificate means Secure Sockets Layer for HTTPS abbreviation. Usually SSL will have a lock symbol on the URL. SSL is a standard security technology for setting up encrypted links between servers and clients such as web servers (websites) and browsers. SSL is an industry standard and is used by millions of websites in protecting their online transactions with their customers.
- Another meaning of SSL is the most widely used security protocol on websites today. It is basically a protocol that provides a secure connection (secure connection) between two machines operating through the internet or internal network.
- How do I upgrade the package later?
You can upgrade the package in the future by just contacting our team. We will discuss the budget and more information for the next package.
- What is Google Analytics?
Google Analytics is your visitor statistics so you can see the performance of your website and you can monitor the behavior of your customers. Also, you can plan a structured strategy for your business.
- How are photo albums managed?
Photo album according to the info you gave us and you can load as much as you want. Just leave it to us.
- Can a website increase the credibility of my business?
Yes, that is correct.
- The website provides your business identity and is a virtual proof that it exists.
- Users believe that having a website makes your business more reliable than just social media sites.
- Website is able to convey information quickly to visitors.
- Why do I need a website if I already have a Facebook?
Your business can be known by Google compared to Facebook. Facebook has a lot of competitors and not everyone will see and read your posts on Facebook. Unlike a website, other than you can change the layout, color, font that suits your taste, your business will also look more professional.
- Is this website the same as the landing page?
Website and landing page are not same. Website is more suitable for the whole company profile and landing page is more suitable for promoting ads about a single product. If you want to make a landing page, you can contact our team.
- Can a beautiful website increases sales?
Yes, a beautiful and a complete website can make customers like your service.
- Is it difficult to manage your own website?
Not difficult. You just need to know some info to make your website constantly updated or you can contact our team to manage your website.
- How do I update my own website?
We will provide manual and video training to make it easier for you to refer on how to update the website such as inserting pictures in the album. If you want us to manage your website, contact our team.
- Is the website built responsive on the phone?
Each website we build, will be adapted to 4 types of devices and screen resolutions, namely tablets, desktops, large screens, and small screens. Fonts and graphics will be adjusted according to the suitability of the device so that it is easy to access.
- How can visitors contact me?
We will put your address, as well as your phone number on the Contact Us page. You can share your website with your friends other contacts.
- What about customer database affairs?
The website we build can manage your customer database such as data storage to make it easier to monitor your customers and your customer contact details. That way, it will be easier for you to contact them.
- What is SEO?
SEO is an organic (unpaid) marketing tactic that can help in improving the ranking of your website in the search engine that is Google for search related to your business, helping to increase traffic and increase sales success rate. Your website will be exposed to the public naturally and you will no longer need to advertise your business.
- What is Payment Gateway?
Payment gateway is replaced by automatic transfer method where you no longer need to send manual slip and further facilitate business transactions. We support every bank of choice in Malaysia including cards and credit cards.
- What is a Server?
Hosting to store all web files and images and can operate 24 hours a day serving your web visitors.
- What is a Domain Name?
Domain name is the address of your website either Syarikatanda.com or Syarikatanda.my registered in your store name.
- What does Range Mode do?
Range Mode saves power by automatically limiting the amount of power the climate control system uses to maintain the temperature of the battery and the interior cabin. You can turn on this setting by tapping Controls > Driving > Range Mode.
- Should I leave my Tesla plugged in while I’m on a trip?
Tesla recommends keeping your car plugged in while you’re away on trips to ensure you return to a full battery. When not plugged in, the range slightly reduces each day.
- How can I find nearby charging locations?
The most convenient way to find nearby Superchargers, Destination Chargers, and other locations you’ve charged at before is by using the Navigation App on the touchscreen (tap the lightning bolt icon). There are also a variety of 3rd party smartphone apps you can download to locate charging options near you.
- Why is my Supercharger charging slowly?
There are a few factors that affect charging rate at a Supercharger. First, charging your battery from 10% to 80% is quick while charging from 80% to 100% doubles the charge time because the car must reduce current to “top off.” Second, extremely low ambient temperatures and extreme battery pack temperatures lead to slower charging rates. Third, sharing a Supercharger (i.e. two cars plugged in to 1A and 1B) can slightly reduce the charging rate of one or both of the cars. For more information about Supercharger, visit the Supercharger page on tesla.com.
- How fast can I charge?
Charging rate is primarily determined by what you’re plugged in to. A Tesla Supercharger charges up to 170 miles in just 30 minutes while the Tesla Wall Connector charges up to 58 miles per hour. For average charging rates of other options, check out the charging page on tesla.com.
There are several other factors that affect charging rate: amount of power available from the charge source, extremely cold temperatures, and current state of charge (a nearly empty battery charges faster than a battery that is almost full).
- Where can I get an X Signature Key?
You can get the X Signature Key at your Billplz Account Settings.
- Where can I get a Collection ID?
You can get the Collection ID at your Billplz >> Billing.
- Where can I get API Secret Key?
You can get the API Secret Key at your Billplz Account Settings.
- I already have a website. Can I exchange with another website?
Existing websites can be exchanged with our more complete web package. Your old customer data can be imported into a new website. If you want to improve web graphics, you can contact us. Our team will arrange for you.
- In what language is my website?
You can choose one language either Malay or English. If you want to be bilingual, contact our team. Our team will arrange for you.
- What is a blog?
A blog is a space where you can write any articles and shares related to your product or service. This blog is important for SEO where outsiders can find your blog by typing keywords in your article.
- Will the report be prepared?
Yes we will provide after your website is ready. We also provide a training manual where we teach you how to update the website, download images to the gallery and else.
- What is an SSL Certificate?
- SSL certificate means Secure Sockets Layer for HTTPS abbreviation. Usually SSL will have a lock symbol on the URL. SSL is a standard security technology for setting up encrypted links between servers and clients such as web servers (websites) and browsers. SSL is an industry standard and is used by millions of websites in protecting their online transactions with their customers.
- Another meaning of SSL is the most widely used security protocol on websites today. It is basically a protocol that provides a secure connection (secure connection) between two machines operating through the internet or internal network.
- How do I upgrade the package later?
You can upgrade the package in the future by just contacting our team. We will discuss the budget and more information for the next package.
- What is Google Analytics?
Google Analytics is your visitor statistics so you can see the performance of your website and you can monitor the behavior of your customers. Also, you can plan a structured strategy for your business.
- How are photo albums managed?
Photo album according to the info you gave us and you can load as much as you want. Just leave it to us.
- Can a website increase the credibility of my business?
Yes, that is correct.
- The website provides your business identity and is a virtual proof that it exists.
- Users believe that having a website makes your business more reliable than just social media sites.
- Website is able to convey information quickly to visitors.
- Why do I need a website if I already have a Facebook?
Your business can be known by Google compared to Facebook. Facebook has a lot of competitors and not everyone will see and read your posts on Facebook. Unlike a website, other than you can change the layout, color, font that suits your taste, your business will also look more professional.
- Is this website the same as the landing page?
Website and landing page are not same. Website is more suitable for the whole company profile and landing page is more suitable for promoting ads about a single product. If you want to make a landing page, you can contact our team.
- Can a beautiful website increases sales?
Yes, a beautiful and a complete website can make customers like your service.
- Is it difficult to manage your own website?
Not difficult. You just need to know some info to make your website constantly updated or you can contact our team to manage your website.
- How do I update my own website?
We will provide manual and video training to make it easier for you to refer on how to update the website such as inserting pictures in the album. If you want us to manage your website, contact our team.
- Is the website built responsive on the phone?
Each website we build, will be adapted to 4 types of devices and screen resolutions, namely tablets, desktops, large screens, and small screens. Fonts and graphics will be adjusted according to the suitability of the device so that it is easy to access.
- How can visitors contact me?
We will put your address, as well as your phone number on the Contact Us page. You can share your website with your friends other contacts.
- What about customer database affairs?
The website we build can manage your customer database such as data storage to make it easier to monitor your customers and your customer contact details. That way, it will be easier for you to contact them.
- What is SEO?
SEO is an organic (unpaid) marketing tactic that can help in improving the ranking of your website in the search engine that is Google for search related to your business, helping to increase traffic and increase sales success rate. Your website will be exposed to the public naturally and you will no longer need to advertise your business.
- What is Payment Gateway?
Payment gateway is replaced by automatic transfer method where you no longer need to send manual slip and further facilitate business transactions. We support every bank of choice in Malaysia including cards and credit cards.
- What is a Server?
Hosting to store all web files and images and can operate 24 hours a day serving your web visitors.
- What is a Domain Name?
Domain name is the address of your website either Syarikatanda.com or Syarikatanda.my registered in your store name.
- Drip Content Main Settings
When creating or editing a page in WordPress, you have the option to release content at regular intervals by creating a schedule for your content with Membership Pro – Drip Content. This can be found in the right hand side of the screen of any page, by default you will see this message:
You will first have to set for which users this page is active by using the Ultimate Membership Pro – Locker also found on the right hand side. You can choose to display or block the page for: All, Registered, Unregistered and any of your levels. Multiple types can be selected.
After setting up the Locker, you will now have access to Membership Pro – Drip Content. You will be able to turn it on / off for the users set up in the locker.
You will then have the option to pick the Release Time by using the slider to select one of three options:
- Instantly Subscription – after the user receives subscription access;
- After Subscription – determine after how many days / weeks / months to grant access to users;
- On Specific Date – use this date picker to select on which desired date the page will become available;
Below this you will find Expiration Time which can be set by using the slider exactly like release time:
- Never – once available, the content will not expire;
- After certain Period – determine after how many days / weeks / months access to the page will expire;
- On Specific Date – use this date picker to select on which desired date access to the page will expire;
- I want to add HTML content inside Email templates
In order to add HTML content inside Email templates, please go to UMP Dashboard -> Notifications and create a new notification or edit an existing one.
In the WP text editor switch from visual to text as shown in the screenshot below and add your html content here.
Note: Some html elements may be parsed by the WordPress Text Editor. - How to set a Trial for my Level
To create a Trial for a level you will need to go to UMP Dashboard -> Levels. Next we will create a new level, in our example we will have the slug: premium_01 and label: Premium.
Level Access
In this section set the Access Type to Regular Period and set up your own duration.
Billing Options
Next we will take a look at the billing options and what to set.
Payment Type: Payment
Level Price: you choose how much it costs
Billing Recurrences: On Going
Trial Period Price: you can set it to 0 to make the trial free, otherwise set up your custom amount.
Trial Period Type: here you will have two options Certain Period and Couple cycles subscription payments. With certain period you can choose how long this trial will last, you can pick from days, weeks, months, years. With the second option you can choose how many bill cycles have the trial period price after which the following ones use the level price.
Example:
For a Period of 2 weeks with the Level Price of 25$, Trial Period Price of 10$, Trial Period Type set to Couple cycles subscription payments and Trial Couple Cycles set to 1, the following will happen:
Your users will pay 10$ for the first 2 weeks, after which they will be charged with 25$ every two weeks. - I can not see the Login/Register forms
You may not see those forms if you are already Logged. As Admin you will see a warning message but regular users will see nothing.
Admin Info: Login Form is not showing up when you’re logged.Just logout or check the page into a new incognito browser window.
- Why does Stripe transaction show as pending after being approved?
Means the payment have been proceeded via Stripe but there was NO Payment confirmation sent to the system. If your payment was completed on Stripe platform but not confirmed into UMP system, check your settings that have been required and especially be sure that you’ve set the WebHook properly, being the way system and Stripe communicates. . Most probably you didn’t set the WebHook into your Stripe Account like is required. Keep in mind you have set stripe on Test mode to setup Wehhook on this way too.
- Why I’m redirected to Subscription Plan when access the Register Page?
Ultimate Membership Pro system redirects visitors to Subscription Plan when the Register page is accessed because into the Register Form settings have been specified to work with “Subscription Plan”. So, user is redirected first to pick a plan before the the register step, being a required condition to have assigned a level first.
If you do not want a such approach just change the “Choose Subscription Type” option from Register Form settings.
- Is it UMP a Multilingual environment?
UMP system does not provide a bilingual environment but it can be translated into any language.
For a such approach, you may need a proper multilingual script that will be able to manage translations of input/textarea fields. - It can be set two currencies on the same time?
Into UMP system can be set one main Currency to manage the entire process. It can not be handled two currencies on the same time, payment gateways does not accept a such kind of workflow.
- Different time shows for Orders and Levels
If different time shows up for orders or levels it means that the date of the server on which your website is installed on or/and the DataBase server is on a different Time Zone and needs to be changed. We recommend to get in touch with your hosting provider for a such change.
- Coupon Codes not working with Stripe Payment
For recurring subscriptions if the coupon was set to apply the discount just once, it means that it will provide a different price only for the first payment.
Stripe and Braintree only accept either 0% or 100% of the price for the initial payment.
This means that the discount can not be provided for this kind of coupon if it will be paid via Stripe or Braintree.
This is a condition and limitation from Stripe and Braintree, not from the UMP system.
- Can not activate the License
If you’re not able to activate the license based on your <<Purchase Code>> check if cURL is enabled and properly set on your server. Also, be sure that your server is able to connect to other servers, such Envato API, and no denied permissions are provided.
- Login Error: Invalid Email Address or Password entered
If this type of error shows up even if the credentials are correct, or if the login form doesn’t perform the login process, check to see if other scripts affect the login process to WordPress.
Some themes provide by default a login option and if it’s active on the same page as the UMP Login Form, it may affect the login process.
Try to deactivate all other scripts and change to a different WP Theme to see if it works.
- I need some style Customization
For each showcase (Login form, Register Form, Subscription Plan, Account Page) there are some predefined templates that come with the installation of the UMP plugin. If you want to change them you can do so by using the Custom CSS box found in each showcase section.
There you can write your desired CSS code that will change the way each showcase will look like on the front-end side.
Some minimum CSS Knowledge will be required. Some tips and tricks can be found here.
The main steps are:
- Identify the CSS class of the html element that you want to customize. More about that can be found here.
- Go to the showcase page from the UMP dashboard and identify the Custom CSS box.
- Type your custom css code for that specific CSS Class using !important; after each one.
- Save and clear your cache system.
- Custom Special Fields
Custom Special Fields – are used by the system to accomplish certain special features and are provided by default. They can not be deleted or added by the website admin.
- ihc_avatar – provides a special avatar option in the forms where users can upload their avatar image.
- ihc_coupon – is a special input field that provides the option for users to insert a coupon code for discounts. If there are no coupons set in the system, this field will not show up.
- ihc_social_media – provides the perfect way to link users’ WP accounts to their social accounts for an easier login approach. If there is no social login option activated this field will not show up.
- payment_select – provides a way for your users to select which payment gateway to use for their payments. More than one payment gateway needs to be active for this field to show up.
- ihc_invitation_code_field – is a special input field that requires an invitiation code in order to allow the user to register in the system. If the Invitation Code module is disabled or there are no invitation codes, then this field will not show up.
- ihc_dynamic_price – allows your users to choose the price they will pay for all subscription levels and/or specific levels. You can set up the minimum and maximum price. If the Level Dynamic Price module is disabled, this field will not show up. If the module is disabled for a certain level, then users that have selected that level will not see this field. For the time being, ihc_dynamic_price is only available during the Register step.
- What is the Public Individual Page?
In the Ultimate Membership Pro system you have an additional module called: Members List which will provide a way to display members’ profiles on public.
Depending on your settings, you can activate the Public Individual Page option which lets you display an individual page for each profile. It is accessed by clicking on a member’s item from the members list showcase. To do this, you need to set a specific Visitor Inside User Page using the
shortcode.Visitor Inside User Page is not mandatory if the Public Individual Page functionality from Members List is not required.
- Is it possible to Import users or other options in the Plugin?
If you want to import data from one website to another, there is a dedicated module available in UMP.
This can be found by going to Extensions -> Import Users&Levels.
An additional solution may be to use one of the default import solutions provided by WordPress: WordPress Importer.
If you want to import users from a different membership system to UMP, you can do so if those users are WP users. UMP is linked to WP and any user that is added as a WP user will show up in the UMP system.
- Can I set multiple Register forms?
Register Form is a complex and important module from UMP which is strongly linked to other modules such as Payment, Double Email Verification, Notifications, Levels, Conditional Logic Fields, Subscription, WP Roles, etc.
Although only one register form may be used, each field can be set to show up only for specific levels. Based on what level is selected from the subscription plan, the visitor may see a “different” register form, with unique fields.
- Already set Pages like Login,Register, Lost Password doesn’t work
If the main pages that were assigned as Membership Pages are not working as you expected, first check if those were set properly.
You can learn more about setting those pages by reading this article.
Those pages may show up differently or not at all, even if you have set common slugs such as: login/, lost-password/, register/. In this case, WordPress may require an update on permalinks.
To avoid interacting with other scripts, we recommend that you set custom slugs for those pages (my-lost-password, ump-login, register-page, etc).
- Charging tax on any membership
The Ultimate Membership Pro system doesn’t manage taxes and invoices. These are handled by the the payment services that are integrated in the membership system as Payment Gateways.
- RedirectLinks: Can I use External Links for redirect?
Yes you can, and we made sure that it’s very easy. Simply head over to the UMP Dashboard -> Extensions -> Redirect Links module and add your desired redirects.
There you simply add an identification name for your external link and the link itself. Once they are stored, you will find that custom redirect in any drop-down menu where a redirect is requested.
- The registration doesnt work – Please complete all required fields
Be sure that other 3rd party plugins don’t affect the WP Register and Login process.
- New Account email/Welcome email Notification is not sent
There are two different welcome notifications from the register process that are sent to users:
- New Account – when the user is able to login.
- New Account Review Request – when the user is set by default to pending.
Based on your settings, especially in the Register Form section, make sure that you have the proper notification active.
- New users are not set on Pending even if the WP default role is set properly
This may happen because of setting up a specific WP role to be assigned to certain levels. Specific WP Roles set on levels will override the default WP role set in the register form.
- The Stripe Payment is invoked, even if the registration form is not completed
This kind of behaviour may occur only when it comes to required fields and stripe payment gateway.
Stripe – works based on JS calls, providing a popup box where customers need to fill their payment details (Card Number, Expiration Date, etc).Because it is a JS action, it cannot be processed until after the registration form is submitted. Even if the Stripe box shows up before the registration form is completed, the customer will be charged only when the register process will have concluded and the new user stored.
Stripe details are not requested twice, therefore there should be no worry about the charging procedure.
- Avatar is working properly but the standard user image/avatar is not replaced
The Avatar feature is custom built in UMP, and it only works inside the system. It is not meant to replace the standard Profile image or Gravatar which are displayed on other pages.
- Users are not receiving Double Email Verification
There can be several reasons as to why this is happening:
- Check if double email verification is properly set. You may want to check out the following article.
- Verify that your WordPress environment and your server are able to send regular emails.
- Check the spam folder.
- The OptIn Subscription are not stored
New subscriber emails can be sent to an external email platform for follow-up on newsletter campaigns. If your subscribers are not stored in your list, this may be caused by a few things:
- Double-check your Opt-In credentials for the desired email platform destination (Extensions -> Opt-in Settings).
- Check your destination list for restricted conditions, such as required fields (should be off).
- Check your destination list for a double opt-in requirement (should be off).
- Check if the Opt-In Subscription is enabled and properly set in the Register Form settings.
We recommend that you first try to create a fresh new list on the email platform of your choice, but with no additional options attached. - How to set a Multi Payments option?
If you want to provide your customers a multi payment option, you need to go through the following steps:
- Activate multiple payment gateways from the Payment Services tab by completing the payment settings and turning the activation button on.
- Activate the custom field payment_select from the Showcases->Register Form->Custom Fields page by checking where you want this field to appear (“On Register Page” and/or “On Account Page”).
Tip: By editing the special payment_select field you can choose the template showcase and also set additional options: labels, sub-label, etc.You might also want to look over the additional options found in the General Options->Payments page.
- The Upload file button on Register form is not working
If the upload file button on the Register form or the Avatar buttons don’t work, make sure that the jQuery library has not been altered or customized by 3rd party scripts installed in your WordPress environment (such as plugins or WP Themes).
Try checking the upload file button after deactivating the other plugins, or after changing the current WP Theme.
- Inside Locker is showing up but the content is not restricted
If the Inside Locker box is showing up, that means that you’ve already properly set up the Inside Locker Template and the restrict conditions, but the restricted content is not properly set.
If you want to restrict specific content (text, button, images, videos) on a certain page, you need to place that content between the Inside Locker shortcode tabs.
You can set the content inside manually, or when you wanna add an Inside Locker over a specific Content, just select that content inside the Page content with dragging the mouse and after that Add the Inside Content using the red-button: MP Locker. The shortcode will be set automatically on a proper way.
When you want to add an Inside Locker over specific content, just select the content with your mouse and after that use the MP Locker red button. The shortcodes will be placed automatically and in the correct position.
- Change reCaptcha language
The default language for the reCaptcha script is English.
You can change that in the UserAddEdit.class.php file on line 975, utilities.php file on line 904 or you can search for recaptcha/api.js?hl= in both files.
- Error 500 Internal Server Error is showing up
Internal server errors are not specific to WordPress, they can also happen as a result of anything else running on your server as well.
500 Internal Server is an error from server side.An internal server error is very generic, therefore it does not tell the developer anything. It does not specify the cause of the error or where the problem is.
Increase the PHP Memory Limit
Sometimes this error can show up if you are exhausting your PHP memory limit. Ask your hosting provider about your server settings and limitations. There may be a very small limit set there and any script that needs to process bigger jobs will be stopped.
Check Server Permissions
On some servers based on firewall conditions, or other restrictions, certain files (from subfolders, or with specific names) are restricted from being accessed via browser. Ask your hosting provider what error was stored in the server logs behind the generic “500 Server Error”.
- Can I add another Payment Gateway or use an external script?
Ultimate Membership Pro has multiple payment gateways included which automatically manage recurring payments and are able to confirm any completed payment on external payment platforms.
Each payment gateway is linked to multiple modules such as: Register, Subscriptions, Coupons, Transactions, Levels, etc.
Adding a new payment option is a very complex job, therefore not on option for the customer. External scripts can not replace the available payment gateways from UMP.
- I can not activate the Plugin
The plugin is activated based on the purchase code verification, which is done directly on the Envato server.
It is possible that the Envato API is down, if that is the case, try to check again a little bit later.
If it’s still not working, please check on your server/website if the cURL option is enabled in your PHP settings.
Even with cURL enabled, based on security settings your server may refuse to send or receive data from the Envato server.
You can ask your hosting provider about it.cURL is the only professional way that two servers connect to get data from one place to another.
- Native Fields can not be edited. I want to change the Label
The native WordPress fields (Username, Email, First Name, Last Name, Password, Confirm Password, etc.) can’t be edited or deleted. If you want to change the labels for those fields, you can do so by using the translation file.
The Ultimate Membership Pro plugin is translation ready, meaning you can add an additional language file (even English) to your language set on WP.
All the text elements that are not available to be managed from within the UMP Dashboard (native fields labels, buttons, etc), can be handled via the Translation file, the plugin being fully translation ready.
For English – ihc-en_EN.mo & ihc-en_EN.po
To learn more, please head over to this link.
- Some words/texts needs to be changed. How to?
All the texts that can not be changed from the UMP Dashboard (native field labels, buttons, etc) can be modified through the translation file.
You can add an additional language file (even English) to your language set on WP.
For English: ihc-en_EN.mo & ihc-en_EN.po
A full guide on how to add a new language file can be found here.
- How can I translate the Plugin?
The Ultimate Membership Pro plugin is coming by default with English interface but fully translation ready. You may translate the entire Front-end and Back-end section based on your needs.
Part of existent strings and custom messages are directly manageable from UMP Dashboard interface and not via language files. So look into UMP Dashboard first for all available options.You can add an additional language file for your language set on WP.
Make sure that the plugin folder of the translation target is on your local machine before starting the translation.
Copy and rename the file with the relevant WordPress locale. For example, if you want to translate the file to French, rename the file to fr_FR.po. In the case of a plugin, rename it to ihc-fr_FR.po, where ihc is the name of the text domain that the plugin loads.
For French: ihc-fr_FR.mo & ihc-fr_FR.po
1. Using PoEdit standalone app
You can use the free PoEdit app to create and manage language files based on the default files available from the Ultimate Membership Pro plugin.
- Open the po translation file in Poedit, click update to update the translation
source. - Open the catalog properties from Catalog > Properties and select the language,
press ok. - Now you can go through the source text and enter your translations.
- Click validate then save the translations, the po file will be updated and an mo file
will be generated. - Upload the new or updated language files to your WordPress installation folder indeed-membership-pro/languages/.
- Set your WordPress language by using a plugin such as WordPress localize, WPML, or manually update the WP_LANG constant in your WordPress config.php file.
2. Using LocoTranslate plugin
https://wordpress.org/plugins/loco-translate/
You can easily manage translations over Ultimate Membership Pro directly from WordPress Dashboard.
- Install Loco Translate free plugin
- Change default Loco Translate Settings by increasing “Skip PHP files larger than“.
- Open Loco Translate -> Plugins section and search for Ultimate Membership Pro
- Edit ihc.pot Template file and proceed a “Sync” action in order to be sure that all available strings are included. You must “Save” changes before leave current file setup.
- Create or open your language file and use “Sync” button to have all available strings inside.
- Translate all available strings
There are many guides on how to add a new translation file to any WP Plugin or Theme:
https://make.wordpress.org/polyglots/handbook/
http://themekraft.com/add-your-own-language-files-to-wordpress-plugins-with-poedit/
http://wordpress.stackexchange.com/questions/57219/how-to-translate-a-plugin-via-po-mo
If an important update was released and texts were added, you will need to update your language file.
The plugin’s custom name used in the translation file name is: ihc - Open the po translation file in Poedit, click update to update the translation
- A New version was released, how to Update the Plugin?
If you have received an update notification and you want to update the plugin to the latest version, first you need to download the newest uploaded file. You must log in your CodeCanyon account and head over to:
http://codecanyon.net/downloads
The safest way to update the plugin to a new version is via FTP Upload. Download the latest version, unzip the file and copy the folder to your website wp-content/plugins/ overwriting the current plugin folder.
Important features and fixes are released with each update. If your plugin version is very old, make sure to keep a back-up of your current version before updating to the latest plugin version. - Parse error: syntax error, unexpected T_STRING
If you encounter any syntax errors while you are trying to install the plugin, it’s most probably that the PHP version installed on your server is a very old one. The current available PHP version is v.7.x, but for a proper workflow a PHP version starting with 5.3 is required.
Example of error:
Parse error: syntax error, unexpected T_STRING in /home/public_html/xxxx/wp-content/plugins/indeed-membership-pro/utilities.php on lineContact your hosting provider and request a PHP update.
- Set PayPal on Sandbox but I’m not receiving payment confirmation
SandBox from PayPal is a testing environment for managing payments without being charged. For a proper workflow, you will need a Merchant sandbox Account and a Buyer Sandbox Account.
If you haven’t received payment confirmation and the level hasn’t activated yet, don’t worry. Sandbox does not work as fast as the live system, and some delays may occur from time to time.It’s recommended that you run a few tests using the live PayPal environment, but with insignificant prices (ex: $0.01) for a foolproof simulation. If you’re still experiencing issues, please drop us a quick line and we’ll see how we can help.
- User cancelled payment, still has access to content?
If a user has registered but cancelled the process right before setting up payment, the user does not have access to paid content. They are however registered as a subscriber.
In fact, here’s a breakdown of exactly everything that happens behind the scenes:
Signup Phase:
- Upon signup, the user completes his registration and is forwarded to the payment section
- At this stage, the user is assigned their access level
- Activation occurs automatically once payment is confirmed during the Confirmation Phase
Confirmation Phase:
- If you check the Subscription tab, you can verify the payment status of specific levels
- If the user hasn’t completed the payment, you’ll notice that their status is set to [Hold]
- At this stage, the user’s WP-Role is set to [Pending] and manual admin activation is required
- If the payment was not completed, the user’s role is changed to [Subscriber]
- If a user is demoted to [Subscriber] they can only continue payment with assistance from the admin
In short, as stated above, there’s no real need to worry! Unless the user has completed payment, they are unable to access any paid content for their respective signup level.
- Known Compatibility Issues
If you have installed our plugin and it’s not behaving as expected, this can be due to a number of reasons including some known compatibility issues with third party plugins.
To help troubleshoot, we recommend taking the following steps:
- Deactivate Jetpack as it may cause some issues.
- Deactivate any third party login plugin where the captcha functionality may cause conflicts.
- Deactivate any other third party plugins, not specifically advertised as compatible¹.
- A2 Optimized WP doesn’t let you login using the front-end form.
- Zoho Campaign Plugin affects the register form style and VC elements.
If you’re still experiencing any issues after attempting all of the above, please get in touch with us so we can look into it.
Due to the incredibly large offering of WordPress plugins, it’s nearly impossible to guarantee compatibility with all of them. That being said, we haven’t received many reports about compatibility issues.Customers have also reported the following free plugins that have affected the UMP workflow: Bakery Custom Post Types, Contact Form 7 – Stripe Extension, WP Maintenance.
- Notifications do not work, please help!
The plugin comes with a few example notifications, but due to the vast number of different scenarios it was impossible to include them all by default.
We recommend creating notifications catered to your specific needs by using one of the examples as a template.
If your notifications are not sent, first check if your WordPress environment and your server are able to send emails. Notifications module is based on the standard WP function: wp_mail().You should first check if your notifications are active and properly set. For more information, please follow the next topic: How to send Notifications?
In some cases the SMTP mail server refuses to send some emails based on destination or email content. Check if your SMTP mail server has no additional filters or restrictions, such as special links inside or long words.
- Set everything up correctly, but everything is visible to all users?
No need to panic!
If you have set up a paid membership tier or a content locker and want to check out what it looks like, you need to keep in mind that you’re logged in as an admin user, with the highest privileges. This means that you should be able to see everything, at all times, and the plugin is working as intended.
In order to see the plugin functionality in action, you need to do one of two things:
- Log out of your Admin Account and browse to the respective page
- Open an Incognito Window (Chrome) or Private tab (Firefox) and browse to the respective page
Alternatively, you can create a test user, with a lower access level than the one you’re trying to test, and sign in as that user. You will notice the functionality magically works as expected!
This approach is particularly useful if you have a really complex tier-system and want to make sure that everything is set up properly, without a shadow of a doubt.
- Will pages in your website dashboard be cached?
No, your website dashboard pages are not cached. The cache functionality is only meant to cache frontend pages.
- How do I serve cached pages to people using a phone or tablet?
You can generate a separate cache by selecting ”Generate separate files for mobile devices” in the page cache settings. This cache setting is only necessary if you use a specific theme for mobile devices, or for certain AMP plugins.
- What is the maximum number of pages I can cache?
There is no limit to the number of pages you can cache. The only limit is the space on your server and the maximum number of subdirectories allowed by your server, as caching will write files in subdirectories following the permalink structure.
If you were to reach a caching limit, it probably means that your server is not fit for the size of your website and caching needs.
- Can I make certain parts of the page stay dynamic when cache is enabled?
The cached page is sent to the user before most of your website is loaded. The add-on aren’t loaded yet, making it impossible for them to change the cached content at every request.
- Will caching slow down my server?
No, caching will actually reduce the load on your server, by reducing the amount of PHP and mysql used. You might see a peak in resource usage when using the cache preloader, as this functionality will create the cache files for all your pages in a short amount of time. But once this is done, performance should increase and the load on your server will decrease. Every single major site uses caching to serve cached pages faster by using fewer resources.
- How do I prevent Syspro Website Optimize from caching a certain page?
To prevent a page from being cached, you can add the URL to the field “URLs to exclude from cache” in the cache “Advanced settings” tab. If you are developing a plugin and want to prevent a page from being cached, you can define the “DONOTCACHEPAGE” constant on the pages you need. Any request where “DONOTCACHEPAGE” is defined will not be cached.
- How do I cache only the home page?
Add /.+ to the cache option “URLs to exclude from cache” on the advanced settings tab.
- What frequency should I choose for the cache preloading schedule?
Choosing a frequency for the cache preloading schedule will depend on factors such as the frequency at which the website content is updated, the number of pages in the cache, the resources of the server and more.
For example a site with hundreds of pages will require more resources to preload its cache. So choosing a high frequency will mean that the cache will be recreated often, and the resource usage will be higher.
On a website where updates aren’t as frequent, you can even disable the cache preloading schedule, or set a high cache lifespan and set the cache preloading schedule to follow it.
- What is “cache preloading”?
Usually, a page is cached when a user visits it. So the first user visiting won’t be served a cached version of the page, and will wait longer than the next users. The cache preloading functionality will go through all your pages and posts, and simulate a visit by a user, allowing Syspro Website Optimize to cache the pages before anyone visits them. Your first visitor will thus be served a cached version of the page, increasing its performance.
- Will the comments work even when page caching is enabled?
Yes, when using our website’s commenting system, your users will still be able to post comments. Every time a comment is approved, the cache for that page or post will be cleared, allowing the next visitor to see an up to date list of comments.
- Do I need a special setup to use the caching feature?
No, if your website works properly, Syspro Website Optimize will be able to cache your pages and posts.
- How do I know my webpage is being cached (or why it isn’t)?
If cache is enabled, and in order to see if your page is cached, use the “View Source” function in your web browser to view the page source. However, note that if you are using a further service that minifies HTML (e.g. Cloudflare). Also note that if you do not preload the cache, a page or post will have to be visited once for the cache file to be generated.
- Why should I use a caching add-on on my website?
You think your site is fast without caching? A caching add-on will make your website even faster. A faster cached website will increase SEO, it will improve your visitors experience. Caching will also save your server’s resources.
- What is caching, or page caching?
“Caching”, from Wikipedia: “In computing, a cache is a hardware or software component that stores data so that future requests for that data can be served faster; the data stored in a cache might be the result of an earlier computation or a copy of data stored elsewhere. A cache hit occurs when the requested data can be found in a cache, while a cache miss occurs when it cannot.” — Syspro Website Optimize cache does this by saving the page computed by your website on the disk. When a user visits a page, Syspro Website Optimize will serve the cached page before your website is loaded. If the page wasn’t cached before, it will be computed by your website, and Syspro Website Optimize will then save the result to the cache.
- Which optimization will make the biggest difference?
This depends on your setup (theme, number and quality of add-on used, etc…), but generally, caching will make the biggest visible difference to your website’s performance.
- Can you help me restore my database?
Not unless you have an existing backup. Please ensure that you make a backup of your entire database before using Syspro Website Optimize for the first time, and when you upgrade to a major new version of it.
- Is optimizing my database safe?
Yes; optimizing does not involve any “tricks” or poking around in dangerous ways. It involves running routine clean-up operations using well-defined, common MySQL commands. Nevertheless, we always recommend backups, which cover every possibility; not just database malfunctions, but hackers, human errors, etc.
- What savings can I expect to make?
This is a “how long is string?” sort of question. It depends completely on your site – how big it is, how many users interact on it, how long it has been running, and when you last optimised it. However, the savings and speed-ups can be substantial; it is always worth making sure that your database is optimised.
- Isn’t it better to use a dedicated caching add-on to cache my site?
Our caching tests and feedback from real-world users show that the caching feature alone can make your site faster than any other cache add-on or optimization. See these speed test results.
- My favorite carrier is not in the list, can I add it?
The right way to do that is to open a ticket in our support desk and specify in it: carrier name, carrier URL and a valid tracking code (even if expired). Yet, as a temporary solution, you can add the carrier you prefer manually in the class.carriers.php file that you find in the plugin directory and harking back to one of the existing ones for the right way to add it.
N.B. Any change you make in the code scripts will be overwritten, and therefore deleted, in the next update. For this reason, we suggest you send us the data concerning the carrier you’re interested in, so that we can add them in the plugin and include them in the first following update.
- How can I get support if my WooCommerce plugin is not working?
If you have problems with our plugins or something is not working as it should, first follow this preliminary steps:
- Test the plugin with a WordPress default theme, to be sure that the error is not caused by the theme you are currently using.
- Deactivate all plugins you are using and check if the problem is still occurring.
- Ensure that you plugin version, your theme version and your WordPress and WooCommerce version (if required) are updated and that the problem you are experiencing has not already been solved in a later plugin update.
If none of the previous listed actions helps you solve the problem, then, submit a ticket in the forum and describe your problem accurately, specify WordPress and WooCommerce versions you are using and any other information that might help us solve your problem as quickly as possible.
- I always use the same carrier to ship my WooCommerce orders, may I set it as default carrier?
Yes, sure, you can set the carrier name in the settings of YITH WooCommerce Order Tracking and for each new WooCommerce order you will find the field “carrier name” automatically filled with your default carrier.
- Can I customize the message I want to sent to customers?
You can set your own text for your WooCommerce orders using the specific option available in YITH WooCommerce Order Tracking. You can also use some optional placeholders to specify carrier’s name, tracking code and shipping date.
- How can I try the full-featured plugin?
If you want to see a demonstration version of the premium version of YITH WooCommerce Order Tracking, you can see that in this page. Browse it and try all options available so that you can see how your plugin looks like.
- What is the difference between “A product is sold” and “A new order is placed”?
A product is sold is the type of notification showing when a specific product is sold. You can specify one or more products when you create the notification. Whereas, A new order is placed is the notification shown when an order is created.
- Do I need to be logged to the website backend to get the notifications?
Yes, it is essential to be logged in your website backend to receive any notifications. Moreover, every type of notification must be created and configured first since the add-on doesn’t enable any for your shop by default.
- What happens when an old order that was completed but the gets refunded and How does the plugin handle the points that were received from the refunded order?
There are total two ways for handling the refund request.
- Earn Points
Product Assigned Points: When a user makes a refund request for that product which has some of the assigned points then after refunding the amount, the earned points will be deducted from his/her account.
Per RM Spent Point: When a user makes a refund request for an order from which he/she earned points, then after refunding the amount, earned points will be deducted from his/her account.
- Deduct Points:
Product Purchase through Points: When a customer makes any refund request for that product which has been purchased free of cost(by using his/her points) then after refund request, deducted points will be refunded to his/her account.
- What is the difference between “Redeem Points Conversion” and “Per RM Points Conversion” and also what’s the use of “Enter Product Points”?
- About Redeem Points Conversion – In this setting Merchant can set the amount required for converting reward points to generate the coupon. For example, if you have set the value 1, the point will be equivalent to RM1 (for your site) and if any user has 50 points then he or she will get the coupon amount of RM50 after converting it from My Account section.
- About Per $ Points Conversion – Let’s take an example if Merchant has set the RM1 = 1point (for their site) and any customer will purchase any product with RM50 then he or she will be rewarded with 50 points.
- About Enter Product Points – From here Merchant can select some product and can set the Points for a particular product, and if any user will purchase that selected product he or she will be rewarded with those Points.
- I have installed Syspro Ultimate Points And Rewards plugin and all I get on the points page is a 404 error?
After activating Syspro Ultimate Points & Rewards extension, please save the permalinks.
- How to sort the entire database in Smart Manager?
Click on a specific column header in the grid to sort it in the entire database in Smart Manager. For removing the sort, keep clicking on the same column header till the ‘blue arrow’ (beside the column name) is gone, and by default Smart manager will list records sorted by ID in descending order.
- Can I edit serialized data in Smart Manager?
Yes, you can from Smart Manager version 4.1.0+.
- Can I bulk edit or upload featured images with Smart Manager?
Yes, you can bulk edit or upload featured image for multiple products.
- Can I undo Bulk Edit results?
No.
- I cannot see the “Description” column anywhere. How do I update the product description using Smart Manager?
Update Smart Manager to 4.0+ and you will be able to see it.
- Simple / Advanced Search functionality not working
Please make sure you are using the latest version of Smart Manager. Kindly deactivate and then reactivate Smart Manager once and then have a check with the Smart Manager search functionality. If the issue still persists, contact us.
- How to have Price / Sale Price column to show with more than one decimal point after the decimal separator? For example, I want Price to be displayed as 25.57 instead of 25.
There is a setting in WooCommerce which lets you set the number of decimal points to be shown in prices after the decimal separator.
- Go to your WordPress Dashboard > WooCommerce > Settings > General.
- There under Currency Options, you will find the Number of Decimals to be set. You can set it to any value you want and then have re-check with Smart Manager functionality.
- Does Smart Manager support custom columns that may be added using another plugin? If yes, then how to manage any custom field of any custom plugin?
Yes, Smart Manager supports custom columns added using another plugin (Version 4.0+ onwards).
You would need to save at least a single product with that custom plugin fields from WooCommerce edit product page. Then only Smart Manager will detect those custom fields and will display them in the dashboard.
- How can I update one product or products based on a particular category in Smart Manager if I have loads of products?
It is very easy to achieve this using Smart Manager. Use simple search or advanced search functionality to enter product or category name, enclose the name in double quotes for exact match. Then use Bulk Edit to perform all actions you want.
- Why am I not able to view all columns in Smart Manager? Can I customize Smart Manager by adding / removing columns?
To keep things easier to understand, Smart Manager shows the most important fields by default. You can show/hide additional columns. Here’s how. You can only show new fields from here. You cannot add new fields to this list.
- Updating variation parent price / sales price not working
Smart Manager is based on WooCommerce and the same e-commerce plugin sets the price / sales price of the variation parents automatically based on the price/sales price of its variations.
- What does the blue line indicate in the Products dashboard in Smart Manager?
Blue line beside the product name indicates product variations (child) of a variable product (parent).
Also, while updating Regular Price & Sale Price of variable parent product, it is handled by WooCommerce based on the variation child.
- Smart Manager is empty / Can’t see products in the grid
Please make sure you are using the latest version of Smart Manager. If still the issue persists, deactivate all other plugins except WooCommerce and Smart Manager and have a re-check the issue.
If the issue goes away, keep on activating other plugins one-by-one, to find out which plugin was conflicting and let us know about that plugin. If the issue still persists, contact us.
- Is Smart Manager WPML compatible?
Smart Manager is not fully WPML compatible. In other words, Smart Manager will display and let you manage the different translations of the product. However, it will not update all the translations on updation of any one of the translations for a given product.
- How do I upgrade a Lite version to a Pro version?
Follow the steps listed here
- What browsers does Smart Manager work with?
Smart Manager works best in Firefox and Chrome. It is not compatible with IE.
- Can I export data in CSV using Smart Manager?
Yes, you can. Export feature is available in the Pro version.
- Can I import data using Smart Manager?
Unfortunately, you cannot import data using Smart Manager.
- What do the Paid / Pro version give me?
Paid versions allow managing all post types, bulk edit, unlimited inline editing, advanced search, export CSV, duplicate products, print PDF invoices and a lot more.
View all Pro version features - What do I get in the Free / Lite version of Smart Manager?
Smart Manager provides you support for managing four post types in the free version – WooCommerce products and variations, orders, coupons, WordPress posts.
For these post types, you can perform inline editing (upto three records without saving), simple and advanced search using AND filters, and delete upto 50 records at once. View all Lite version features
- What do I get in this Lite version?
Spreadsheet like view of products, orders and posts. Search and navigation, limited inline editing, ability to delete multiple items at once
- Which browser to choose for the best performance?
Syspro E-Commerce Smart Manager works best in Chrome, Firefox. Currently it is not compatible with IE.
- Can I export data in CSV?
Yes, you can but the export feature is available in Pro version.
- How does Automatic Emergency Braking work?
If your car is equipped with Autopilot hardware, Automatic Emergency Braking automatically applies full braking in situations where a collision is considered imminent by the forward looking camera and the radar sensor. It is the driver’s responsibility to drive safely and remain in control of the vehicle at all times. Never depend on Automatic Emergency Braking to avoid or reduce the impact of a collision. To cancel Automatic Emergency Braking while it is engaged, press on either the accelerator or the brake pedal.
- How do I turn off my car?
You can turn off the car either by simply putting the car in Park, exiting the vehicle, and closing the door behind you, or by tapping Controls > E-Brake & Power Off > Power Off.
- How do I use Autopilot?
To learn about driving with Autopilot, view the following instructional videos: Enhance your commute with Autopilot, Autopark, Autosteer, Auto Lane Change, and Summon. For thorough instructions, Tesla encourages all new owners to review the Driver Assistance section in the Owner’s Manual.
Also, check this video:
- Why do my rated miles drop faster than mile for mile?
Rated Range calculates your estimated range with a fixed formula based on existing energy in the battery and average energy consumed per mile. There are a few factors that could cause the rated miles to drop faster than mile for mile, i.e. driving style, wheel size, and ambient temperature.
- My charging connector is stuck in the charge port. What do I do?
Unlock the car before attempting to remove the connector. When your car is plugged in and locked, the connector locks into the charge port and the indicator light around the charge port turns off.
- Where can I get an X Signature Key?
You can get the X Signature Key at your Billplz Account Settings.
- Where can I get a Collection ID?
You can get the Collection ID at your Billplz >> Billing.
- Where can I get API Secret Key?
You can get the API Secret Key at your Billplz Account Settings.
- Where can I get an X Signature Key?
You can get the X Signature Key at your Billplz Account Settings.
- Where can I get a Collection ID?
You can get the Collection ID at your Billplz >> Billing.
- Where can I get API Secret Key?
You can get the API Secret Key at your Billplz Account Settings.
- I already have a website. Can I exchange with another website?
Existing websites can be exchanged with our more complete web package. Your old customer data can be imported into a new website. If you want to improve web graphics, you can contact us. Our team will arrange for you.
- In what language is my website?
You can choose one language either Malay or English. If you want to be bilingual, contact our team. Our team will arrange for you.
- What is a blog?
A blog is a space where you can write any articles and shares related to your product or service. This blog is important for SEO where outsiders can find your blog by typing keywords in your article.
- Will the report be prepared?
Yes we will provide after your website is ready. We also provide a training manual where we teach you how to update the website, download images to the gallery and else.
- What is an SSL Certificate?
- SSL certificate means Secure Sockets Layer for HTTPS abbreviation. Usually SSL will have a lock symbol on the URL. SSL is a standard security technology for setting up encrypted links between servers and clients such as web servers (websites) and browsers. SSL is an industry standard and is used by millions of websites in protecting their online transactions with their customers.
- Another meaning of SSL is the most widely used security protocol on websites today. It is basically a protocol that provides a secure connection (secure connection) between two machines operating through the internet or internal network.
- How do I upgrade the package later?
You can upgrade the package in the future by just contacting our team. We will discuss the budget and more information for the next package.
- What is Google Analytics?
Google Analytics is your visitor statistics so you can see the performance of your website and you can monitor the behavior of your customers. Also, you can plan a structured strategy for your business.
- How are photo albums managed?
Photo album according to the info you gave us and you can load as much as you want. Just leave it to us.
- Can a website increase the credibility of my business?
Yes, that is correct.
- The website provides your business identity and is a virtual proof that it exists.
- Users believe that having a website makes your business more reliable than just social media sites.
- Website is able to convey information quickly to visitors.
- Why do I need a website if I already have a Facebook?
Your business can be known by Google compared to Facebook. Facebook has a lot of competitors and not everyone will see and read your posts on Facebook. Unlike a website, other than you can change the layout, color, font that suits your taste, your business will also look more professional.
- Is this website the same as the landing page?
Website and landing page are not same. Website is more suitable for the whole company profile and landing page is more suitable for promoting ads about a single product. If you want to make a landing page, you can contact our team.
- Can a beautiful website increases sales?
Yes, a beautiful and a complete website can make customers like your service.
- Is it difficult to manage your own website?
Not difficult. You just need to know some info to make your website constantly updated or you can contact our team to manage your website.
- How do I update my own website?
We will provide manual and video training to make it easier for you to refer on how to update the website such as inserting pictures in the album. If you want us to manage your website, contact our team.
- Is the website built responsive on the phone?
Each website we build, will be adapted to 4 types of devices and screen resolutions, namely tablets, desktops, large screens, and small screens. Fonts and graphics will be adjusted according to the suitability of the device so that it is easy to access.
- How can visitors contact me?
We will put your address, as well as your phone number on the Contact Us page. You can share your website with your friends other contacts.
- What about customer database affairs?
The website we build can manage your customer database such as data storage to make it easier to monitor your customers and your customer contact details. That way, it will be easier for you to contact them.
- What is SEO?
SEO is an organic (unpaid) marketing tactic that can help in improving the ranking of your website in the search engine that is Google for search related to your business, helping to increase traffic and increase sales success rate. Your website will be exposed to the public naturally and you will no longer need to advertise your business.
- What is Payment Gateway?
Payment gateway is replaced by automatic transfer method where you no longer need to send manual slip and further facilitate business transactions. We support every bank of choice in Malaysia including cards and credit cards.
- What is a Server?
Hosting to store all web files and images and can operate 24 hours a day serving your web visitors.
- What is a Domain Name?
Domain name is the address of your website either Syarikatanda.com or Syarikatanda.my registered in your store name.
- Will it slow down my website?
Syspro Website Multilingual will have little impact on your site speed.
- What types of content can I translate?
Syspro Website Multilingual add-on works out of the box with website, custom post types, complex themes and site builders, so you’ll be able to translate any type of content.
- How do I start to translate my website?
After installing the add-on, select your secondary language and click “Translate Site” to start translating your entire site exactly as it looks in the front-end.
- Can you translate your E-Commerce store?
Yes, Syspro Website Multilingual works out of the box with E-Commerce. You can use it to build a multilingual E-Commerce store.
- Where are my translations stored?
All the translations are stored locally in your server’s database.
- What happens after my licence expires ?
When your licence expires the plugin will still continue to work as configured. However, you will lose access to updates and premium support. This includes new features, bug fixes, and full compatibility with the latest versions of WordPress and WooCommerce.
- Does TranslatePress work on WordPress Multisite?
Yes, TranslatePress works on multisite as well. You can either network activate the plugin, or do it individually for each sub-site.
It works to add languages on individual sub-sites in a network install (and choose the languages in which you translate each sub-site).It will NOT work to have each sub-site as a secondary language.
Note: The license key of the premium product needs to be added in the Main site -> Settings -> TranslatePress, not in the Network Dashboard.
- How can I translate an email that I customize in my Dashboard ?
This can be achieved using the Conditional Shortcode Based on Language.
You wrap the content for every language using the right shortcode and only the correct part will be emailed to the user.
Ex.
This content will be sent only to English users. - How can I make TranslatePress not process a custom URL ?
When the Force Language in Custom Links option is set to Yes, any custom link that you add to your website will get processed by TranslatePress to add the language to it.
If you want TP to ignore an URL, you can append this hash to it: #TRPLINKPROCESSED
Example: Let’s say the URL we want to be ignored is this one:
https://mysite.com/ignored-url
To make this work we add the hash from above so the link we will insert is:
- How do I change the Default Language ?
You might want to make the language you translated your website into the first one.
To do this, go to Settings -> TranslatePress and set the Use subdirectory for default language option to Yes. Then, using drag and drop, drag the language you want to be the default one to the top.
A better way of handling this is to use the Automatic Detection of User Language add-on. This will redirect the user to the correct language based on his IP or browser settings.
Ex.
- How do I add a dropdown language selector to my menu ?
When you’re adding or modifying a menu and TranslatePress is active, you’ll find the defined languages under the Language Switcher tab. You can use these elements to create the dropdown menu, exactly as you would create any other dropdown menu on your website.
Ex:
- My Google Translation API key doesn’t work
If you’re having trouble with your Google API key, please make sure that you followed correctly our guide for generating it.
Be extra careful at Step 4 since this is the cause of issues most of the time.
- Is the DeepL API free ?
No, the package that contains API access is listed and can be purchased for 4.99€ + usage fees.
More information about the DeepL API package can be found here: https://www.deepl.com/pro.html#developer.
- Is the Google Translation API free ?
No, the Google Translation API is not free, they charge 20$ per million characters that you translate. You can read more about this here.
However, Google is offering a Free Trial option that gives you access to 300$ over 12 months that can be used towards the Google Translation API. This means that you can use it for free, within this limit, because TranslatePress is storing the translations locally. The data is retrieved from Google only once, then it’s being served from your own database.
To access this trial, you can follow this link: https://console.cloud.google.com/freetrial
- How can I show different versions of a video based on the current language ?
This can be achieved using the Conditional Shortcode Based on Language.
You add both versions of the video to the content and wrap them up with the shortcode using the correct languages.
Ex.
- I cannot select some strings from the page to translate
It’s possible that some strings cannot be clicked through our visual interface.
If this is the case, you should try to look for them inside the Strings List that’s available under the current language at the top of the translation interface.
- I don’t see the Licence tab to add my serial key
The licence tab only appears after installing one of the paid add-ons.
So first go to your TranslatePress Account page, download, install and activate one of the add-ons and the tab will show afterwards.
- Do I need to be logged to the website backend to get the notifications?
Yes, it is essential to be logged in your website backend to receive any notifications. Moreover, every type of notification must be created and configured first since the add-on doesn’t enable any for your shop by default.
- What is the difference between “A product is sold” and “A new order is placed”?
A product is sold is the type of notification showing when a specific product is sold. You can specify one or more products when you create the notification. Whereas, A new order is placed is the notification shown when an order is created.
- Do I need to be logged to the website backend to get the notifications?
Yes, it is essential to be logged in your website backend to receive any notifications. Moreover, every type of notification must be created and configured first since the add-on doesn’t enable any for your shop by default.
- What is the difference between “A product is sold” and “A new order is placed”?
A product is sold is the type of notification showing when a specific product is sold. You can specify one or more products when you create the notification. Whereas, A new order is placed is the notification shown when an order is created.