Instantify – PWA & Google AMP & Facebook IA for WordPress
Instantify – PWA & Google AMP & Facebook IA for WordPress
Progressive Web Apps (PWA), Accelerated Mobile Pages (Google AMP), and Facebook Instant Article (FBIA) is an add-on that combines to boost your website.
Progressive Web Apps (PWA), Accelerated Mobile Pages (Google AMP) and Facebook Instant Articles (FBIA) is an add-on that works together to achieve amazing performance and user experience on every possible platform. This add-on makes it easy to make your website mobile friendly and increase load speeds to ensure you get top Google rankings, more traffic, and a big boost in your conversions without any hard work or technical skills needed.
Capabilities
Turn your website into a faster, more secure and lighter mobile friendly site that gets top rankings and more traffic.
Make your website Google compliant, boost SEO and rank higher in search engines.
Monetize your website with Google Adsense & Facebook Ads.
Convert more visitors into buyers.
Get more social engagement.
Progressive Web Apps (PWA)
Progressive Web Apps use modern web capabilities to deliver fast, native-app experiences with no app stores or downloads, and all the goodness of the web. PWAs see an average +68% increase in mobile traffic, +52% increase in conversions, 3X more pages visited and 2.5 seconds to load pages.
Add To Homescreen
Installation Overlays
Offline Usage
Navigation Tab Bar
Web Share Button
Pull Down Navigation
Swipe Navigation
Shake To Refresh
Preloader
Toast Messages
Ajaxify
Background Sync
Persistent Storage
Web Share Target
Vibration
Screen Wake Lock
Push Notifications
Accelerated Mobile Pages (Google AMP)
AMP provides a straightforward way to create web pages that are fast, smooth-loading and prioritize the user-experience above all else. AMPs see an average +35% increase in SEO and traffic, +20% increase in conversions, +80% faster page load time and 2X more time spent on pages.
Use Active Theme Styles
Auto AMP generation
Preload PWA From AMP
All Content Support
SEO Improvement
Monetize Advertisements
Analytics Integration
Facebook Instant Article (FBIA)
Instant Articles is a tool designed for media publishers to distribute instant, interactive articles to their readers within the Facebook mobile app. FBIAs see an average +70% less likely to abandon, +20% more discovery in FB News Feed, +30% more shares on Facebook, 10X faster page load times.
Syspro Website Multilingual add-on works out of the box with website, custom post types, complex themes and site builders, so you’ll be able to translate any type of content.
After installing the add-on, select your secondary language and click “Translate Site” to start translating your entire site exactly as it looks in the front-end.
When your licence expires the plugin will still continue to work as configured. However, you will lose access to updates and premium support. This includes new features, bug fixes, and full compatibility with the latest versions of WordPress and WooCommerce.
When the Force Language in Custom Links option is set to Yes, any custom link that you add to your website will get processed by TranslatePress to add the language to it.
If you want TP to ignore an URL, you can append this hash to it: #TRPLINKPROCESSED
Example: Let’s say the URL we want to be ignored is this one:
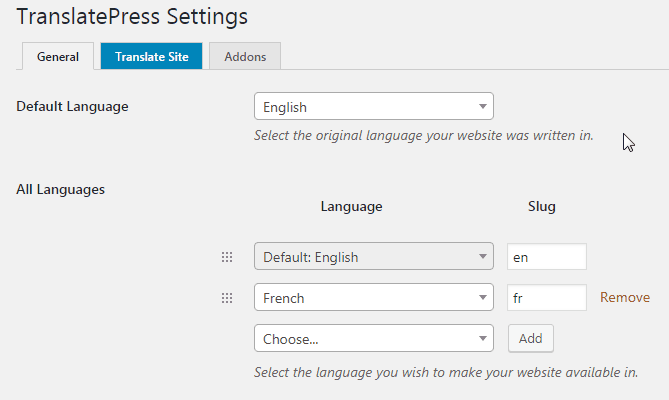
You might want to make the language you translated your website into the first one.
To do this, go to Settings -> TranslatePress and set the Use subdirectory for default language option to Yes. Then, using drag and drop, drag the language you want to be the default one to the top.
A better way of handling this is to use the Automatic Detection of User Language add-on. This will redirect the user to the correct language based on his IP or browser settings.
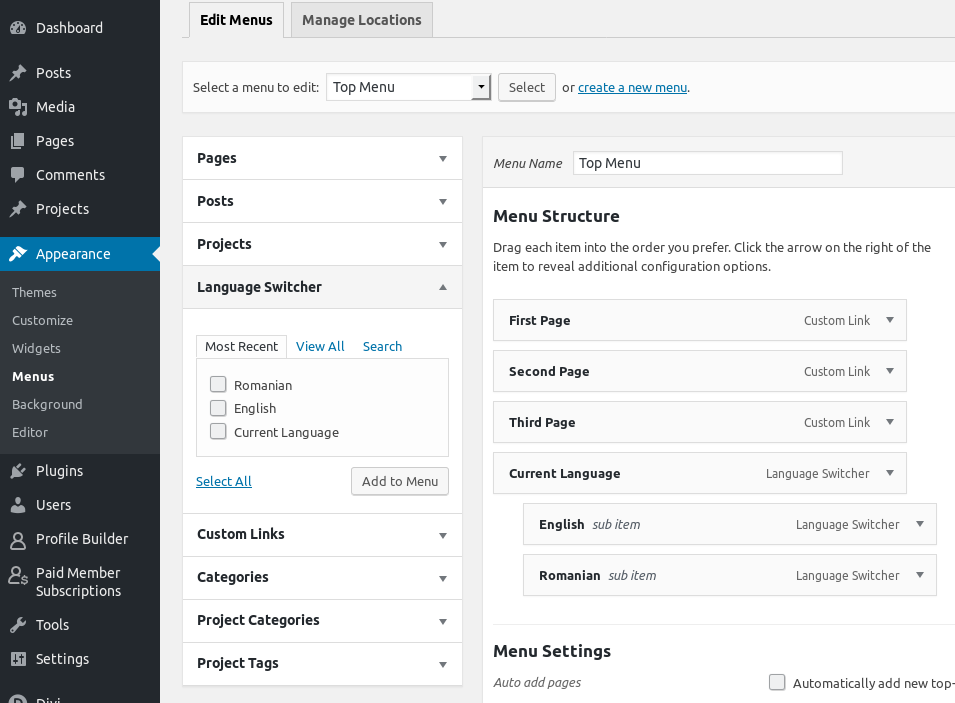
When you’re adding or modifying a menu and TranslatePress is active, you’ll find the defined languages under the Language Switcher tab. You can use these elements to create the dropdown menu, exactly as you would create any other dropdown menu on your website.
No, the Google Translation API is not free, they charge 20$ per million characters that you translate. You can read more about this here.
However, Google is offering a Free Trial option that gives you access to 300$ over 12 months that can be used towards the Google Translation API. This means that you can use it for free, within this limit, because TranslatePress is storing the translations locally. The data is retrieved from Google only once, then it’s being served from your own database.
It’s possible that some strings cannot be clicked through our visual interface.
If this is the case, you should try to look for them inside the Strings List that’s available under the current language at the top of the translation interface.
The licence tab only appears after installing one of the paid add-ons. So first go to your TranslatePress Account page, download, install and activate one of the add-ons and the tab will show afterwards.
Go to Social analytics->Social Applications Usage Summary, click on Search and then click on View under Additional Information.
You will find user details fetched by our Plugin for each login attempt there.
Note: Make sure you have enabled the extended attribute check from the plugin. Also, your app needs to have permissions from user to collect extended attributes.
We ask our customers to register with miniOrange because we take care of creating applications for you so that you don’t have to worry about creating applications in each social network.
Also, registration helps us to be in contact with our customers. In case you need any help, we can help you with step by step instructions.
By registering for our plugin, you can also upgrade to our Premium plans with ease. Our premium plans come with a lot more features tailored for providing your users with a seamless login experience.
Please Note: You can go through our Privacy Policy for how we use your information. We don’t sell your information to any third-party organization.
Please check if you have an Adblock extension installed on your browser where you are checking the plugin. If you do, the Adblock extension will have a setting to block social buttons. Uncheck this option.
If you don’t have Adblock installed and still face this issue, please contact us using the support form on the right or mail us at info@xecurify.com
Email share is the plugin is enabled through mailto. mailto is generally configured through desktop or browser if it is not working, mailto is not setup or improperly configured.
To set it up properly, search for “mailto settings” followed by your operating system’s name where you have your browser installed.
Instagram has made a conscious effort to not allow sharing from external sources to fight spam and low quantity photos at this point in time, uploading via Instagram’s API from external sources is not possible.
This issue arises if your website is not publicly hosted. facebook, for example, looks for URI to generate its preview for sharing. That does not work on the localhost or any privately hosted URI.
You can put social sharing icons before the content, after the content or both before and after the content. Go to the sharing tab, check the blog post checkbox and select one of three(before, after, both)options available. save settings.
There are two cases to according to the page you see –
1. Login to the miniorange screen: you should click on forgot password link. you will get your new password on your email address which you have registered with miniorange. now you can login with the new password.
2. Register with miniorange screen: Enter your email ID and any random password in the password and confirm password input box. This will redirect you to login with miniorange screen. Now follow the first step.
Use the Resend OTP option to get an additional OTP. please make sure you did not enter the first OTP you received if you selected Resend OTP option to get an additional OTP. Enter the latest OTP since the previous ones expire once you click on Resend OTP.
If OTP sent on your email address are not working, please verify your account using your mobile number. you will get an OTP on your mobile number which you need to enter on the page. If none of the works. please contact using the support form on the right.
The OTP send as an email to your email address with which you have registered with miniorange. If you can’t see the email from miniorange in your emails, please make sure to check your SPAM folder.
If you don’t see an email even in the SPAM folder, please verify your account using your mobile number. you will get an OTP on your mobile number which you need to enter on the page. If none of the works. please contact using the support form on the right.
You will have to register in miniorange again with your new email id. please deactivate and activate the plugin by going to Plugins -> Installed Plugins and then go to the social login plugin to register again. This will enable you to access miniorange dashboard with a new email address.
For any further queries, please submit a query on the right-hand side in our support section.
This means you must have unchecked the check-box of auto-register in the Social Login tab. Please check it. This will allow new users to be able to register to your site.
You can set up the custom app for Facebook in the social login plugin so that the issue is altogether avoided. We have contacted Facebook regarding the blocked URL issue. We are awaiting their response.
Steps to set up custom app:
1. Go to the Custom app tab in the WordPress social login plugin.
2. Click on the Add Application button.
3. Select the facebook app in the dropdown list and follow the instructions to set up the app.
4. Click on Products from the left pane of the page and select Facebook Login and click on Set Up button.
5. Click on Web. Enter your site URL into Site URL option then click on Save.
6. Goto Settings -> Basic from the left pane of the page, Enter App Domain (eg. example.com), your privacy policy URL in Privacy Policy URL and select Category of your website. Then click on Save Changes.
7. From the left pane, select Facebook Login -> Settings.
8.Under Client OAuth Settings, enter {YouWebsiteURL}/openidcallback/{appname} (eg: login.xecurify/openidcallback/facebook ) in Valid OAuth redirect URIs and click Save Changes button.
9. Change your app status from In Development to Live by clicking on OFF (sliding button) beside Status option of the top right corner. Then, click on the Confirm button.
10. Go to Settings –> Basic. Copy the App ID and App Secret and Paste into the Facebook custom app tab in the plugin.
Go to the PHP file which invokes your page/post and insert the following html snippet. Also, increase the margin-left value as per your requirement. Save the file.
Go to the HTML file which invokes your page/post and insert the following html snippet. Also, increase the margin-left value as per your requirement. Save the file.
Your website must be starting with http://. Now generally that’s not an issue but our service uses https://( s stands for secure). You get a warning from the browser that the information is being passed insecurely. This happens after you log in to social media application and are coming back to your website. The warning is triggered from the browser since the data passes from https:// to http://, i.e. from a secure site to non-secure site.
We make sure that the information(email, name, username) getting passed from social media application to your website is encrypted with a key which is unique to you. So, even if the there is a warning of sending information without security, that information is encrypted.
To remove this warning, you can add an SSL certificate to your website to change it to https OR use your own custom app
Check the option of Extended Attributes in the Social Login tab. Then in the miniOrange dashboard, go to Social analytics-> Social Applications Usage Summary, click on Search and then click on View under Additional Information to see extended attributes of users who login using your app. You can also download it as a csv there.
Note: Your app needs to have permission from users to collect extended attributes.
Your theme and Social Login plugin may conflict during logout. To resolve it you need to uncheck Enable Logout Redirection checkbox under Display Option of Social Login tab.
Your login/registration form may not be wordpress’s default login/registration form. In this case you can add social login icons to custom login/registration form using ‘social login shortcode’ [miniorange_social_login]. Refer to ‘Shortcode’ tab to add customizations to Shortcode.
You can add social login icons to any page or custom login page using ‘social login shortcode’ [miniorange_social_login]. Refer to ‘Shortcode‘ tab to add customizations to Shortcode.
You can add social login icons to frontend login page using our shortcode [miniorange_social_login]. Refer to ‘Shortcode’ tab to add customizations to Shortcode.
Go to Social analytics->Social Applications Usage Summary, click on Search and then click on View under Additional Information.
You will find user details fetched by our Plugin for each login attempt there.
Note: Make sure you have enabled the extended attribute check from the plugin. Also, your app needs to have permissions from user to collect extended attributes.
The image is selected by Facebook and it is a part of Facebook sharing feature. We provide Facebook with webpage URL. It generates the entire preview of webpage using that URL.
To set an image for the page, set it as a meta tag in of your webpage.
You can generate a separate cache by selecting ”Generate separate files for mobile devices” in the page cache settings. This cache setting is only necessary if you use a specific theme for mobile devices, or for certain AMP plugins.
There is no limit to the number of pages you can cache. The only limit is the space on your server and the maximum number of subdirectories allowed by your server, as caching will write files in subdirectories following the permalink structure.
If you were to reach a caching limit, it probably means that your server is not fit for the size of your website and caching needs.
The cached page is sent to the user before most of your website is loaded. The add-on aren’t loaded yet, making it impossible for them to change the cached content at every request.
No, caching will actually reduce the load on your server, by reducing the amount of PHP and mysql used. You might see a peak in resource usage when using the cache preloader, as this functionality will create the cache files for all your pages in a short amount of time. But once this is done, performance should increase and the load on your server will decrease. Every single major site uses caching to serve cached pages faster by using fewer resources.
To prevent a page from being cached, you can add the URL to the field “URLs to exclude from cache” in the cache “Advanced settings” tab. If you are developing a plugin and want to prevent a page from being cached, you can define the “DONOTCACHEPAGE” constant on the pages you need. Any request where “DONOTCACHEPAGE” is defined will not be cached.
Choosing a frequency for the cache preloading schedule will depend on factors such as the frequency at which the website content is updated, the number of pages in the cache, the resources of the server and more.
For example a site with hundreds of pages will require more resources to preload its cache. So choosing a high frequency will mean that the cache will be recreated often, and the resource usage will be higher.
On a website where updates aren’t as frequent, you can even disable the cache preloading schedule, or set a high cache lifespan and set the cache preloading schedule to follow it.
Usually, a page is cached when a user visits it. So the first user visiting won’t be served a cached version of the page, and will wait longer than the next users. The cache preloading functionality will go through all your pages and posts, and simulate a visit by a user, allowing Syspro Website Optimize to cache the pages before anyone visits them. Your first visitor will thus be served a cached version of the page, increasing its performance.
Yes, when using our website’s commenting system, your users will still be able to post comments. Every time a comment is approved, the cache for that page or post will be cleared, allowing the next visitor to see an up to date list of comments.
If cache is enabled, and in order to see if your page is cached, use the “View Source” function in your web browser to view the page source. However, note that if you are using a further service that minifies HTML (e.g. Cloudflare). Also note that if you do not preload the cache, a page or post will have to be visited once for the cache file to be generated.
You think your site is fast without caching? A caching add-on will make your website even faster. A faster cached website will increase SEO, it will improve your visitors experience. Caching will also save your server’s resources.
“Caching”, from Wikipedia: “In computing, a cache is a hardware or software component that stores data so that future requests for that data can be served faster; the data stored in a cache might be the result of an earlier computation or a copy of data stored elsewhere. A cache hit occurs when the requested data can be found in a cache, while a cache miss occurs when it cannot.” — Syspro Website Optimize cache does this by saving the page computed by your website on the disk. When a user visits a page, Syspro Website Optimize will serve the cached page before your website is loaded. If the page wasn’t cached before, it will be computed by your website, and Syspro Website Optimize will then save the result to the cache.
This depends on your setup (theme, number and quality of add-on used, etc…), but generally, caching will make the biggest visible difference to your website’s performance.
Not unless you have an existing backup. Please ensure that you make a backup of your entire database before using Syspro Website Optimize for the first time, and when you upgrade to a major new version of it.
Yes; optimizing does not involve any “tricks” or poking around in dangerous ways. It involves running routine clean-up operations using well-defined, common MySQL commands. Nevertheless, we always recommend backups, which cover every possibility; not just database malfunctions, but hackers, human errors, etc.
This is a “how long is string?” sort of question. It depends completely on your site – how big it is, how many users interact on it, how long it has been running, and when you last optimised it. However, the savings and speed-ups can be substantial; it is always worth making sure that your database is optimised.
Our caching tests and feedback from real-world users show that the caching feature alone can make your site faster than any other cache add-on or optimization. See these speed test results.
Yes, it is essential to be logged in your website backend to receive any notifications. Moreover, every type of notification must be created and configured first since the add-on doesn’t enable any for your shop by default.
A product is sold is the type of notification showing when a specific product is sold. You can specify one or more products when you create the notification. Whereas, A new order is placed is the notification shown when an order is created.
